Signa Software Option Installation From eLicese
Prerequisites
Overview
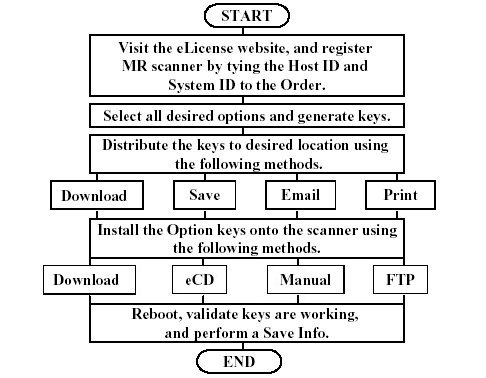
This procedure describes how to generate and install software options using eLicense. eLicense allows the field to generate license keys for MR scanners, and removes the need to send out physical media for all options on the order. The first step in creating these option keys is to visit the eLicense website, and register the scanner. In order to access the eLicense website, the user must have a computer with connectivity, as well as a single sign-on account. The eLicense website can be accessed outside of the GE intranet, at http://elicense.gehealthcare.com/elicense/. The MR system must be tied to the global order number (GON), through the host id and system id of the scanner. Once this site information has been entered, the keys can be generated, and distributed by email, downloading, saving to an eCD, or printing. This file can then be installed on the system, through inSite download eCD, or manual entry. Illustration 1-1 shows the eLicense process flow. For additional information on how to generate and obtain these keys from the eLicense server, please refer to the “eLicense User Guide” under the HELP tab of the eLicense website.
Figure 1. PROCESS FLOW OF OPTION KEY GENERATION
1 Create Licenses
This feature is used to create option keys for a new or existing system based on an order. To create new licenses, the user must have the order number(s) that contain the options ordered, as well as the host id and system id of the system. The host id is the MAC address of the network card.
1.1 Obtaining the System’s Host ID
Procedure
- Select the[Service Tools Desktop].
- Select [Guided Install] from the Service Desktop Manager and press [Start…] to open Guided Install.
- A command window will open with “Type Root Password” displayed. Type the system’s root password and then press the [Enter] key. “operator” is the Signa default root password. If, for your site, the customer has changed the root password, you will have to obtain the correct root password from the customer.
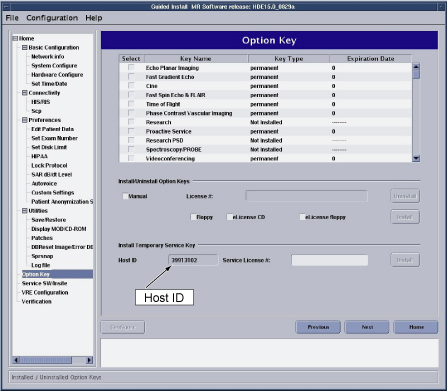
- Once the Guided Install window opens, select the Option Keys
tab. The host ID will be listed towards the bottom under the Install
Temporary Service Key section. See Figure 2.
Figure 2. GUIDED INSTALL WINDOW WITH HOST ID
- Another method of obtaining the host ID is to type “sysinfo” at a command prompt. The host ID
will be returned.note:
“hostid” is NOT the valid command to get your Host ID. This will cause an error when trying to generate keys, due to the incorrect host id. You MUST use the methods listed above to get a valid id.
1.2 Adding a System to an Order
Procedure
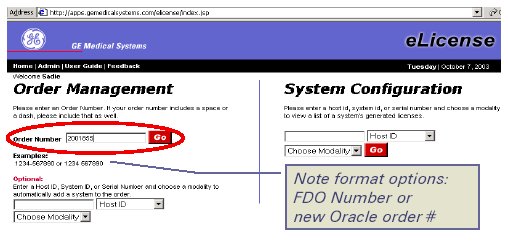
- Go to the eLicense website http://elicense.gehealthcare.com/ and log on using your single sign-on username and password.
- From the eLicense home page, enter the order number into the Order Number box and select [Go]. See Figure 3. This will pull up the order associated with
the number entered from the eOM system. The order number may be a
new global order number, or an FDO number, depending on when the order
was placed. This number will be listed on the packing slip included
with the order.
Figure 3. ELICENSE HOME PAGE
- It is possible that the order number is not unique to your customer.
If this is the case, a screen will pop up listing all matching sites. Figure 4 shows this Site Selection screen. Select the radial button next
to the desired system and select [Go]. This
will pull up the order and take you to Figure 5. If the order number is unique, eLicense will automatically bring
up the order and take you to the Order Information Screen.
Figure 4. ELICENSE HOME PAGE
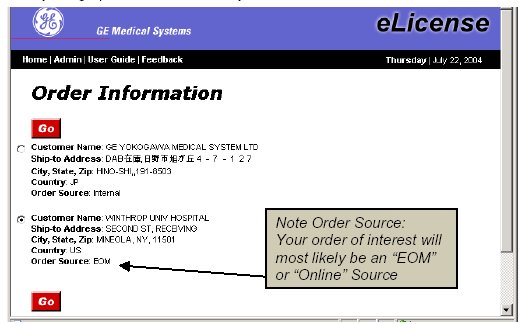
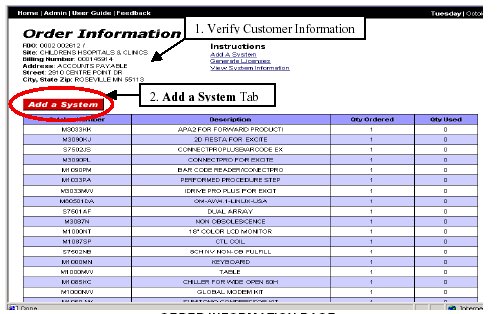
- Verify that the Customer Information at the top left of the screen is the correct customer you are visiting.
- Select the [Add a System] button to tie
the order to a specific system. See Figure 5.
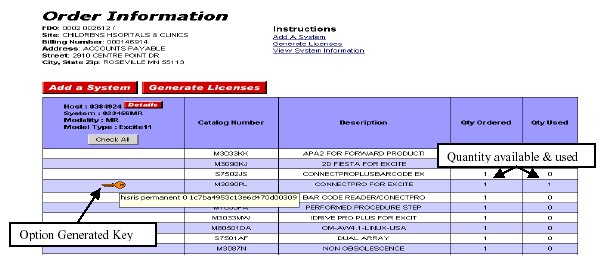
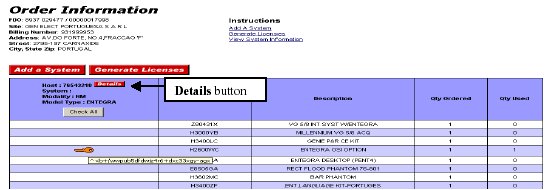
Figure 5. ORDER INFORMATION PAGE
- Enter the Host ID obtained in Obtaining the System’s Host ID, select Host ID, and select the MR modality. Then select [Go]. See Figure 6.
Figure 6. ENTER SYSTEM INFORMATION POPUP

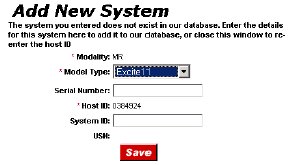
- Another popup will appear requesting additional information
for this system. Select the Model Typeof the
system, and enter in the System ID. MR is currently
leaving the Serial Number field blank. See Figure 7.
Figure 7. ADD NEW SYSTEM POPUP
- The Order Information screen will reappear, with a new column
for the added system. All items on the order that correspond to an
option key for the selected Model Type will have a radial checkbox
next to it. See Figure 8.
Figure 8. GENERATING LICENSES FROM ORDER INFORMATION SCREEN
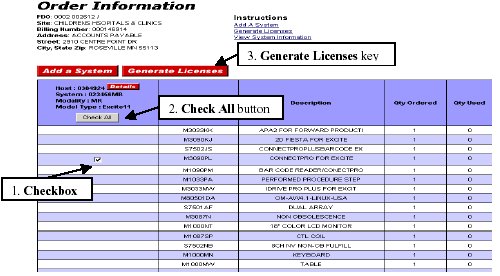
- Select all options that must be generated for the system, or select [Check All] if there is only one system on the order, and all options will be placed on it.
- Select the [Generate Licenses] Button.
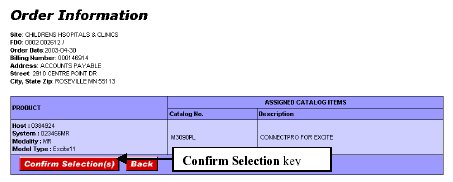
- Read through the selected options, customer information, and
system information. If all is correct, select [Confirm
Selection]. See Figure 9.
Figure 9. CONFIRM KEY GENERATION SCREEN
- The license information will be displayed on the Order Information screen. All options that have been
generated will have a key displayed next to it in the system column.
By placing the mouse over the key symbol, the option string can be
seen. SeeFigure 10.
Figure 10. CONFIRM KEY GENERATION SCREEN
1.3 View existing licenses for a system
It is possible to retrieve a list of licenses that have been previously generated for a system, by searching for that system from the eLicense home page.
Procedure
- Go to the eLicense website http://elicense.gehealthcare.com/elicense/ and log on using your single sign-on username and password.
- From the eLicense home page, enter the System ID or Host ID
and modality, in the System Configuration portion
of the web page, and select [Go]. This will
bring up the System Information page, which
lists all the options that have been generated for that system. Other
information shown is Generate Date, Order ID, License information,
and the SSO of the user who generated the option keys. See Figure 11.
Figure 11. SYSTEM INFORMATION SCREEN
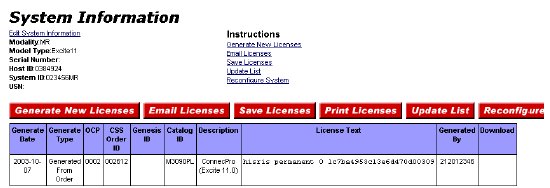
2 Distributing Licenses
Procedure
- There are currently four methods of distributing license keys
once they have been generated at the eLicense server; email, save,
print, or download via inSite. The distribution methods are accessible
on the System Information page of eLicense.
This page can either be accessed by following View existing licenses for a system of this document, or, by selecting the [Detail] button from the Order Information screen.
See Figure 12.
Figure 12. SYSTEM INFORMATION SCREEN
2.1 Email Licenses
Procedure
- From the System Information screen, select [Email Licenses].
- The Email License Keys popup will appear,
as shown in Figure 13.
Figure 13. EMAIL LICENSE KEYS POPUP
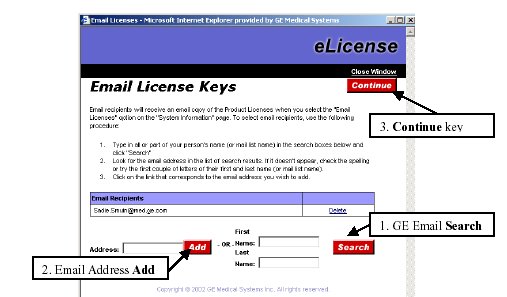
- Additional recipients can be added to this email.
- If the recipient is a GE employee, enter their first and last name, and then select the [Search Key]. Select the name you want from the list generated.
- If the email address is an external address, type it in the Address field, and select [Add].
- Select the [Delete] link to remove any unwanted address.
- When all recipients are listed, select [Continue].
- A verification window will be displayed. Hit [Close Window] in the upper right corner to close the window.
2.2 Save Licenses
The license file can be saved to the hard disk drive for installation via Guided Install on the scanner and can later be transferred to a CDROM, printed, or FTPed to the scanner.
Procedure
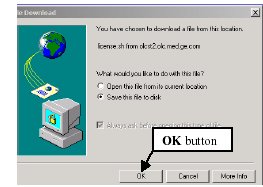
- From the System Information screen, select [Save Licenses].
- The File Download menu will appear. Select [Save
this file to disk] and select [ok]. See Figure 14.
Figure 14. FILE DOWNLOAD SCREEN
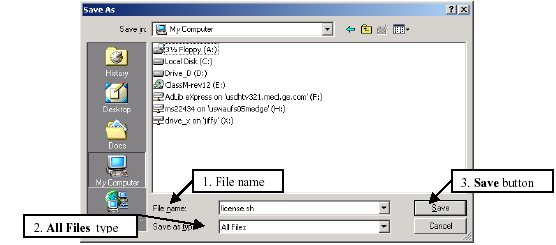
- The Save As screen will appear, allowing
you to select the destination of the license file. See Figure 15.
- If saving to the hard drive, select the proper folder to save the file to.
- Do not change the file name to anything other than license.sh. The software will look for this exact name.
- For the Save as Type field, select the pull down arrow, and select All Files.
- Select the [Save] button when finished.
Figure 15. SAVE AS MENU
- The Download Complete popup will appear after the file has been saved. Select [Close] too get message to disappear.
2.3 Print Licenses
The license key file can also be printed out if desired. This print out can be used to copy the option keys from when manually entering them into Guided Install. The copy can also be saved for future reference.
Procedure
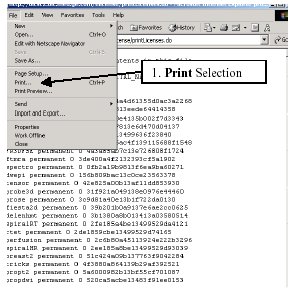
- From the System Information screen, select [Print Licenses].
- A screen listing all the generated licenses will appear. Select File -> Print to print the screen. See Figure 16.
Figure 16. PRINTABLE SCREEN
2.4 Download Licenses
The ideal method of installing option keys is to download them directly to a site that has connectivity, and has completed an inSite checkout. The download procedure is completed from the eLicense website, not necessarily from the scanner itself.
Procedure
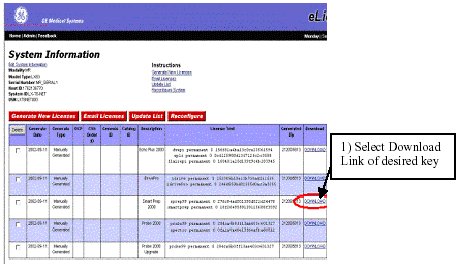
- After generating the option keys for the system, go to the System Information screen of the eLicense website by selecting [Details] next to the host id.
- Click [DOWNLOAD] link in the right hand
column of the option you would like to activate. See Figure 17. If there is no link, no modem or broadband connectivity has been
previously established. Please try one of the other installation options.
Figure 17. ELICENSE SYSTEM INFORMATION SCREEN
- Wait for the request to be processed. A status page will provide information on the downloading process.
- Repeat steps 2-3 for all options that must be activated on the scanner.
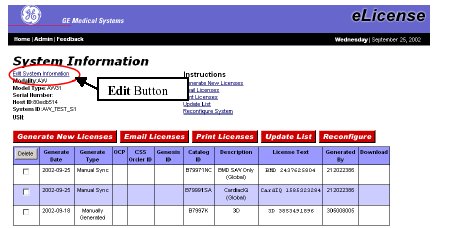
3 Modifying System Information
A situation may arise where system information must be changed within eLicense. This could be due to a hardware failure and replacement of the network card, system upgrade, or human error. System information can be modified on the System Information page of eLicense. This page can either be accessed by following View existing licenses for a system of this document, or, by selecting the [Detail] button from the Order Information screen.
Procedure
- From the System Information screen, select [Edit System Information], located in the left corner
above the order information. See Figure 18.
Figure 18. EDIT SYSTEM INFORMATION BUTTON
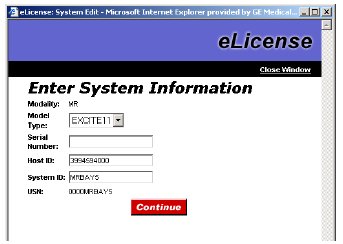
- A new popup window will appear to allow the modification of
any system information required. SeeFigure 19.note:
All changes to system information and host ID are tracked based on your single sign-on ID. Any suspicious usage of this feature will be rigorously checked to verify the modification was due to a valid problem.
Figure 19. EDIT SYSTEM INFORMATION SCREEN
4 OPTION INSTALLATION
There are four methods available to install eLicense option keys onto the system. The details of each method are given in the following sections.
Procedure
- notice
 |
4.1 eLicense CD-ROM
All of the eLicense option keys can also be saved onto one CD-ROM. This CD-ROM must be created after the file is saved to the hard drive of a computer. Once the CD has been created, the options can be loaded onto the system.
Procedure
- Click on the Start -> Programs button from the Windows menu.
- From the list of programs, select the Roxio Easy CD Creator -> Applications -> Easy CD Creator option to open up the program.
- Find and highlight the file license.sh, which was downloaded from eLicense web page.
- Click on the [Add] button, to transfer the file to the bottom right window.
- Install a blank CD into the CDROM drive of the computer and
select the [record] button. See Figure 20.
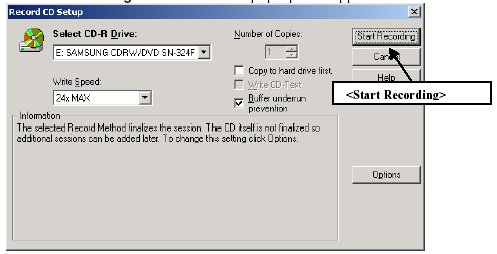
Figure 20. EASY CD CREATOR GUI

- Click on the [Start Recording] button
from the pop-up that appears. See Figure 21.
Figure 21. RECORD SETUP POP-UP
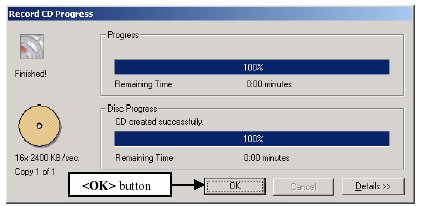
- When the recording is complete, click on the [OK] button as shown in Figure 22.
Figure 22. RECORD PROGRESS POP-UP
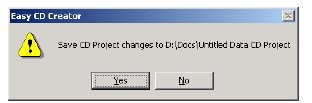
- Click [No] to answer the question on
the pop-up shown in Figure 23, and then eject the CD.
Figure 23. PROJECT CHANGES POP-UP
- Insert the CD-ROM into the host computer CD drive.
- Select the [Service Tools Desktop].
- Select [Guided Install] from the Service Desktop Manager and press [Start…] to open Guided Install.
- A command window will open with “Type Root Password” displayed. Type the system’s root password and then press the [Enter] key. “operator” is the Signa default root password. If, for your site, the customer has changed the root password, you will have to obtain the correct root password from the customer.
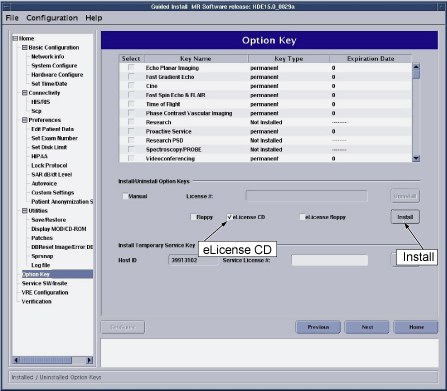
- Once the Guided Install window opens, select the Option Keys tab. See Figure 25.
- Select the eLicense CD check box on the
Install Option Key portion of the window, and then select [Install].
Figure 24. GUIDED INSTALL WINDOW
 note:
note:Because of the Optima software dependency, some of Optima specific Option Keys won’t be installed and the following popup will appear.
Figure 25. Popup because of Optima software dependency
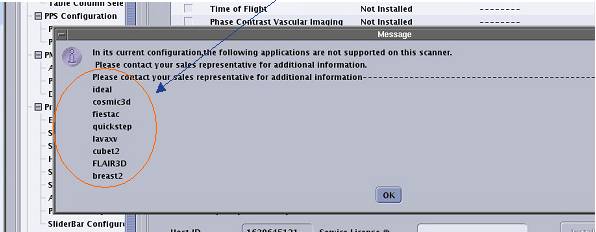
In case you encountered this screen, please repeat Step 14. It will be resolved by entering the option key twice.
- When the keys are finished loading, a popup will appear listing all the options that were installed.
- Verify the option list in the Guided Install GUI is updated with the options just loaded.
- Select File -> Quit from the main menu bar to exit the Guided Install tool.
- Reboot the computer, and verify all options are still available.
- Complete a Save Info to retain all newly installed options on an Info DVD.
Once the option key file has been downloaded from the eLicense site to the hard drive of a computer, it can be burned onto a CD.
After creating this CD-ROM, follow these instructions to load the keys onto the system.
4.2 Option Key Auto Download
If the auto download procedure is performed as described in Download Licenses, the keys will be sitting on the scanner waiting for a reboot.
Procedure
- Reboot the MR scanner after all option keys have been downloaded from the eLicense server.
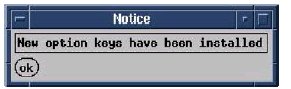
- Verify that a popup message appears saying “New
option keys have been installed” after the “Please do not interact with the system until this message
disappears…” window disappears. See Figure 26 for an example of this popup.
Figure 26. BOOT UP POPUP MESSAGE AFTER INSTALLING NEW OPTIONS
- Open Guided Install, and verify the downloaded option keys have been installed as permanent keys on the Option Keys tab.
- Complete a Save Info to retain all newly installed options on an Info MOD.
4.3 FTP Option keys to scanner
If an inSite checkout has not been completed on the scanner, but the system is connected to the hospital network, the option keys can be FTP’ed to the scanner. The option key file must be saved to the computer hard drive before continuing.
Procedure
- Obtain the scanner IP address and connect to the system.
- FTP the option key file from the desktop to the scanner.
- Move the file to the temp directory by typing “mv license.sh /usr/tmp”.
- Modify license.sh
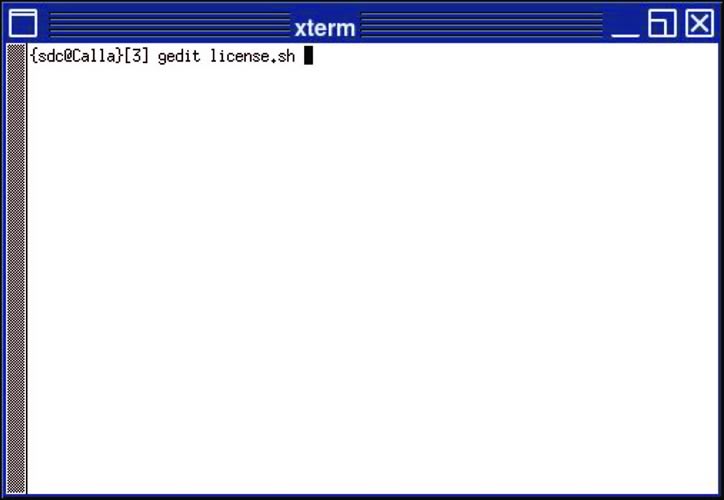
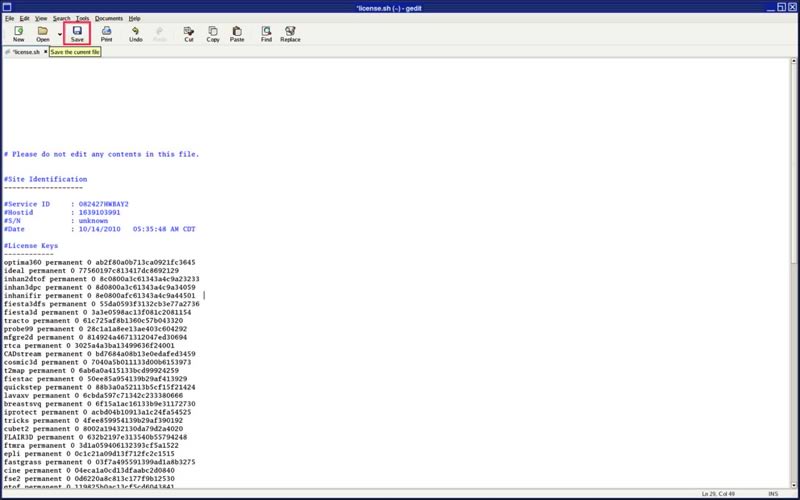
- Open command window and type “gedit license.sh” and press [Enter] key, see Figure 27.
Figure 27. Command Window
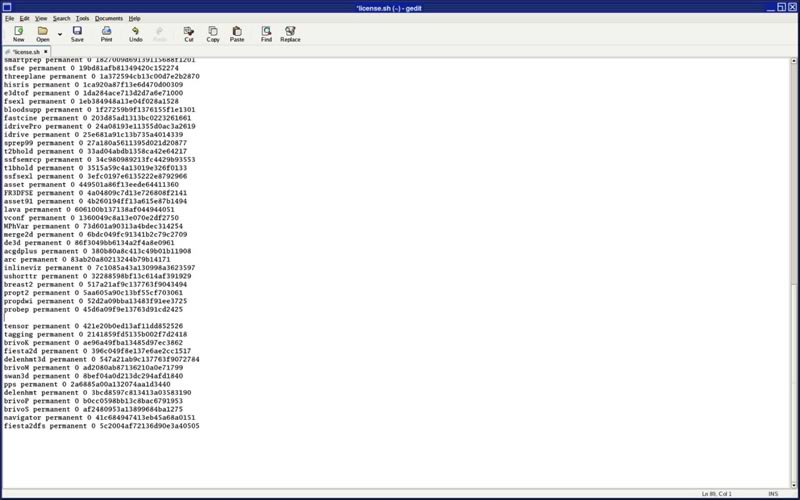
- Find out optima360 permanent key in this file, select the line,
and click [Cut] button. The blank line will
be remained. Please press [Backspace] key to
remove this blank line.
Figure 28. Find out and cut optima360 key

Figure 29. After cut optima360 key
- Move the cursor to the top line of option key and click [Paste] button.
Figure 30. Paste optima360 key
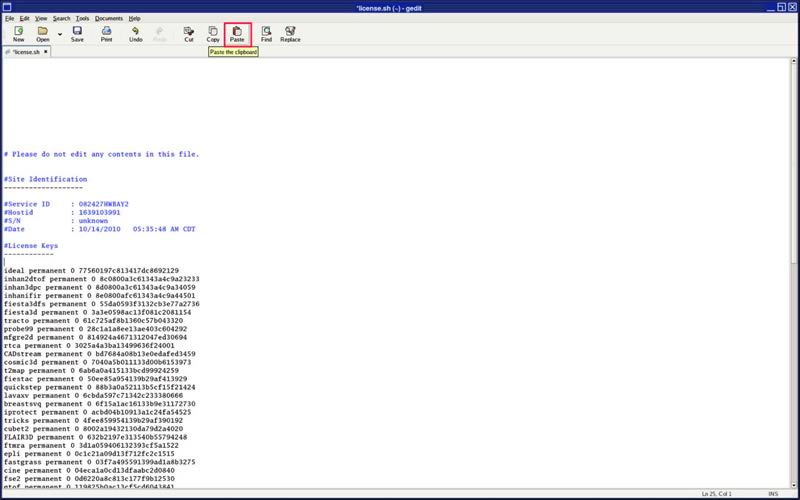
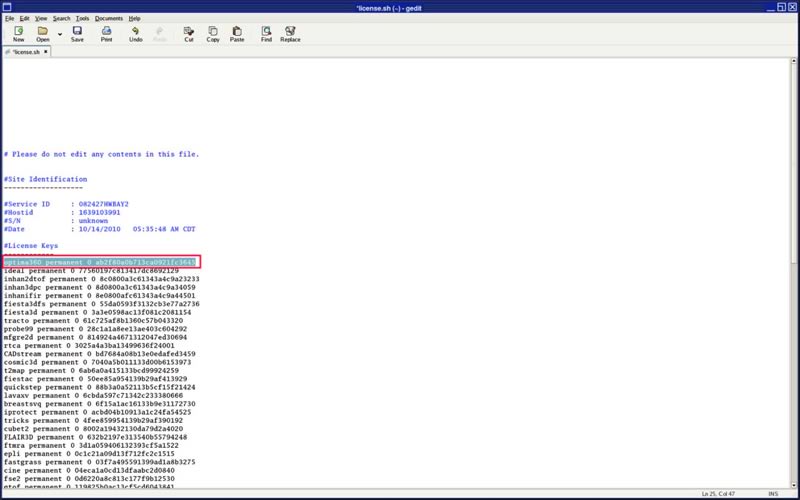
Figure 31. optima360 key
- Click [Save] button to save the current
file.
Figure 32. Save file
- Open command window and type “gedit license.sh” and press [Enter] key, see Figure 27.
- Rename the file by typing “mv license.sh flexkeys_install”.
- Reboot the system.
- Verify that a popup message appears saying “New option keys have been installed” after the “Do not interact with this system…” message disappears.
- Open Guided Install, and verify the option keys have been installed as permanent keys on the Option Keys tab.
- Complete a Save Info to retain all newly installed options on an Info MOD.
4.4 Manual Option Key Entry
If all other methods of option key installation are unavailable, the keys can be entered manually. A print out of the keys must be obtained to transcribe the strings from.
Procedure
- Select the [Service Tools Desktop].
- Select [Install…] from the Service Desktop Manager to open Guided Install.
- A command window will open with “Type Root Password” displayed. Type the system’s root password and then press the [Enter] key. “operator” is the Signa default root password. If, for your site, the customer has changed the root password, you will have to obtain the correct root password from the customer.
- After the Guided Install window opens, select the Option Keys tab. See Figure 33.
- Select the Manual check box on the Install
Option Key portion of the window, enter the 24- character license
key string into the text box, and select [Install]. Please be aware that this field is case sensitive.
Figure 33. GUIDED INSTALL WINDOW
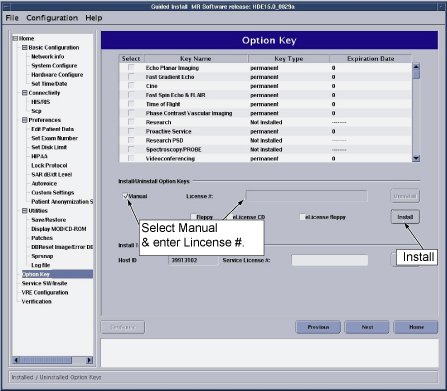 note:
note:For Optima MR360, optima360 key must be installed first. Input optima360 license key string into the text box before all other key's installation.
- Verify the option list in the Guided Install GUI is updated with the option just loaded.
- Repeat steps 5-6 for all the option keys being installed.
- Select File -> Quit from the main menu bar to exit the Guided Install tool.
- Reboot the computer, and verify all options are still available.
- Complete a Save Info to retain all newly installed options on an Info MOD.
5 OPTION KEY CATALOG MATRIX
Procedure
- Refer to Table 2 for a list of available electronic
options for MR Scanners.note:
Please note, that the Options Activated list below may change periodically. To see the most current keys, please refer to the official drawing prints for each part.
6 GLOSSARY
-
Bloodsupp - Blood Suppression
-
Cine - Images usually of moving anatomy scanned and arrange for playback rapidly in movie format.
-
ConnectPro (HIS/RIS) - Provides DICOM modality work list connectivity to hospital or radiology information system.
-
DW EPI - Diffusion Weighted Echo Planer Imaging
-
eOM – electronic Order Management, the Oracle order management system.
-
Fast cine - Fast gated multi-phase images of the heart that show the heart as it contracts and expands during cardiac cycle in a movie format.
-
FTP - Short for File Transfer Protocol, the protocol used to exchange files between computer systems.
-
IVI - Interactive Vascular Imaging.
-
iDRIVE Pro - Interactive imaging uses a fast GRE pulse sequence and a new user interface to acquire continuous 2D images at a high frame rate and provide on-image navigation. Not available on systems with a single i860 AP.
-
MS/MA - Multi-Slice/Multi-Angle Oblique
-
Sgdperf - SGD enhancements, which increase, slew rates and duty cycles for higher resolution thin slice imaging.
-
SmartPrep - Automated triggering for contrast enhanced MRA
-
SmartPrep2000 - Provides SmartPrep automated table motion
-
SPECIAL - Spectral / Spatial Fat Suppression. Chemical saturation using an inversion pulse (180º pulse). This key will always suppress just fat and cannot be changed to suppress water.
-
SSFSE - Single Shot Fast Spin Echo
-
Tagging - The placement of "tags" in an MR image is used to assess myocardial wall functions visually.
7 Finalization
Finalization
No finalization steps.