Returning Plates to Gradient Insertion Tool Kit
Prerequisites
Procedure
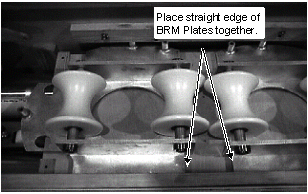
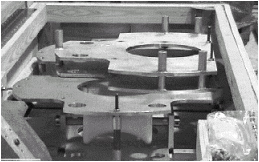
- BRM plates with the rollers attached (spacers pointing up) are placed
in the crate. See Figure 1.
Figure 1. PLACEMENT OF BRM PLATES
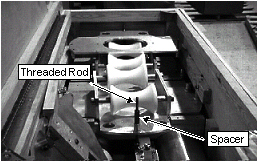
- Install threaded rod through spacer on the outer edge of the BRM plate
(see Figure 2) and secure with
washer and nut on bottom of BRM plate (see Figure 3).note:
Slide threaded rod with washer and nut attached on end through the bottom of the spacer.
Figure 2. PLACEMENT OF BRM PLATES

Figure 3. THREADED ROD AND SPACER ATTACHED TO BRM PLATE
- Install spacer on both threaded rods. See Figure 3.
- Install CRM plates (labeled 55cm Plate) onto BRM plates and rollers
by placing CRM spacer on the threaded rod. See Figure 4.
Figure 4. PLACEMENT OF CRM PLATES
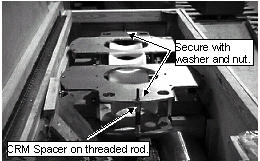
- Place washer and nut on threaded rod and tighten to secure plates on both ends. See Figure 4.
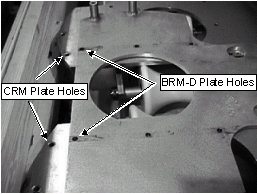
- Place BRM-D plate labeled Service End on CRM plates (see Figure 5). Line up holes on BRM-D plate and CRM
plates (see Figure 6).note:
BRM-D Plate labeled Service End has the short spacers.
Figure 5. PLACEMENT OF BRM-D (SERVICE END) PLATE

Figure 6. BRM-D PLATE ALIGNMENT
- Move BRM-D plate to wall of crate with holes in Figure 6 aligned.
- Put washer and nut on one end of both threaded rods.
- Underneath the CRM plates slide the threaded rods through the aligned
holes of the CRM and BRM-D plates. See Figure 7.
Figure 7. PLACEMENT OF THREADED RODS IN CRM & BRM-D PLATES
 note:
note:Allow the threaded rods to rest on the BRM plates while performing next step.
- Place the BRM-D plate, labeled Patient End, on top of the Service End
BRM-D plate. Threaded rods will go through the same holes as on the Service
End BRM-D plate. See Figure 8.
Figure 8. PLACEMENT OF THE PATIENT END BRM-D PLATE
- Place washers and nuts on the threaded rods and secure both ends of rods to plates. Verify all threaded rods are fastened securely so plates do not move during shipping.
Finalization
No finalization steps.