Replacing/Installing the SCIM, Keyboard and Mouse
Prerequisites
In this section you will replace the old keyboard or install the new keyboard.
1 System Power must be turned off
2 Keyboard Replacement
Procedure
- Disconnect the USB extension cable from the keyboard. The one-meter long USB extension goes directly to the host computer.
- Lift up on the Keyboard to detach it from the SCIM base plate. The keyboard is attached with Velcro.
- Pull the cable and defective Keyboard clear of the SCIM and set it aside
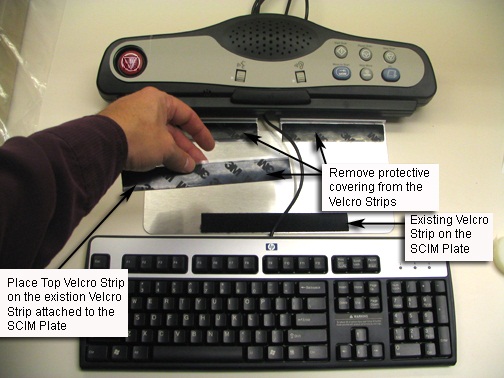
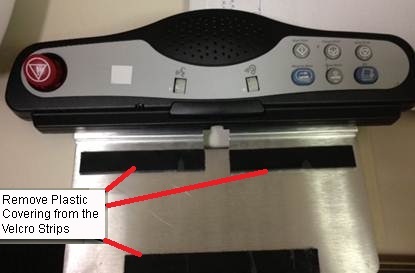
- Place new Velcro strips on the top of the strips attached to
the SCIM as shown in Figure 1.
Figure 1. Placing Velcro Strips
- Pull the replacement keyboard USB cable through the opening in the SCIM.
- Remove the protective covering from the Velcro, see Figure 1. Position the replacement keyboard, then firmly push down to fasten
Velcro.note:
The glue on the Velcro must be given time to set. Do not attempt to remove the keyboard from the SCIM for 24 Hrs.
- Connect the keyboard USB cable to the Host Computer through the USB extension cable.
- This completes the Keyboard Replacement.
3 Mouse Replacement
Procedure
- Unplug the defective Mouse from the host computer USB connector.
- Install the new mouse by plugging it directly into the host computer USB connection.
- This completes the Mouse Replacement.
4 SCIM Replacement
Procedure
- Disconnect the USB extension cable from the keyboard. The one-meter long USB extension goes directly to the host computer.
- Lift up on the Keyboard to detach it from the SCIM base plate. The keyboard is attached with Velcro.
- Pull the cable and Keyboard clear of the SCIM and set it aside
- Turn the SCIM over to expose the cable connections. See Figure 2.
Figure 2. Data Cable Connection
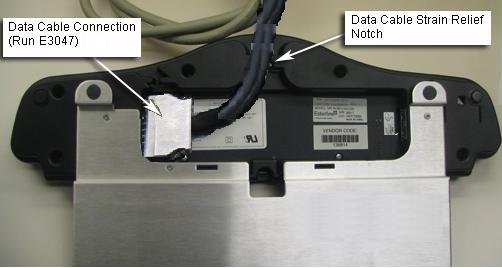
- Remove the Data cable from the defective SCIM.
- Turn the replacement SCIM over to expose the cable connections, as in Figure 2.
- Connect the data cable to the new SCIM, see Figure 2.
- Turn the SCIM over (top facing up).
- Pull the keyboard USB cable through the opening in the SCIM. See Figure 1.
- Remove the protective covering from the Velcro, see Figure 1. Position the keyboard then firmly push down to fasten Velcro.note:
The glue on the Velcro must be given time to set. Do not attempt to remove the keyboard from the SCIM for 24 Hrs.
- This completes the SCIM Replacement.
5 SCIM,Keyboard and Mouse Install
Procedure
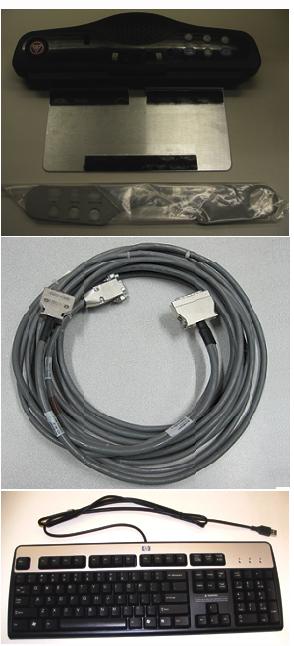
- Remove the SCIM, Data Cable, Keyboard and SCIM language overlay
from the box.
Figure 3. SCIM Kit Contents
 note:
note:SCIM's come with one overlay for the selected language.
note:For the availability of other languages check the Sales Catalog.
Figure 4. Language Overlay
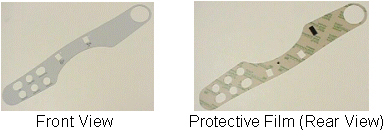
- Remove the Protective film from the language overlay and position it over the SCIM. When you are satisfied it is in the proper position, rub your finger over it lightly, in between the Scan buttons and around the Emergency Stop button to press it in place.
- Flip the SCIM unit up side down exposing the cable connections.
- Attach the data cable. see Figure 2
- Flip the SCIM over so it is right side up and guide the keyboard cable through the center opening.
- Center the keyboard, Flipping it on top of the SCIM patient speaker (Bottom of keyboard facing up) Keep the Cable as short as possible so when the key board is flipped right side up onto the Velcro, the keyboard cable does not interfere with the installation.
- Remove the plastic strips from the Velcro, exposing the adhesive
surface. See Figure 5.
Figure 5. SCIM Velcro Strips
- Guide the cable back into the center notched opening until all the remaining cable is under the SCIM base.
- Place the keyboard tight against the SCIM, Center it as best
as possible, and drop into place. The Velcro pads will now be sticking
to the bottom of the keyboard.note:
The adhesive on the Velcro takes 24 hours to completely adhere to the bottom of the keyboard. Allow the adhesive to dry completely before removing keyboard from SCIM base.
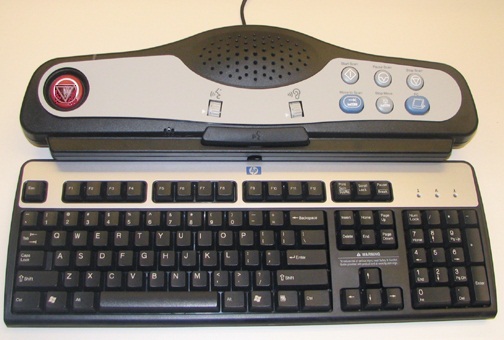
Figure 6. SCIM And Keyboard Assembled
- Position the SCIM Assembly in front of the monitor and guide any excess data cable through the opening provided in the Workspace Desktop.
- Connect the USB cable from the Keyboard to the USB extension cable which connected the host Computer.
- Plug the mouse cable directly into the USB port on the Host computer.
- This completes the installation of the SCIM Assembly.
6 Finalization
Procedure
- Restore Power by referring to Lockout / Tagout for SV 1.5T System Cabinet PDU Main Breaker
- Perform Keyboard Function Check
- Perform Signal to Noise - Head Scan.