Re-Configuring The System
Prerequisites
1 Reconfiguring the System Using the Install GUI
If this is a new/upgrade Installation or if the system just needs to be reconfigured between software loads, do the following to start the Configuration GUI:
Procedure
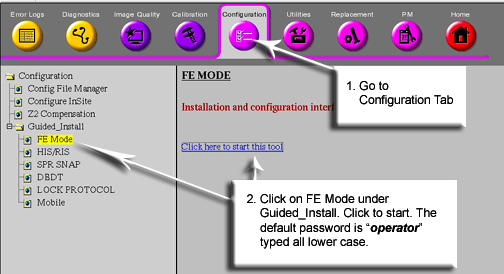
- Go to the Service Desktop and start the Common Service Browser
if it is not already running. Select [Configure tab], then select
[Guided Install], [FE mode]. Then Click [Click here to start this
tool]. The password is “operator”.
Figure 1. Start GUI
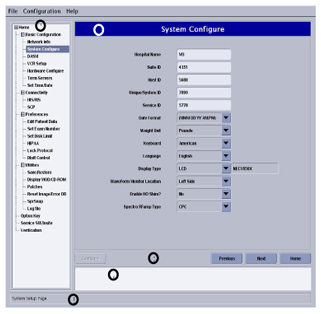
- Help documentation is built into the GUI. Push the Help button on the tab you need information for in the
GUI. Push the Next button to move through tabs
in order. Modify entries to match your system as required. When satisfied,
push the Configure button at the bottom of
the tab page or wait until all tabs have been modified and go to the
“Verification” tab. Review changes made and correct, then
push the Configure Tab(s) button to update
the system (see Figure 2)
Figure 2. Verification Menu-Configure Tabs
- Before exiting the GUI, insert the SaveInfo CD/DVD or a new
CD/DVD. From the File menu, select Save, and
then Save GI Configuration to CD/DVD.
This process does not create a SaveInfo disk, but a copy of the current information in the GUI fields for use in the next software install.
- Exit the install GUI by selecting File then Quit. If any error conditions still
exists, you will be warned that no changes will be made before exiting.note:
The GUI will not automatically reboot the system in configure mode. It will be up to the user after making configurations.
- If changes were made to the system configuration, select System Shutdown and reboot the system for changes to take effect
2 Set Time/Date Tab
The Time/Date tab is the only tab that the Configure button will never be highlighted to set options. There are separate buttons for configuring this tab (see Figure 3). If you need to reconfigure the Host time and or date at any time, do the following:
Procedure
- Select the time zone your system is located in, then push the Set Time Zone button
- Select the date and local time, then push the Set
Time/Date button
Figure 3. Set Time/Date Menu

Finalization
No finalization steps.