Grafidy - Manual mode
The Manual Mode tab is provided to allow individual components to be calibrated.
The Manual Mode tab is provided to allow individual components to be calibrated. In manual mode, all of the signal checks are performed, but since the scan has already completed, an option to abort is not presented if an error is found. In addition, unlike in Auto mode, there is not a way to turn the checking off. Due to the fact that signal from all six samples is collected and therefore all four components are available, only the selection of an entire mode is available for selection. That is, you may select the long mode pulsing the Z-axis, but not the long ZX component.
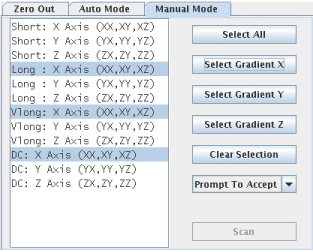
Figure 1. Manual Mode Tab
Procedure
- Similar to the Zero Out tab, there are several methods provided to select the modes to be run. To select individual modes, select the desired component or components. An item appears selected when it is highlighted.note: For multiple component selections, hold CTRL and Shift as you select your desired components.
- Group select buttons are provided to allow quick selection of multiple modes.
- Click Select All to highlight all modes listed.
- Click Select Gradient X (or Y or Z) to select all of the modes related to pulsing of that specific gradient. For example, selecting Select Gradient Y will select the long, very long, and DC modes for the Y-axis. The short mode with Y-axis is not selected.
- The Clear Selection button will deselect all of the modes in the list.
- Once the desired modes are selected, click the Scan button to begin acquisition of highlighted modes.
Once the desired modes are selected, click the Scan button to begin acquisition of highlighted modes.
Whether the resulting best-fit curve calibration parameters are used by the system (written to the calibration files) depends on the selection in the menu.
Figure 2. Prompt to accept
 note: For DC mode, there are no values written to the calibration files and the Prompt to Accept function is not supported.
- Prompt To Accept - In this mode, after data acquisition is complete, the data curves and associated best-fit curves are presented. In the window showing the data curve, you may select the Accept or Cancel button. The Accept button writes the best-fit calibration parameters to the calibration files. Choosing the Cancel button does not update the calibration parameters. The data curves for all four components are presented one at a time.
- Always Accept - In this mode, the calibration parameters are written to the calibration files. The data curves are not automatically presented to the user.
- Never Accept - In this mode, the calibration parameters are not written to the calibration files. The data curves are not automatically presented to the user.