4KW LCS Low Level FRU Replacement
Prerequisites
note:
If it’s difficult to remove the plastic pipes from the pump nipples, use heat gun to warm up the pipes until they become softer and then remove them. The usage of heat gun can reduce the risk to break the nipples, because the pipes may lose its elastic properties after a few years.
1 Motor Coupling Kit replacement
Procedure
- Disconnect power from the LCS and follow all Lock-out Tag-out procedures.
- Remove top, right and left side covers.
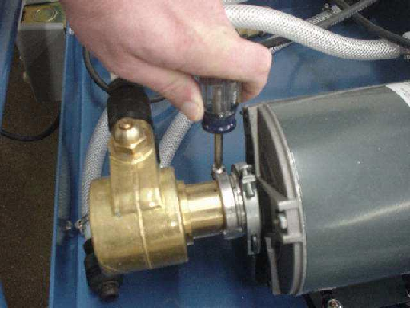
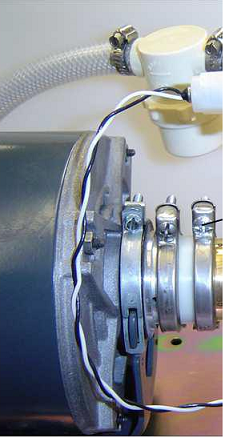
- Remove the pump / motor clamps by loosening the screw until
the clamp can be slid over the pump housing.
Figure 1. Remove pump / motor clamps
- Carefully remove pump from spacer and place to the side just enough to get coupling and spacer off of motor. Remove the coupling from the motor or pump.
- Place the spacer with one clamp onto the pump and tighten just enough to keep in place.
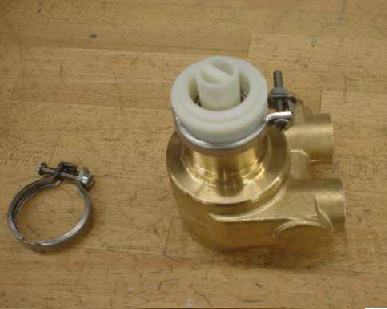
- Place the center of the coupling onto the pump shaft. Ensure
the coupling slides down over the pump shaft.
Figure 2. Place the Coupling
- Place the other motor clamp onto the coupling.
- Place the pump / coupling assembly onto the motor. Ensure the coupling is seated into the pump & motor shafts.
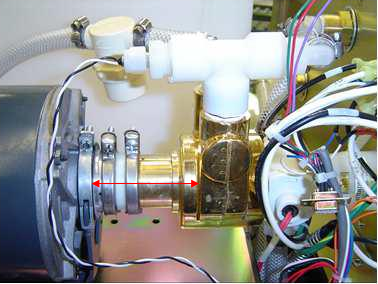
- Tighten the clamp screws while ensuring the coupling is seated
evenly on both the motor and pump.
Figure 3. Tighten Clamp Screws
- Re-Check the assembly. Check the alignment of motor to clamp, clamp to spacer, spacer to clamp and clamp to pump interfaces. Verify all are in alignment and tight.
- Fill the reservoir with coolant as necessary.
- Wipe up any spills before applying power.
- Start LCS and check for noise or leaks. If there is abnormal noise or leaks, repair before placing unit back in service.
2 LYTRON PUMP Replacement
Procedure
- Disconnect power from the LCS and follow all Lock-out Tag-out procedures.
- Remove top, right and left side covers.
- Drain all coolant.
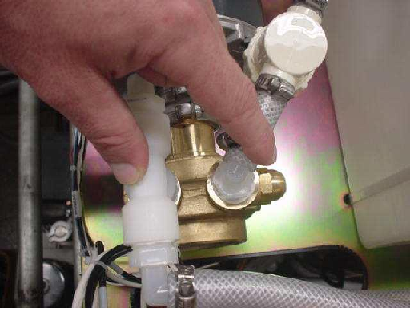
- Remove hose clamps from the nipple fittings attached at the
pump head.
Figure 4. Remove Hose Clamps
- Remove the hoses from these fittings.
- Remove the pump / motor clamp by loosening the screw until the
clamp can be slid over the pump housing.
Figure 5. Remove the Pump / Motor Clamp
- Remove pump from unit. Take precautions not to spill coolant inside LCS. Some coolant will remain in pump after draining.
- Remove all fittings from the pump. Do not damage threads of fittings.
- Attach fittings to replace pump using thread sealant or Teflon
tape.note:
: Do not leave Teflon tape or sealant near end of fittings. Foreign matter in coolant lines will damage the system.
- Place the coupling with one clamp onto the pump and tighten just enough to keep in place.
- Place the center of the coupling onto the pump shaft.
Figure 6. Place the Coupling
- Place the original pump / motor clamp onto the coupling.
- Place the pump / coupling assembly onto the motor. Ensure the coupling is seated into the pump shaft.
- Tighten the clamp screws while ensuring the coupling is seated
evenly on both the motor and pump.
Figure 7. Tighten the Clamp Screws
- Reattach the hoses to the fittings and tighten the hose clamps.
- Fill the reservoir tank with coolant.
- Wipe up any spills before applying power.
- Start LCS and check for leaks.
3 LYTRON MOTOR Replacement
Procedure
- Disconnect power from the LCS and follow all Lock-out Tag-out procedures.
- Remove top right and left side covers.
- Remove the clamp that secures the pump coupling to the motor.
Figure 8. Remove Clamp
- Carefully remove the pump and coupling from the motor and place to the side without putting too much stress on the pump hoses or wires.
- Remove the 4 nuts and washers securing the motor to the LCS base. Be sure to leave the rubber isolation mounts on the LCS frame.
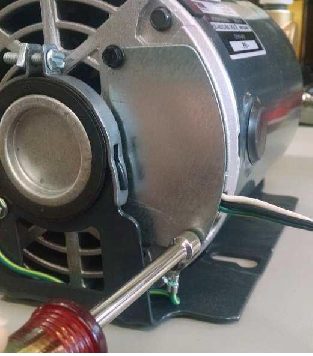
- Locate electrical connections to motor. Remove motor access
cover by loosening the two screws 2-3 turns. The plate will slide
out of the way.
Figure 9. Locate Electrical Connections to Motor
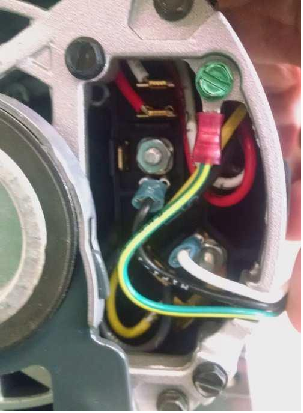
 note:Write down the location of the wires on motor before removing. Disconnect the wires at the spade lugs. DO NOT MOVE ANY JUMPERS ON REPLACEMENT MOTOR. It has been wired for 208-230V service prior to shipping form the factory.
Figure 10. Location of the Wires
- Mount motor in machine using 4 nuts and washers removed in Step 6
- Attach pump to motor using pump coupling, plastic collar, and clamp removed in Step 4.
- Check all water and electrical connections – route hoses and wiring in proper manner.
- Install cover on motor.
- Fill the reservoir with coolant as necessary.
- Wipe up any spills before applying power.
- Start LCS and check for noise or leaks. If there is abnormal noise or leaks, repair before placing unit back in service.
Finalization
No finalization steps.