Head Coil Replacements
1 Overview
Follow this process to replace the external cable and mechanical hardware of GE 1.5T HDe Split Head Coil
5145658(1.5T HDe)
2 Procedure
Simple removals that are clearly obvious are not described here.
Unless otherwise noted, the steps for re-assembly are simply the reverse order of the steps described for disassembly.
2.1 External Cable Replacement
The 4 connection pins on the top half of the coil insert into recessed spring clips on the bottom half of the coil. The spring clips are available as a FRU.
2.2 Mechanical Hardware Replacement
To re-assemble put the cover back on the posts and press on it till it snaps back into place. Push the foam flap under the jacket. Carefully put the fabric flap into place making sure that the Velcro on the edges lines up with the Velcro on the jacket. Tuck the end of the flap under the jacket. Press over the Velcro while making sure that no edges are left open.
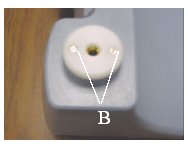
1) The four spring clip connectors are located in the head coil baseplate, under the plastic caps marked “A”
Figure 1.

2) Remove the plastic caps by removing the two screws labeled “B”
Figure 2.
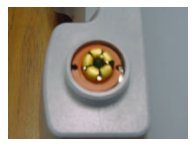
3) Remove the gold spring clip and red gasket.
Figure 3.

4) Install the new spring clip as shown.
Figure 4.
5) Insert the red gasket and replace the plastic cap