Emergency Magnet Rampdown
 |
|

|
Perform the following procedures in the order listed until emergency rampdown is achieved.
 |
|
-
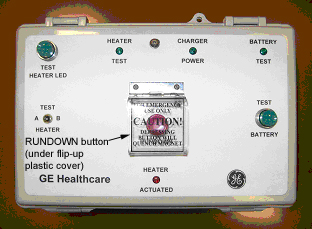
Magnet Rundown Unit (MRU): Press and release the red Rundown button on either the primary or remote MRU (the Rundown button will remain depressed for 30 seconds). The magnet will quench and the magnetic field will begin to decay. Field decay times may vary by magnet type—refer to the Magnet and Cryogen manual for the exact times for your system.
Figure 1. MRU
 note:
note:The illustration above shows an MRU example. Other models may be used on some systems. Refer to the Magnet and Cryogen manual for your system.
-
Engage the shim lead.
note:This method will only work for magnets with shim leads (actively shimmed magnets). If your magnet does not have shim leads, go to vacuum break method, below. Shim lead configuration may vary by magnet type. Refer to the Magnet and Cryogen manual for your system.
-
Unlock the Shim Lead Assembly from its disengaged position.
- notice
-
Rapidly lower and engage the Shim Lead Assembly in the Sav-Con Connector.
-
-
Break the magnet vacuum to ramp the magnet down.
- notice
note:Vacuum port location and cover configuration vary by magnet type. Refer to the Magnet and Cryogen manual and service documentation for your system.
-
Locate the Emergency Evacuation Release Tool (46-260852G3) for all magnet types (except S3 with Magnashield which uses 46-281847G1).
-
Ensure all room ventilation systems are on and the magnet room door is propped open.
-
Remove enclosure cover from the magnet cover exposing the vacuum port.
Figure 2. Vacuum Port Enclosure Cover Removal
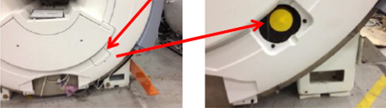 note:For MR systems with a Salt block magnet cover configuration (shown below) or any other system (e.g., Vectra, Contour, Openspeed, etc.) for which the vacuum port is not easily accessible, call your GE Healthcare Service Representative for enclosure removal.
Figure 3. Salt Block Magnet Cover Example

-
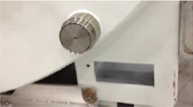
Remove the protective dust cover from the vacuum port.
Figure 4. Vacuum Port Dust Cover Removed
-
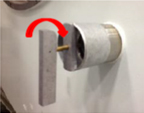
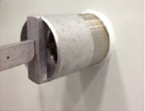
Screw the handle of the Emergency Evacuation Release Tool into the plug of the vacuum port.
Figure 5. Vacuum Release Tool Attachment
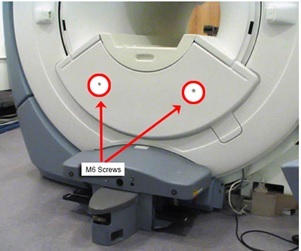
 note:If the magnet enclosure prevents the vacuum break tool from screwing into the vacuum port, use a non-magnetic 5 mm Allen Wrench to remove the two M6 screws that secure the magnet cover and then remove the bridge cover (the table may need to be moved for bridge removal).
Figure 6. Magnet Cover Screws
-
Lift the Emergency Evacuation Release Tool handle until it is parallel to the floor. This will engage the tool and break the vacuum seal. Leave the handle in this position. The vacuum break tool must stay attached to the vacuum port until pressure is equalized inside and outside of the magnet vessel.
Figure 7. Vacuum Release Tool Engaged
The inrush of air into the magnet vacuum may be loud. The magnet will quench in about 30 seconds.