
- Optima MR450w BASE 1.5T System Service Methods
- 5690012-2EN Revision 3
- 00000018WIA3052DD20GYZ
- id_131074313.0
- Aug 29, 2019 1:51:54 AM
1.5T 8-Channel High Res Brain Array Replacements
Personnel Requirements
| Required Persons | Procedure |
| 1 | 30 min. |
Overview
Follow this process to replace FRUs for the 1.5T HD 8-Channel High Res Brain Array by Invivo (catalog number M3335LZ).
Tools and Test Equipment
For cable replacement, a ¼ inch flat blade screwdriver.
Replacement Parts
Refer to the FRU document.
Procedure
Cable Continuity Check
Troubleshooting should be performed by an authorized service engineer only.
Cable Replacement Procedure
To be performed by an authorized service engineer only.
The 4 coil connector mounting screws are located at the superior end of the coil. Remove the 4 coil connector mounting screws as shown below. Remove the coil connector by pulling away from the coil in the superior direction.
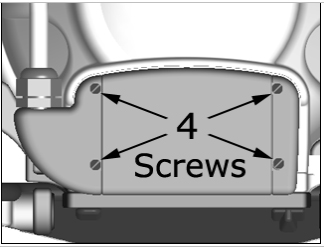
To install the new cable, reverse the removal steps.
Mechanical Hardware Check
Lift the coil latches on both sides of the coil, and slide the coil to its superior and inferior extents. The coil must slide freely on the base with no binding or grinding. Make sure that the coil does not move with respect to the baseplate when the latches are locked down.
Replacement of Inferior or Superior Mirror
There are two mirrors included with the 1.5T HD 8-Channel High Res Brain Array: superior and inferior. Both are shown below. Instructions for replacement are included with the FRU.
Coil Replacement
No instructions are required.
Head Mirror Mount Kit Replacement
Instructions for replacement are included with the FRU. 5030024.pdf
Head Bucket Kit Replacement
Instructions for replacement are included with the FRU. 5030023.pdf
Latch Kit Replacement
Instructions for replacement are included with the FRU. 5030022.pdf