- Topic ID: task_egg_jlt_xjb
- Version: 3.0
- Date: Dec 29, 2020 12:58:48 AM
AW Enterprise Option Installation and Configuration
Prerequisites
Overview
This procedure outlines the process required to install and set up the AW Server Client software on system.
1 Verified Software Version
Procedure
- Identify software release versions on both the CT system and AWE Server systems.
- Compare software revision with verified release version below.
- Do not attempt to perform the following procedures if software releases do not match with table above.
2 Acquire AW Enterprise Server information
Procedure
- Acquire/Record the IP address of AW Enterprise Server, as well as the User Name and Password created for this purpose, for configuration on CT console in later steps.note:
The User Name and Password are one of the accounts configured on AW Server.
Consult with the site IT Admin for the account assigned for this use.
3 Install AWE Connection Software Option on CT System
Procedure
- Install the supplied “AWE connection” software option license according to the Install Software Options by eLicense procedure.
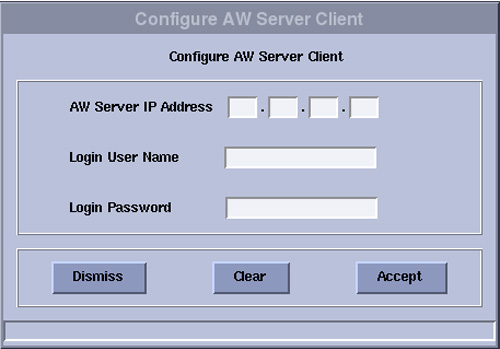
- The "Configure AW Server Client" window appears automatically, Input the AW Server IP Address, User Name and Password and click Accept. Note: This is the account information obtained earlier is Section Acquire AW Enterprise Server information.
Figure 1. Configure AW Server Client
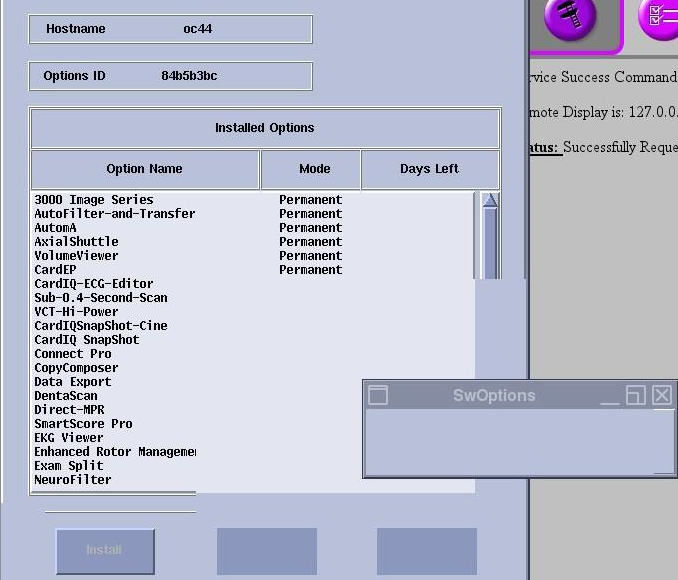
- Software Option installation window may appears, please wait until the process is completed.
Figure 2. Software Option Installation
- Continue the installation for all of the rest Software Options if there are any.
- When finishing all Software Options installation, select Shutdown on the Desktop and select Restart, then click OK on the Attention Window.
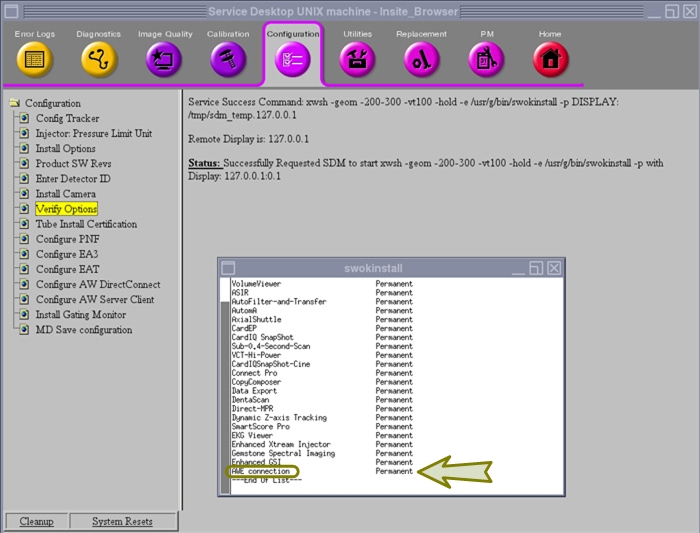
- Open the Common Service desktop (CSD) and click the Configuration tab. Click on Verify Options menu selection and review the loaded software options.
Figure 3. Verify Software Option Load - AWE Connection
- Declare DICOM Settings for AW Server on the CT System.
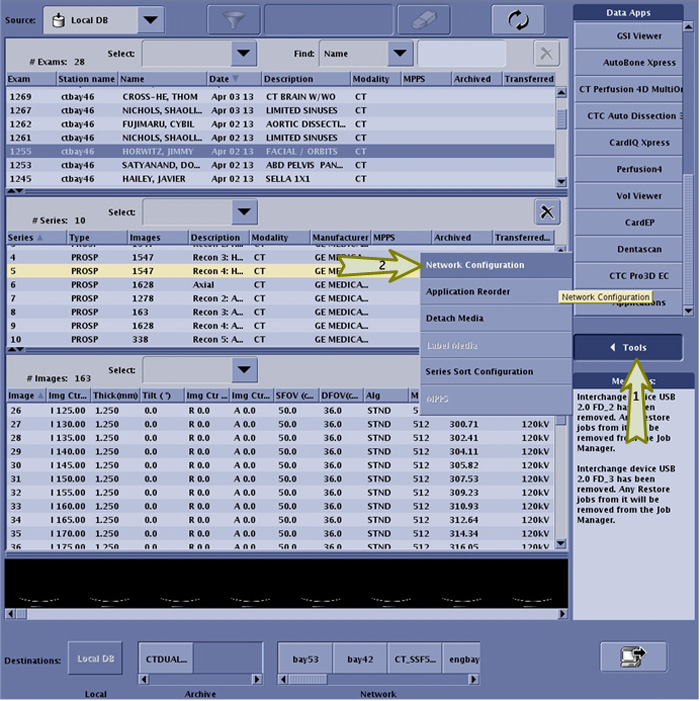
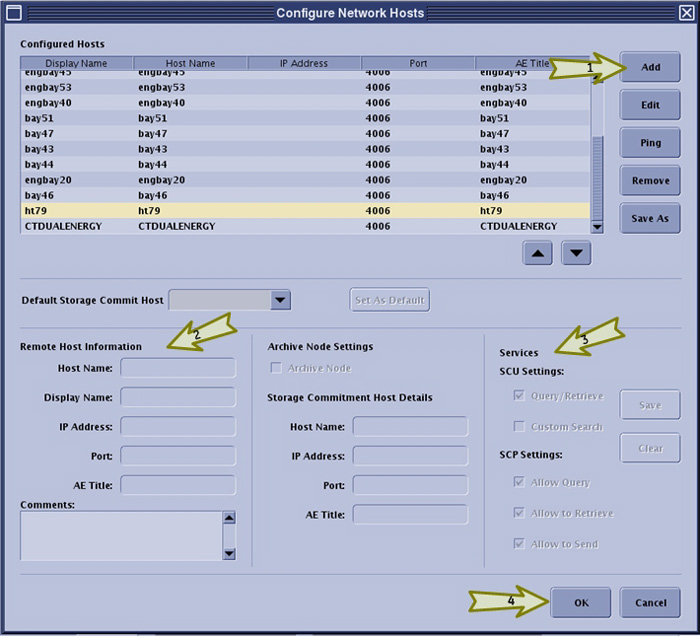
- On CT Console, select ImageWorks > Tools > Network Configuration. The Configure Network Host page will appear.
Figure 4. ImageWorks - Tools Button
- In the Configure Network Host page, click Add, complete the Remote Host Information and Services (SCU & SCP Settings) sections, then click OK. One will need to supply the following information:
Remote Host Information:
-
Host Name
-
Display Name
-
IP Address
-
Port (Enter, 4006)
-
AE Title
-
Service:
-
SCU Settings (Select, Query/Retrieve)
-
SCP Settings (Select, Allow Query, Allow to Retrieve, & Allow to Send)
Figure 5. ImageWorks - Tools Button - Network Configuration Page
- On CT Console, select ImageWorks > Tools > Network Configuration. The Configure Network Host page will appear.
4 Enable Integration On AW Server
NOTE: Please pay attention that maintenance mode will disconnect all server users, it is suggested that AW Server setting should be done by AW Server engineers.
Procedure
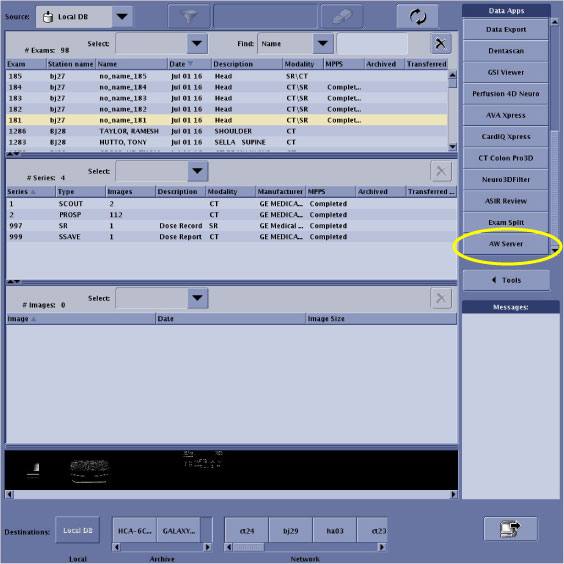
- Open AW Server client from Data Apps menu in ImageWorks desktop by clicking AW Server button.
Figure 6. ImageWorks Desktop – AW Server Button
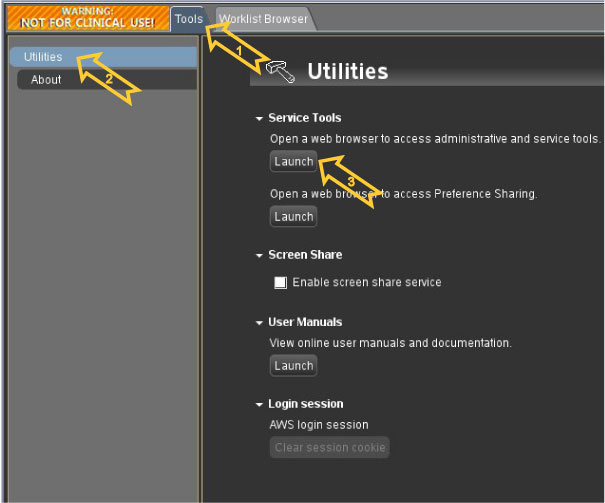
- The AW Server Client software web browser will launch and display the AW Server on the CT console. In the client web browser, select Tools tab to show tools menu. See Figure 7 below.
- In the client web browser Tools tab, select the Utilities menu item.
- Click Launch to open web browser to access AW Server 3.2 Administrative and Service Tools.
Figure 7. AW Server Tools Tab - Utilities Menu
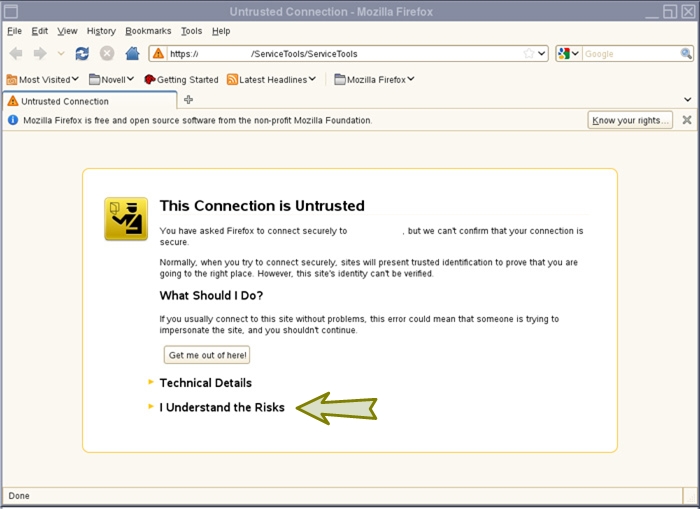
 note: "This Connection is Untrusted" window may appear when accessing the Service ToolsLaunch button in the AW Server Utilities menu the first time after AW Server Client software installation has been performed. Disable the security setting according to the follow procedure.
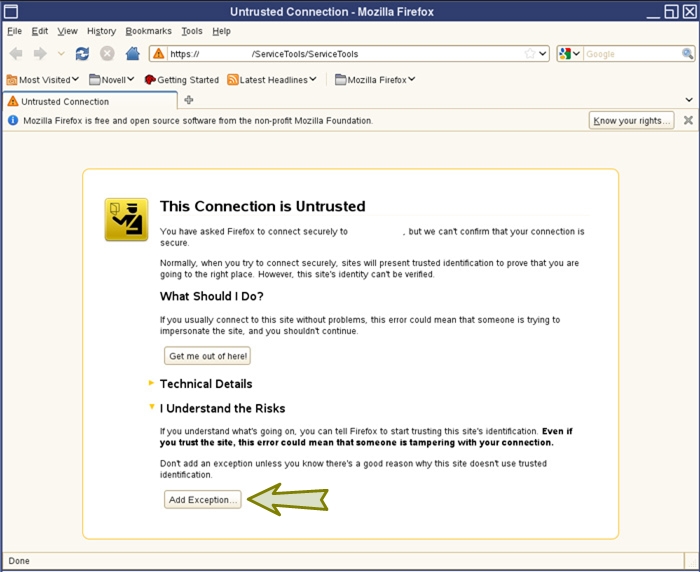
- “This Connection is Untrusted” page may appear in Mozilla web browser. Click I Understand the Risks link.
Figure 8. Untrusted Connection Page
- On the web browser click Add Exception button.
Figure 9. Untrusted Connection - Add Exception Page
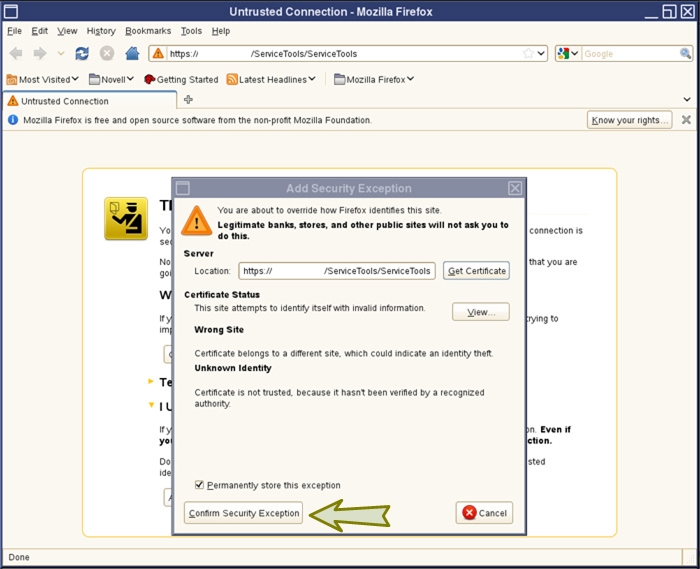
- “Add Security Exception” pop-up window appears. Click the Confirm Security Exception button.
Figure 10. Security Exception Pop-up Window
- The pop up will close and “This Connection is Untrusted” page will not appear from next time.
- “This Connection is Untrusted” page may appear in Mozilla web browser. Click I Understand the Risks link.
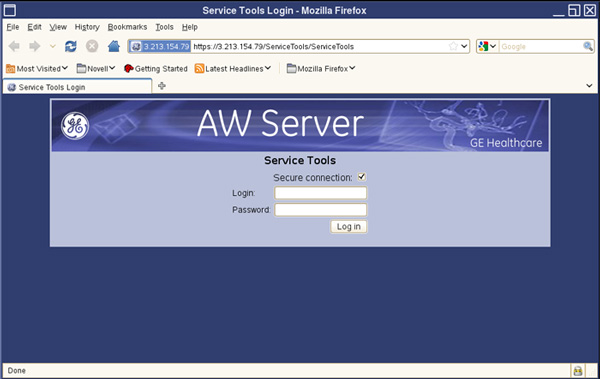
- The AW Server Service Tools secure Login page will appear. Enter Login and Password, then click Log In. Note: This is the account information obtained earlier is step Step 1.
Figure 11. AW Server Secure Login
- At this time the Service Tools – AW Server page of the AW Server will appear in the client web browser.
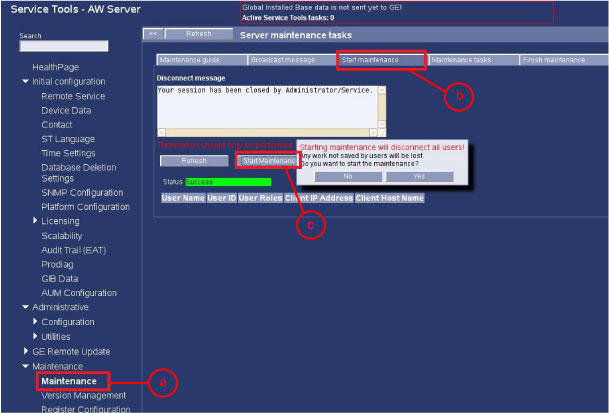
- Following the steps below to change the AW Server to Maintenance mode.
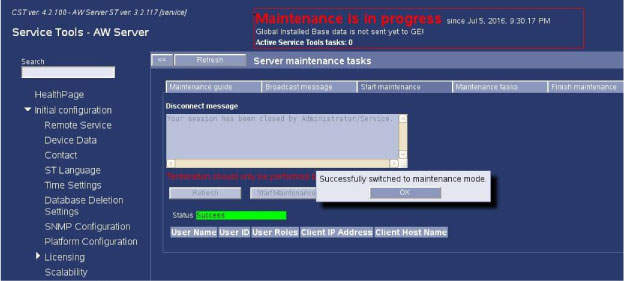
- On the Service Tools – AW Server page, select Maintenance > Maintenance, click Start maintenance.
- When status becomes “Success” at the green area, click Start maintenance.
- When It pops up the message of “Do you want to start the maintenance? ”, click Yes.
Figure 12. AW Server – Maintenance menu
- Confirm the message “Successfully switched to maintenance mode” pops up.
Figure 13. AW Server – Maintenance menu
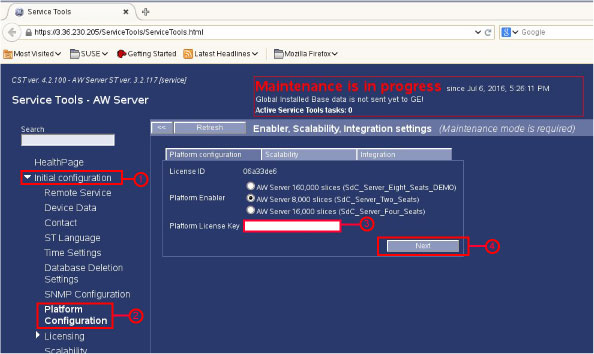
- On the Service Tools – AW Server page, select Initial configuration > Platform configuration, fill in the license key, then click Next..
Figure 14. AW Server – Initial Configuration
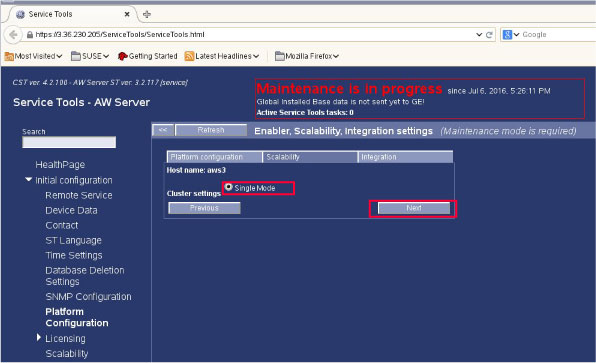
- Select the Single Mode and Click Next again.
Figure 15. AW Server – Single Mode
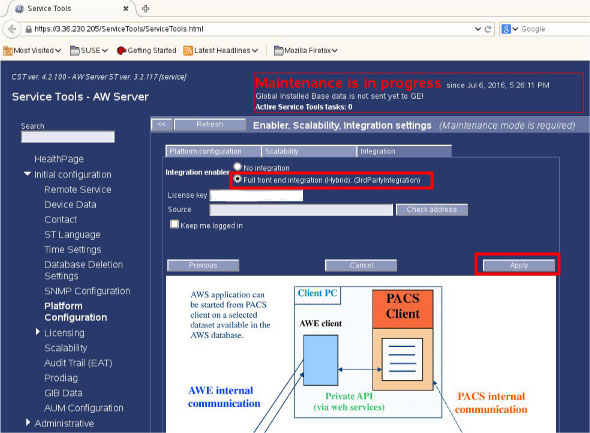
- Select Full front and integration (Hybrid) (3rdPartyIntegration) as Integration enabler, then click Apply.
Figure 16. AW Server – Integration enabler
 note: At this step, it will request for CT reboot, please ignore this and continue next step.
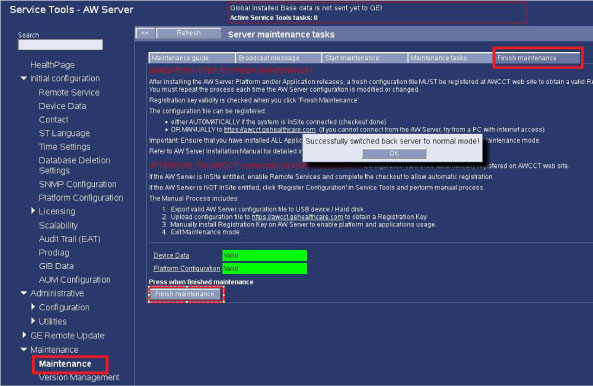
 - On the Service Tools - AW Server page, select Maintenance >Finish maintenance, click Finish maintenance, make sure it pops up the message “Successful switch back server to normal mode!”
Figure 17. AW Server – Back to normal mode
- Reboot the System. Select Shutdown on the Desktop and select Restart, then click OK on the Attention Window
- Declare CT on AW Server.
The CT system must be declared in AW Server as a DICOM host. Refer to AW Server installation manual for the detailed configuration procedure.
- This completes the Installation and setup of the AWE Server Option. Proceed to the Finalization section.
5 AWS Client Software Update Procedure
The following procedure is only required when AWE Server is upgraded, AW Server client software has already been loaded on CT system and new/updated AWE client software needs to be installed on CT system.
Procedure
- Remove the AWE Connection Option
- Click on the Service icon to access the Common Service Desktop (CSD).
- Click on Configuration of CSD and select Install Options.
- Select AWE Connection Option and click Remove.
- Re-install the AWE Connection Option, please refer Install Software Options by eLicense
- Shutdown and restart the system.
6 Finalization
Procedure
- Open ImageWorks desktop.note: Before launching the AW server application, the selected exam and series in the console exam list needs to be transferred to AW server.
- Confirm that "AW Server" button exists on ImageWorks desktop and will launch the client software and display the AW Server on the CT Console by clicking the AW Server button.
Figure 18. ImageWorks Desktop
- Perform a System State Save to save the AWE Server Configuration.