- Topic ID: id_15460906
- Version: 2.0
- Date: Nov 8, 2018 1:36:48 AM
Product Locator
Prerequisites
Overview
This document describes and illustrates the Product Locator feature and the procedure for completing the entry of Product Locator information. Product Locator information consists of Certified Components and Components (Both Hardware and Software) supplied with Product Locator Cards. This procedure shall be performed at the end of the installation process of the system and used periodically during service activities through the life of the System.
Term Definitions:
-
Baseline – a record of part information at a point in time.
-
Certified Component – A part of the CT scanner that is documented as an item whose location and use must be known (i.e. where is the product located?).
-
Common Service Desktop (CSD) – Launching point for Service Tools.
-
eGIB – Global Installed Base. Database used to record serial number information for the purpose of determining FMI applicability.
-
History – a change in a part’s identification
-
Login – establish user identification for the purpose of recording who changed a part.
-
Part – alias for component.
-
Product Locator – identifying the component (serial number) and recording where the component is in use (System ID).
Functional Description:
Component identification is accomplished through serial numbers and model numbers. This information is provided with the components either from the Manufacturing facility or from any replacement part. This procedure provides a means of updating the component identification information as the parts are installed or changed. At any appropriate time, the Service personal can create or modify the data using a fill-in-the-form design. The resultant data is then written to a database for future recall. To support the needs for Electronic Records, each change of the part’s history requires a User Identification/Login (to record who made the change) and a date (to record when the change was made). The changed information is then added to the database and does not erase any existing data. Part history information can be reviewed on the scanner using the Common Service Desktop (CSD) interface. Additional permanent records can be created by selecting the Baseline operation. These Baseline records can also be reviewed from the CSD.
1 Install: Initial Setup and Data Entry for Product Locator
Follow and perform this section of the procedure for initial setup of Product Locator preferably during installation. If Product Locator has been setup previously and is in need of maintenance, skip to Replace, Update or Remove: Product Locator Maintenance.
Procedure
- Access the Product Locator Feature
- To access the Product Locator feature, select the Product Locator link on the Replacement Tab of the from the Common Service Desktop.
Figure 1. Product Locator Link in CSD
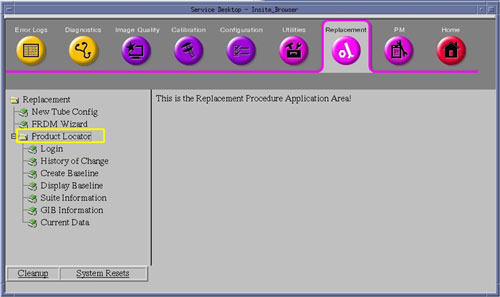
- Click on the Product Locator link.
- To access the Product Locator feature, select the Product Locator link on the Replacement Tab of the from the Common Service Desktop.
- Select Login Link in Product Locator Menu
of CSD
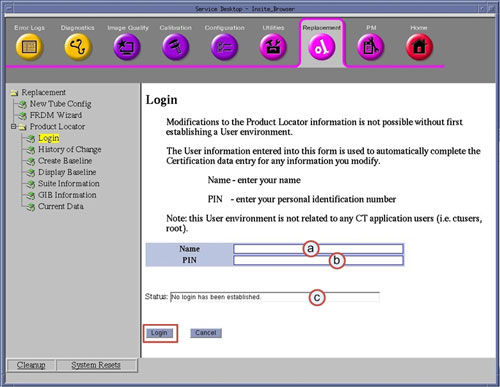
- Click on the Login link. The Login page
will appear.
Figure 2. Product Locator Login Page
 note:
note:The use of Login Credentials aides in the identification of individuals entering information into the Product Locator feature as well as preventing accidental changes.
Login credentials are maintained on the system for 24 hours, then automatically expire. Once expired, the credentials must be recreated.
Login can be disabled and erased by selecting the Cancel button on the bottom of the Login page.
Do not use someone else’s login credentials, check login Status and if necessary disable login first.
- Enter Name (a). Click in Name field and type Service Persons name. Preferably Given Name followed by Surname/Family.
- Enter PIN (b). Click in PIN field and type Service Persons PIN (password).
- Click the Login button at the bottom of the Login page.
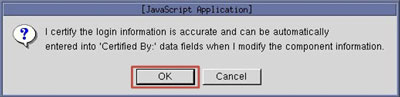
- Click the OK button when the Login Confirmation
Pop-up window appears.
Figure 3. Login Confirmation Pop-up Window
- Click on the Login link. The Login page
will appear.
- Select Suite Information Link in Product
Locator Menu of CSD
- Click on the Suite Information link. The
Suite Information page will appear.
Figure 4. Product Locator Suite Information Page

- Click the Check to Allow Change box to enable data entry. The fields displayed can not be modified until this box has been checked.
- Click in each of the fields (a – l) shown above and type in the requested information.note:
Fields (m-o) will be blank and non-editable on first display of the Product Locator Suite Information page. Upon form completion and save of this page, this data will be automatically completed with the login credentials.
- Click the Save button at the bottom of the Suite Information page.
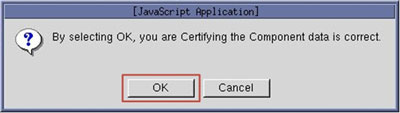
- Click the OK button when the Confirmation
Pop-up window appears.
Figure 5. Confirmation Pop-up Window
- Click on the Suite Information link. The
Suite Information page will appear.
- Select GIB Information Link in Product
Locator Menu of CSD
- Click on the GIB Information link. The
GIB Information page will appear.
Figure 6. Product Locator GIB Information Page
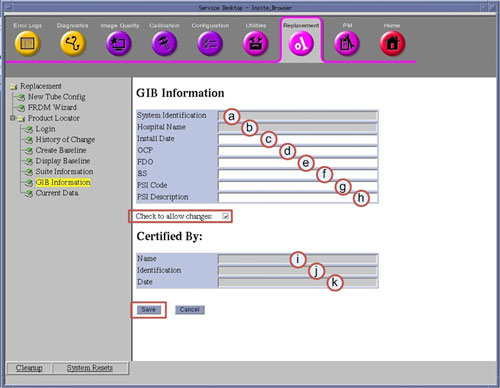
- Click the Check to Allow Change box to enable data entry. The fields displayed can not be modified until this box has been checked.
- Click in each of the fields (c – h) shown above and type in the requested information.note:
Fields (i-k) will be blank and non-editable on first display of the Product Locator GIB Information page. Upon form completion and save of this page, this data will be automatically completed with the login credentials.
- Click the Save button at the bottom of the GIB Information page.
- Click the OK button when the Confirmation
Pop-up window appears.
Figure 7. Confirmation Pop-up Window
- Click on the GIB Information link. The
GIB Information page will appear.
- Select History of Change Link in Product
Locator Menu of CSD
- Click on the History of Change link. The
History of Change page will appear.
Figure 8. Product Locator History of Change Page
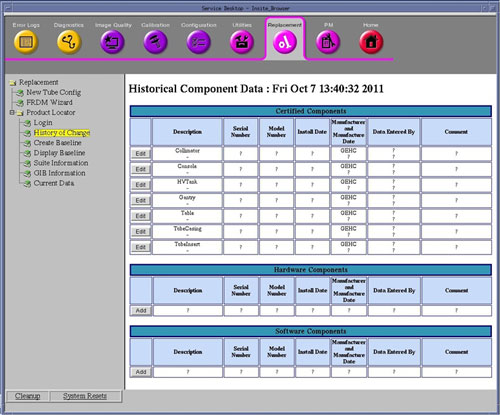 note:The History of Change page is divide into three sections:
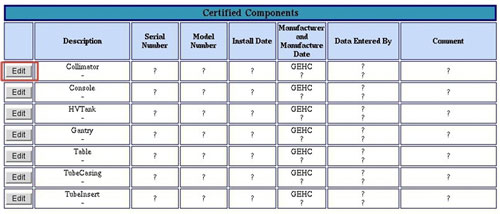
Figure 9. History of Change Page – Certified Components Section
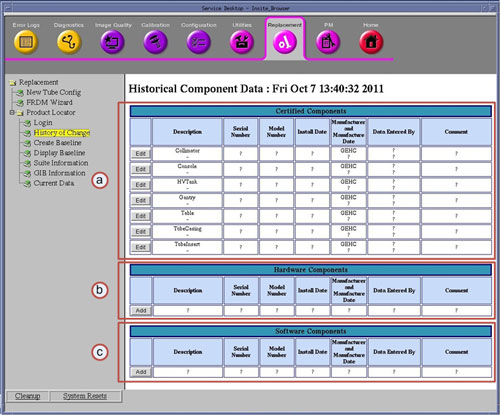
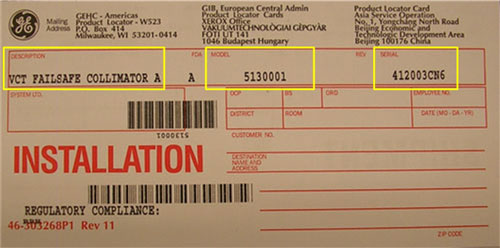
Information (data) required in the above fields of the History of Change page will be taken from Product Locator Cards (PLC) supplied with system or Option.
Figure 10. Example Product Locator Card
- Enter PLC information for each Certified Component in the Certified
Component Sectionnote:
Certified Components shown in this section have been predefined and are permanent entries in the Product Locator Database.
-
Click the Edit button for each of the Certified Components.
Figure 11. Edit of Certified Components Data
-
Enter the following information on the Certified Component Information page that appears.
Figure 12. Component Information Page
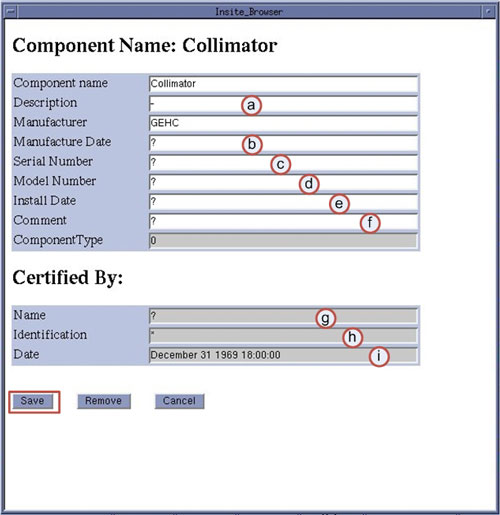 note:
note:Fields (g-i) will be blank and non-editable on first display of the Component Information page. Upon form completion and save of this page, this data will be automatically completed with the login credentials.
-
Click the Save button at the bottom of the Component Information page.
note:After clicking Save on the Component Information page, a Confirmation Pop-up window will appear. It is important to note at this time by clicking OK, one creates a permanent record entry into the Product Locator database. Take time to confirm correct information has been entered.
-
Click the OK button when the Confirmation Pop-up window appears.
Figure 13. Add Component Confirmation Pop-up Window
-
Close the Following Component Was Modified window.
-
If desired, click on the History of Change link again to refresh the display.
-
Continue adding Certified Component Information until all Certified Components have been updated.
-
- Enter PLC information for Hardware Components sectionnote:
Enter additional PLCs in this section, including Accessories and Options that have hardware.
-
Click the Add button to enter information for the remainder of the PLCs that are for Hardware related items (ex: Hardware or Software Options that come with Hardware) in Product Locator.
Figure 14. Add of Hardware Components Data

-
Enter the following information on the Hardware Component Information page that appears.
Figure 15. Hardware Component Information Page
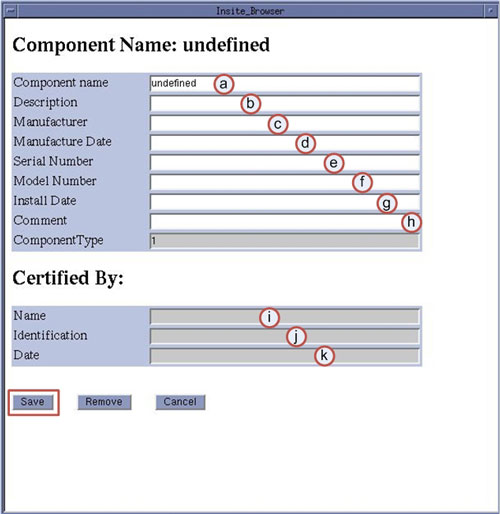 note:
note:Fields (i-k) will be blank and non-editable on first display of the Component Information page. Upon form completion and save of this page, this data will be automatically completed with the login credentials.
-
Click the Save button at the bottom of the Component Information page.
-
Click the OK button when the Confirmation Pop-up window appears.
Figure 16. Add Component Confirmation Pop-up Window
-
Close the Following Component Was Modified window.
-
Click on the History of Change link again to refresh the display.
-
Continue adding Hardware Component Information until all Hardware Options have been entered.
-
- Enter PLC information for Software Components sectionnote:
Enter only Software Options PLCs that do not include hardware.
-
Click the Add button to enter information for the remainder of the PLC Cards that are for Software related items (ex: Software Options) in Product Locator.
Figure 17. Add of Software Components Data

-
Enter the following information on the Software Component Information page that appears.
Figure 18. Software Component Information Page
note:Fields (i-k) will be blank and non-editable on first display of the Component Information page. Upon form completion and save of this page, this data will be automatically completed with the login credentials.
-
Click the Save button at the bottom of the Component Information page.
-
Click the OK button when the Confirmation Pop-up window appears.
Figure 19. Add Component Confirmation Pop-up Window
-
Close the Following Component Was Modified window.
-
Click on the History of Change link again to refresh the display.
-
Continue adding Software Component Information until all Software Options have been entered.
-
- Click on the History of Change link. The
History of Change page will appear.
- Select Create Baseline Link in Product
Locator Menu of CSD
- Click on the Create Baseline link. The
Create Baseline page will appear.
Figure 20. Create Baseline Page
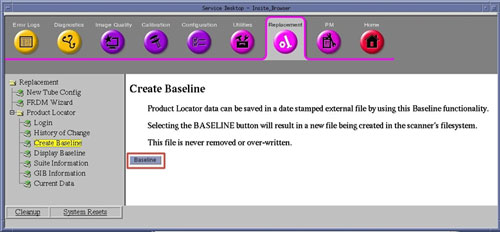 note:
note:Each Baseline created becomes a permanent record (report) in the Product Locator database on the system. A baseline shall be created at installation (or first entry of Product Locator information). Optionally, additional baselines may be created but should be used primarily to capture major changes (Ex: System upgrades or Certified Component replacement).
- Click on the Baseline button at the bottom of the Create Baseline page.
- Click the OK button when the Confirmation
Pop-up window appears.
Figure 21. Create Baseline Confirmation Pop-up Window

- Click on the Create Baseline link. The
Create Baseline page will appear.
- Select Display Baseline Link in Product
Locator Menu of CSD
- Click on the Display Baseline link. The
Display Baseline page will appear.
Figure 22. Display Baseline Page
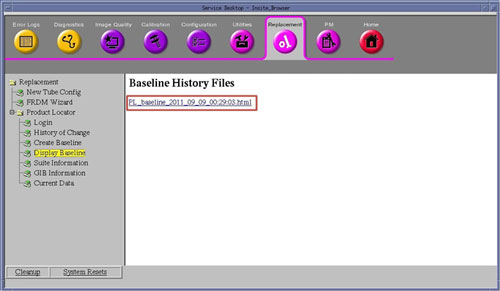
- Click most current PL_Baseline_xxxxx_xx_xx file link displayed on Baseline History Files page.
- The Baseline Report page will appear.
Figure 23. Example Baseline Report Page
 note:
note:The Display Baseline page only displays the most current component data, differentiated by the Description field in the database. Old entries and removed components will not appear on this page.
- Review all information to confirm that Product Locator Baseline
was created.note:
All Baseline files may be reviewed in this manner.
- Close the Baseline Report page
- Click on the Display Baseline link. The
Display Baseline page will appear.
2 Replace, Update or Remove: Product Locator Maintenance
Follow and perform this section of the procedure whenever a Certified Component has been replaced or new Hardware/Software Option or Accessory is added to system.
2.1 Replace: Certified Component Replacement
Procedure
- Access the Product Locator feature by selecting the Product Locator link on the Replacement Tab of the from the Common Service Desktop.
- Ensure Product Locator Login is established. Click on Login link and check status, login if required.
- Click on the History of Change link. The History of Change page will appear.
- Click on the appropriate Edit button for the Certified Component replaced.
- Add new Certified Component information in the Component Information Form that appears, using the information obtained from the Product Locator Card, Part Label and/or Rating Plate supplied with the Certified Component.
- Click the Save button at the bottom of the Component Information page.
- Click the OK button when the Confirmation Pop-up window appears.
- Close the Following Component Was Modified window.
- Click on the History of Change link again
to refresh the display.note:
The new Certified Component will appear with an Edit button and the original entry will still be displayed though no longer editable. Hence a history of all certified components installed on this system is maintained. Certified Components can not be removed from database.
2.2 Update: New Hardware/Software Option Installed
Procedure
- Access the Product Locator feature by selecting the Product Locator link on the Replacement Tab of the from the Common Service Desktop.
- Ensure Product Locator Login is established. Click on Login link and check status, login if required.
- Click on the History of Change link. The History of Change page will appear.
- Click on the appropriate Add button in either Hardware or Software Component sections in the History of Change page
- Add new Hardware or Software Component in the Component Information Form that appears, using the information obtained from the Product Locator Card, Part Label and/or Rating Plate supplied with the Hardware or Software Option.
- Click the Save button at the bottom of the Component Information page.
- Click the OK button when the Confirmation Pop-up window appears.
- Close the Following Component Was Modified window.
- Click on the History of Change link again
to refresh the display.note:
The new Hardware or Software Component will appear with an Edit button.
2.3 Remove: Removing Hardware/Software Options
Procedure
- Access the Product Locator feature by selecting the Product Locator link on the Replacement Tab of the from the Common Service Desktop.
- Ensure Product Locator Login is established. Click on Login link and check status, login if required.
- Click on the History of Change link. The History of Change page will appear.
- Click on the appropriate Edit button in either Hardware or Software Component sections for the hardware or software option to be removed in the History of Change page
- Click the Remove button at the bottom of the Component Information page.
- Click the OK button when the Removal
Confirmation Pop-up window appears.
Figure 24. Removal Confirmation Pop-up Window
- Close the Following Component Was Removed window.
- Close the Component Information window.
- Click on the History of Change link again
to refresh the display.note:
The original entry will still be displayed though no longer editable. The entry will have the Comment and Manufacturer fields updated stating the component was removed. Other fields will still have original data displayed, hence a history of all components installed on this system is maintained.
3 Finalization
Procedure
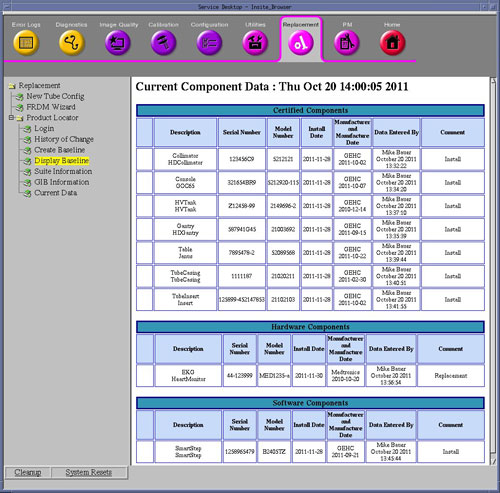
- View Current Data for Product Locator.Select Current Data Link in Product Locator Menu of CSD. The Current Component Data page will appear.
Figure 25. Current Component Data Page

- Review all information displayed for completeness.note:
The Current Data page only displays the most current component data, differentiated by the Description field in the database. Old entries and removed components will not appear on this page.
- If maintenance (update) activities have taken place, create
new Baseline. See procedure for creating a Baseline in Step 6.note:
This step is only required if significant maintenance (update) has been performed (ex: new Certified Component has been entered into Product Locator database). Otherwise the Baseline created earlier in this procedure for first time data entry is sufficient.