- Topic ID: id_17423113
- Version: 3.0
- Date: Apr 22, 2019 12:55:41 AM
Z840 CMOS Battery Replacement, BIOS Settings and ROM Flashing
Prerequisites
Overview
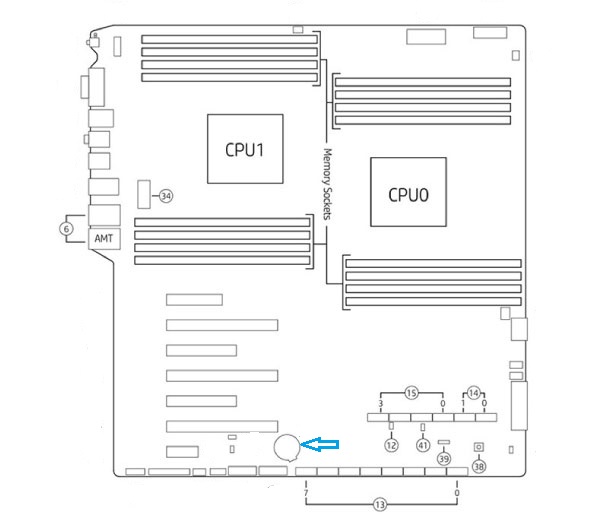
Figure 1. CMOS Battery (3.0V, Lithium Disk Cell – CR2032)

1 CMOS Battery Replacement Preparation and Location
Procedure
- Locate CMOS Battery FRU by referencing the Illustrations below.
Figure 2. CMOS Battery On Motherboard (Not Shown)
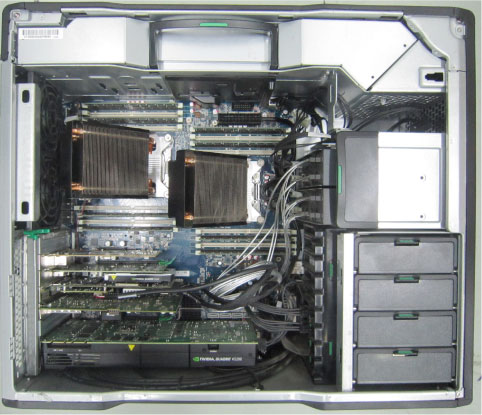
Figure 3. CMOS Battery Location on Z840 Motherboard
- Open the HP Z840 Maintenance and Service Guide manual by clicking on the following PDF icon. Maintenance and Service Guide - HP Z440, Z640, and Z840 Workstation.pdf
2 CMOS Battery Removal
Procedure
- Reference the procedural steps for servicing the HP Z840 computer in the HP Z800 Maintenance and Service Guide HP Z800 Workstation Maintenance and Service Guide.pdf, by looking the pages called out in the following table.
- Open side Access Panel and remove the Expansion Card Support.
- Remove the Recon GPU card to gain access to CMOS Battery.
- Remove original CMOS Battery from Z840 Motherboard and dispose of properly.
- Press and hold the Clear CMOS Button for a few seconds, to clear possible corrupting settings that could have resulted from a weak battery. The CMOS Clear Button is located just to the right of the CMOS Battery.
3 CMOS Battery Install
Procedure
- Reference the procedural steps for servicing the HP Z840 computer in the HP Z800 Maintenance and Service Guide HP Z800 Workstation Maintenance and Service Guide.pdf, by looking the pages called out in the following table.
- Install replacement CMOS Battery on Z840 Motherboard.
- Reinstall the Recon GPU card removed earlier.
- Reinstall the Expansion Card Support and close the side Access panel.
4 NIO64 (Z840) BIOS Settings Procedure
Procedure
- If not already performed, Shutdown and Power OFF the Operator Console.
- Locate the procedural steps for the CMOS BIOS Settings in the HP Z840 Maintenance and Service Guide manual by clicking on the following PDF icon Maintenance and Service Guide - HP Z440, Z640, and Z840 Workstation.pdf and by referencing the pages called out in the following table.
- Power ON Operator Console and press F10 on keyboard when the HP Boot Screen appears.
In Step 5, follow the instructions in the last option shown “Restores the original factory system defaults”. Select File > Default setup > Restore Factory Settings as Default. Press F10 to accept the changes, and then select “Apply Factory Defaults and Exit”. This restores the original factory system defaults.
- Enter Computer Setup again, press F10 on keyboard when the HP Boot Screen appears.
This time change the individual settings listed below in table that are different from the Default settings. Then in step 5, follow instructions in the first option shown “Save Changes and Exit”.
note:if the setting item is not in the Table 4, keep Default setting
note:If the system is configured for Cyber Security Enhancement, apply the additional changes according to System Configuration - Cyber Security Enhancement in product Service Methods CD-ROM.
- Apply and save changes, select File > Save Changes, and then select F10 = YES. This process will configure the NIO64 (Z840) specific settings.
5 ROM Flashing Procedure
Procedure
- If not already performed, Shutdown and Power OFF the Operator Console.
- Locate the procedural steps for the CMOS ROM Flashing in the HP Z840 Maintenance and Service Guide manual by clicking on the following PDF icon Maintenance and Service Guide - HP Z440, Z640, and Z840 Workstation.pdfand by referencing the pages called out in the following table.
- Power ON Operator Console and press F10 on keyboard when the HP Boot Screen appears.
- Follow procedure in the HP Z840 Maintenance and Service
Guide.note:
Flashing the Z840 ROM will reset the BIOS Settings back to HP Factory Defaults. The NIO64 (Z840) BIOS Settings Procedures must be executed!
- Reinstall console covers.