- Topic ID: id_11038752
- Version: 6.0
- Date: Jan 20, 2022 8:42:34 PM
Intercom Adjustment
Prerequisites
Overview
This procedure will enable you to perform the following-
-
Check intercom functionality
-
Adjust intercom board gain and sensitivity (if needed)
Note that two versions of the board are presented in this document. Follow the appropriate section for the board received.
1 Functional Check
Procedure
- At the console set the SCIM patient volume control to its midway point. You should not hear anything in the background when no one is speaking. If someone is talking at the gantry, the intercom should be activated.
- Next rotate the gantry at 0.35 sec (fastest gantry rotation speed) using a DDC (Diagnostic Data Collection) scan with no X-ray. The intercom system will come on briefly while the system is accelerating but should shut off once it reaches the 0.35 sec speed.
- Verify the system will come on when someone is laying on the table and speaking into the microphone while the system is rotating at 0.35 seconds.
- If steps 2 and 3 are working correctly and you can hear the patient clearly there is no need to make any adjustments. Go to Finalization.
- If the intercom system comes on but the volunteer is not heard clearly or the intercom comes on and stays on (or on/off intermittently) during gantry rotation proceed to the adjustment procedures.
2 Adjustment Procedures
2.1 Gantry Intercom Board 2320719
Gantry Intercom Board 2320719 comes with R19 preset to 5.5k ohm and R10 preset to 1.25k ohm. No adjustments are normally needed.
Procedure
- Access the Intercom Board as follows:
- Remove gantry right side cover.
- Stop the rotor of X-ray tube in case of Liquid Bearing Tube before HVDC off. Refer to Liquid Bearing Tube Rotor stop procedure for details.
- Disable Gantry Axial drive, HVDC and 120 VAC from the service switch panel.
- Remove the cover of the Intercom Board (Figure 1) found next to the Service Switch panel, using the Intercom Board Replacement procedure as a reference.
Figure 1. Gantry Intercom Board Location
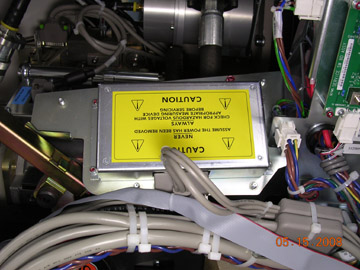
Figure 2. Gantry Intercom Board 2320719
- Verify that the R19 and R10 values are set correctly by using
a multi-meter to measure test points TP1 & TP2 (yellow), for R10,
and TP3 & TP4 (red), for R19. The intercom board must be disconnected
from the system in order to properly measure these test points.
- If the intercom system comes on when the patient is talking but you are unable to hear the person clearly, adjust R19 on the intercom board. Increase the resistance by 1K at a time until you can hear the person clearly. This will increase the sensitivity of ALC also.
- If the system comes on and stays on or if it comes on and off intermittently when rotating at 0.35 seconds, adjust the R10 potentiometer on the intercom board in the gantry. Increase the resistance by 100 ohms at a time.
- Reconnect the intercom board, re-enable gantry power, and repeat the functional check section. Continue this process until the intercom system stays off when no one is talking, is activated when someone is speaking, and the patient can be heard clearly.
2.2 Gantry Intercom Board 5855006 / 5855006-2
Gantry Intercom Board 5855006 / 5855006-2 comes with R308 preset to 25K ohm and R307 preset to 10K ohm. No adjustments are normally needed.
Procedure
- Access the Intercom Board as follows:
- Remove gantry right side cover.
- Disable Gantry Axial drive, HVDC, and 120 VAC.
- Remove the cover of the Intercom board (Figure 1) found next to the Service Switch panel, using Intercom Board Replacement as a reference.
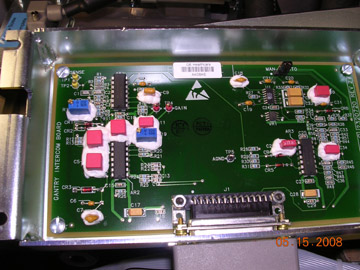
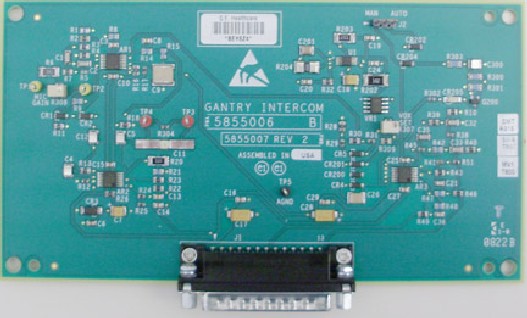
Figure 3. Gantry Intercom Board 5855006
- Verify that the R308 and R307 values are set correctly (within
100ohms) by using a multi-meter to measure test points TP1 & TP2
(yellow), for R308, and between the point R309 and R307 and ground
for R307.The intercom board must be disconnected from the system in
order to properly measure these points.
- If the system comes on and stays on or if it comes on and off
intermittently when rotating at 0.5 seconds, adjust the R308 potentiometer
on the intercom board in the gantry. Increase the resistance by 1-2K
ohms at a time. This will increase the sensitivity of ALC also.note: The red LED illuminating indicates that the system is on. This will assist in verifying when the system turns on and off.
- If, when the system is off, there is too much noise coming through the speaker at the console, adjust the R307 potentiometer on the intercom board in the gantry. Decrease the resistance by 1-2K at a time until desired volume level is reached.
- If the system comes on and stays on or if it comes on and off
intermittently when rotating at 0.5 seconds, adjust the R308 potentiometer
on the intercom board in the gantry. Increase the resistance by 1-2K
ohms at a time. This will increase the sensitivity of ALC also.
- Reconnect the intercom board, re-enable gantry power, and repeat the functional check section. Continue this process until the intercom system stays off when no one is talking, is activated when someone is speaking, and the patient can be heard clearly.
2.3 Gantry Intercom Board 5177862 / 5577862 / 5577862-2
Procedure
- Jumper Plug Setting
- Dip Switch Setting
- Trimmer Adjustment
The following steps describe recommended procedure of trimmer adjustment in system level. These adjustments are not required for board unit.
-
Microphone gain volume setting
Set SCIM patient volume medium (around 5). In case of hard to hear patient voice, adjust the microphone gain volume. The setting range is 0 to 10kΩ, however if it’s difficult to adjust within 3k to 8kΩ, consider other factors as microphone mounting, ICOM volume in console, etc.
note: If audio feedback happens when microphone is ON, set J3 to “MAN” mode to enable microphone. Then adjust “microphone gain volume” until audio feedback disappears. -
Sense volume setting
This step is effective, if jumper is set to “AUTO”, GICOM never mute when the jumper is set to “MAN”.
-
[mute]
Select three (3) representative rotation speeds, confirm GICOM can hold mute state more than five (5) second when the rotation become stable, if it can’t hold mute state, turn the SENSE volume right until it’s possible.
The setting range is 0 to 2kΩ. Even if the volume reaches 2kΩ but GICOM can’t mute stable white noise, consider other factors as microphone mounting etc. Tune the microphone gain volume down (left) makes easy of sense adjustment, deo volente.
-
[signal detect - auto sense]
Stop the gantry rotation, confirm clear communication over intercom. Wheel gantry highest speed, confirm the patient voice audible. Adjust the SCIM volume, if it’s necessary. If GICOM doesn’t detect the patient voice and still mute the microphone input, turn the sense volume left. After auto sense adjustment, confirm the mute test again.
note: GICOM can’t hold mute during gantry speed transition.
-
Usable configuration
Default configuration is defined in Table Table 5, however GICOM has some optional configurations described blow. Per user request, GICOM can be set suitable noise and audio quality. The microphone gain and sense shall be readjusted in case of SW4 setting change
Other Settings are NOT permitted.
note: Reset GICOM by pushing SW1 after changing SW4 setting. -
2.4 Gantry Intercom Board 5577862-3
Procedure
- Jumper Plug Setting
There is not any jumper for service.
- Dip Switch Setting
- Trimmer Adjustment
The following steps describe recommended procedure of trimmer adjustment in system level. These adjustments are not required for board unit.
- Microphone gain volume setting
Set SCIM patient volume medium (around 5). In case of hard to hear patient voice, adjust the microphone gain volume. The setting range is 0 to 10kΩ, however if it’s difficult to adjust within 3k to 8kΩ, consider other factors as microphone mounting, ICOM volume in console, etc.
note: If audio feedback happens when microphone is ON, set J3 to “MAN” mode to enable microphone. Then adjust “microphone gain volume” until audio feedback disappears. - Sense volume setting
This step is effective, if jumper is set to “AUTO”, GICOM never mute when the jumper is set to “MAN”.
- [mute]
Select three (3) representative rotation speeds, confirm GICOM can hold mute state more than five (5) second when the rotation become stable, if it can’t hold mute state, turn the SENSE volume right until it’s possible.
The setting range is 0 to 2kΩ. Even if the volume reaches 2kΩ but GICOM can’t mute stable white noise, consider other factors as microphone mounting etc. Tune the microphone gain volume down (left) makes easy of sense adjustment, deo volente.
- [signal detect - auto sense]
Stop the gantry rotation, confirm clear communication over intercom. Wheel gantry highest speed, confirm the patient voice audible. Adjust the SCIM volume, if it’s necessary. If GICOM doesn’t detect the patient voice and still mute the microphone input, turn the sense volume left. After auto sense adjustment, confirm the mute test again.
note: GICOM can’t hold mute during gantry speed transition.
- [mute]
Usable configuration
Default configuration is defined in Table 7, however GICOM has some optional configurations described blow. Per user request, GICOM can be set suitable noise and audio quality. The microphone gain and sense shall be readjusted in case of SW2 NC setting change
- Microphone gain volume setting
3 Finalization
Procedure
- Replace intercom board cover if previously removed.
- Turn on any gantry service switches previously turned off.
- Replace Gantry side cover.