- Topic ID: task_kl3_5jf_s3b
- Version: 4.0
- Date: Nov 8, 2021 5:11:46 AM
LCD Video Monitor Setup for Z8G4
Prerequisites
This procedure outlines the process required to set up EIZO & HP LCD Display Monitors. If a system has more than one of these monitors, each must be setup. The procedure time listed above is for each monitor. An active video input signal must be connected to each monitor to perform this process.
For an overview of monitor front panel controls and monitor informational messages for the EIZO S1934 LCD Display Monitor, see EIZO S1934 LCD Monitor Screen Manager Controls.
For an overview of monitor front panel controls and monitor informational messages for the EIZO (DIN) LCD Display Monitor, see EIZO (DIN) LCD Monitor Screen Manager Controls.
For an overview of monitor front panel controls and monitor informational messages for the HP E190i LCD Display Monitor, see HP E190i LCD Monitor Screen Manager Controls.
1 LCD Display Monitor Connections and Powering Up
Procedure
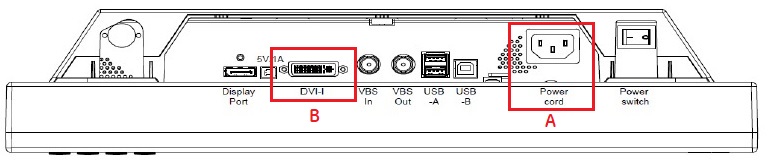
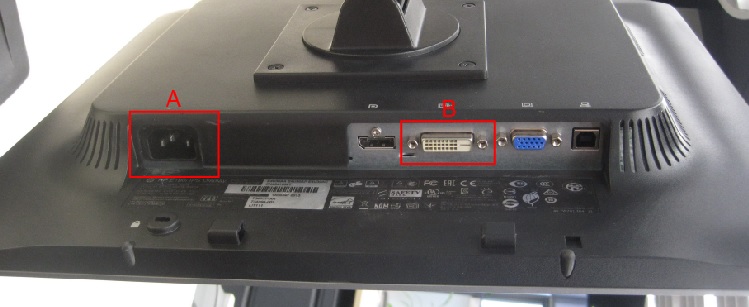
- Connect the video cable(s) between the Operator Console’s HOST computer and each monitor’s inputs. See the following Illustrations for the appropriate LCD Monitor.note: Do not use OEM Manufacturer’s supplied video cables.
-
EIZO LCD Monitor
Figure 1. EIZO S1934 LCD Monitor Connections
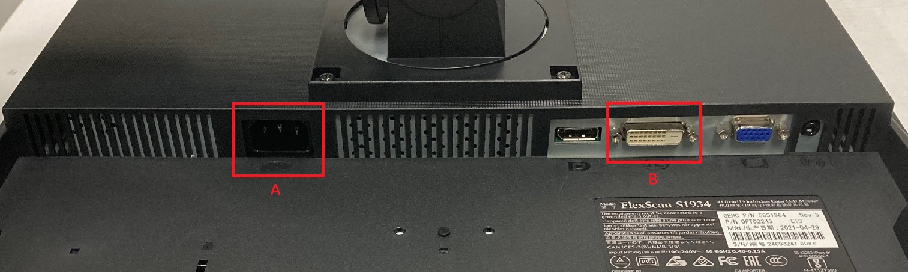
Figure 2. EIZO (DIN) LCD Monitor Connections
-
HP LCD Monitor
Figure 3. HP E190i LCD Monitor Connections
-
- Connect the AC in line cord from the Operator Console to each monitor's rear side using the GE supplied console power cord. See Illustrations above.note: Do not use the OEM Manufacturer's supplied power cord.
- Apply power to each monitor. Press the power button/switch to apply power to each monitor.
2 LCD Monitor Screen Manager Setup and Calibration
The LCD monitor comes configured with OEM default settings and must be properly set up with GE Healthcare Systems settings. The following steps must be performed on all LCD monitors on system.
2.1 EIZO S1934 LCD Monitor, EIZO Screen Manager Setup
Procedure
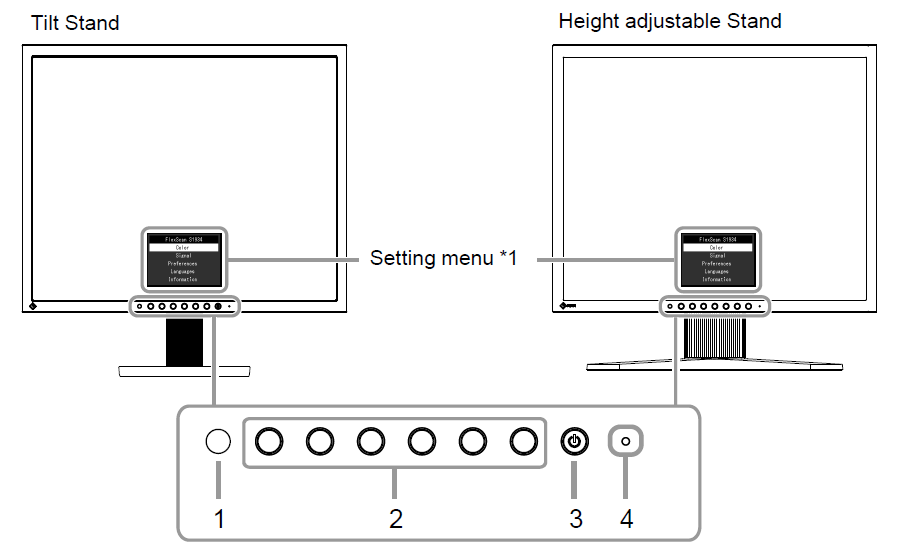
- Access EIZO LCD Screen Manager on monitor display by pressing Operation switches control buttons on monitor front panel. See Figure 4.note: On-Screen Manager detail can be found here EIZO S1934 On Screen Manager Controls.
Figure 4. EIZO S1934 LCD Monitor Control Buttons
- Press the power switch on the front of the monitor to turn it on. This monitor is equipped with EcoView functions to enable users to conserve energy. Use this function to curtail unnecessary power consumption and save on electricity expenses. Saving power also reduces carbon dioxide emissions. (For details on usage, see EIZO S1934 On Screen Manager Controls, 2-4)
- DICOM setup according to customer request. If customer needs to set DICOM, refer EIZO S1934 On Screen Manager Controls, 2-3.
2.2 EIZO (DIN6868-157) LCD Monitor, EIZO Screen Manager Setup
2.2.1 OSD Settings
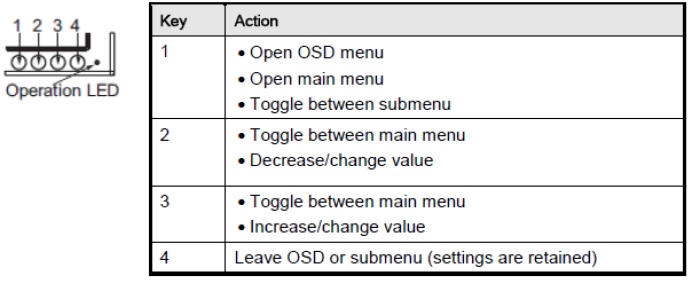
Figure 5. LCD Monitor Operation Key
2.2.1.1 Operator-Room Monitor Settings
Procedure
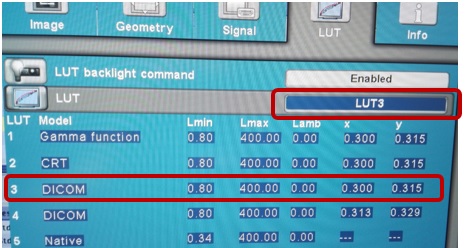
- Keep default setting: "LUT 3" in LUT menu.
- Checking methods:
- Unlock the OSD by the key sequence: press key 4 once and key 2 three times.
- Press key 3, move to LUT.
- Check if the settings are as below.
Figure 6. LUT Model
- Press key 4 to exit.
- Press key 2 to "reject all changes in the OSD".
- Lock the OSD by the key sequence: press key 4 once and key 2 three times.
note: If the following two cases happened on the Site, please follow In-Room Monitor Settings to set the operator room image monitor.- The ambient illuminance in operator room is high and the operator room image monitor can't pass DIN6868-157 test.
- Or, the operator room ambient illuminance is 200Lx to 500Lx during DIN6868-157 test.
2.2.1.2 In-Room Monitor Settings
Procedure
- Unlock the OSD by the key sequence: press key 4 once and key 2 three times.
- Press key 3, move to LUT.
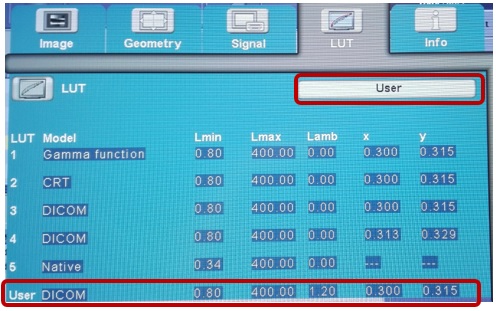
- Press key 1 enter to sub menu, then use key 3 to select User for LUT.
- Press key 4 back to main menu.
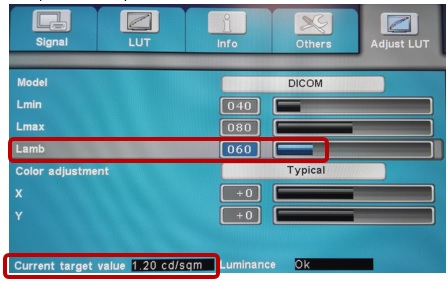
- Press key 3 to Adjust LUT.
- Use key 1 move to Lamb, press key 3 to set as "060", check if the "Current target value (on the OSD lower left corner)" = 1.20cd/sqm.
Figure 7. Adjust LUT Model
- Press key 1 to Color Adjustment, use key 3 to select Typical.
- Press key 4 back to main menu. Use key 2 back to LUT, check if the settings are the same as below.
Figure 8. LUT Model
- Press key 4 to exit.
- Press key 1 to "Save all changes in the OSD".
- Lock the OSD by the key sequence: press key 4 once and key 2 three times.
2.2.2 TG18 Pattern Installing and Viewing
Procedure
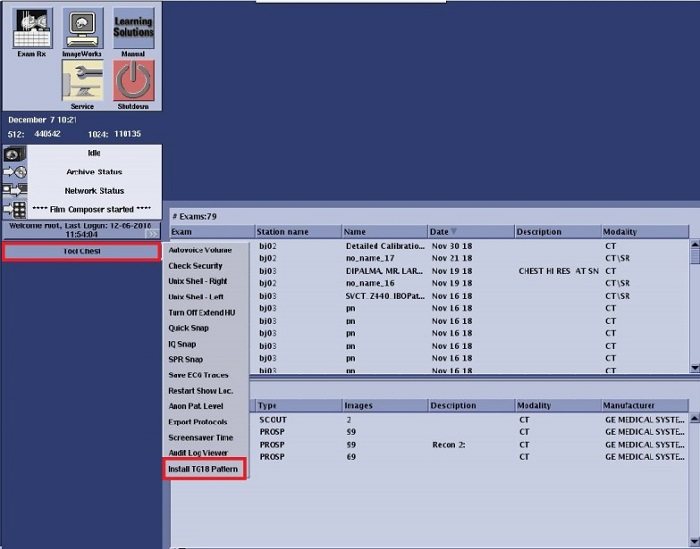
- Click [Tools Chest] button, then select "Install TG18 Pattern" in pop up window.
Figure 9. Install TG18 Pattern
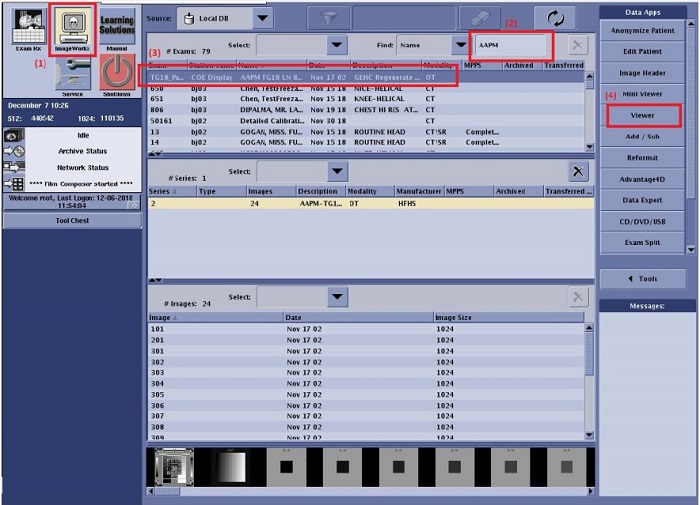
- Switch to ImageWorks (1) window and search "AAPM" (2, image name) in the search bar, then TG18 Pattern will be found in the exam list.
- Choose TG18 Pattern (3) and click "Viewer" (4) to enter the image window.
Figure 10. View TG18 Pattern Exam
2.3 HP E190i LCD Monitor, HP Screen Manager Setup
Procedure
- Access HP LCD Screen Manager on monitor display by pressing Menu control button on monitor front panel. See Figure 11.note: On-Screen Manager detail can be found here HP E190i On Screen Manager Controls.
Figure 11. HP E190i LCD Monitor Control Buttons
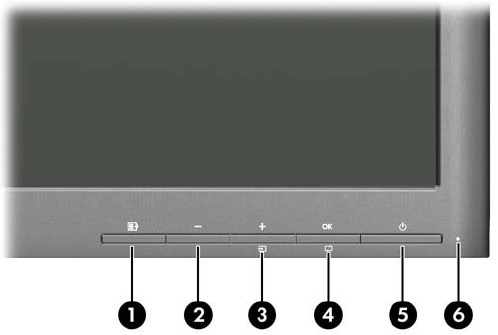
- Press the power button on the front of the monitor to turn it on. If pressing the power button has no effect, the power button lockout feature may be enabled. To disable this feature, press and hold the monitor power button for 10 seconds.
- DICOM setup according to customer request.
If customer needs to set DICOM, press the Menu button and select Color > DICOM using Minus or Plus/Input button. Double press OK button to save, and then exit the OSD menu.
3 Display Monitor Positioning
3.1 Raise and Lower Monitor Screen
Procedure
- Place your hands on the side of the monitor.
- Lift or lower the monitor to the desired height.
Figure 12. Raise or Lower LCD Monitor Screen
3.2 Tilt and Swivel
Procedure
- Grasp both sides of the monitor screen with your hands.
- Adjust the monitor tilt and swivel as desired.
Figure 13. LCD Monitor Tilt and Swivel

4 Finalization
No finalization steps.