- Topic ID: id_17423122
- Version: 3.0
- Date: Jan 20, 2020 8:35:54 PM
Cradle Characterization Procedures
Prerequisites
Overview
Procedure
- Move the table to the proper height position where the cradle can be inserted into the Gantry bore.
- Install the cradle characterization blocks as follows:
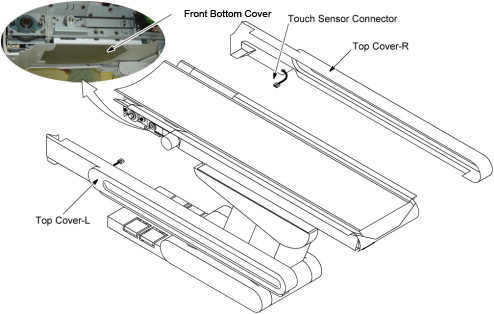
- Remove the following covers and component.
-
Top Right Side Cover (2 screws)
-
Table Front Bottom Cover (4 screws)
Figure 1. Table Covers Removal
-
- Install the characterization block to the front end of the right
guide rail.
Figure 2. Front Characterization Block

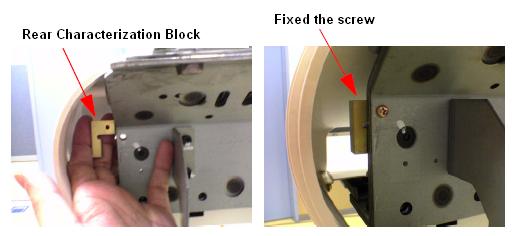
- Install the characterization block to the rear end of the right
guide rail.
Figure 3. Rear Characterization Block
- Remove the following covers and component.
- Set the service switch (MODE_SEL) to the SERVICE position.
- Confirm that the “CRDL” LED on the GTCB board in the table is ON. If it is NOT ON, press the “Motion Target” button until “CRDL” LED is ON.
- Press the two “Characterize” Buttons at the same time to start characterization.
- Confirm that the “UP/IN” LED is ON.
- Using the Service Switches (Fast and Slow), move the cradle IN until the cradle and front characterization block just touch.
- Press the two “Characterize” Buttons at the same time.
- Confirm that the “DOWN/OUT” LED is ON.
- Using the Service Switches (Fast and Slow), move the cradle OUT until the cradle and rear characterization block just touch.
- Press the two “Characterize” Buttons at the same time.
- 5 - 10 seconds later (to write characterization data to the flash memory), confirm that both of LED's (UP/IN and DOWN/OUT) are OFF.
- Confirm that in syslog the cradle characterization completed
and “ABS um per count” shows around 18.3 um/count
If both of LED's blink during procedures, it means that characterization fails. Retry characterization.
- Remove the characterization blocks from the guide rail.
- When finished with characterization set the service switch (MODE_SEL) to the NORMAL position for customer use.
Finalization
- Install the covers in the reverse order of removal.