- Topic ID: id_11038871
- Version: 9.0
- Date: Jan 20, 2022 8:40:46 PM
Torque Wrench Information
This procedure contains the following information:
-
Recommended Torque Wrench Practices, Recommended Torque Wrench Practices
-
General Torque Cross Reference, General Torque Cross Reference
-
Torque Formula, Torque Formula
-
Torque Wrench Accuracy, Torque Wrench Accuracy
1 Recommended Torque Wrench Practices
 |
|

|
|
 |
|
-
Never use a torque wrench to loosen a tightened fastener. Permanent damage of the internal mechanism can occur due to excessive strain.
-
Always approach the specified torque slowly. This is not a speed wrench.
-
Hand location is important. Position one hand at the axis of rotation and one hand on the tool handle. This gives the user stability and accurate torque repeatability.
-
Always approach the desired torque evenly and slowly. If the desired torque is 66 N-m on 4 bolts, then tighten each bolt 50 to 70% of desired value. Then set the wrench to the required torque and tighten slowly until the wrench “Just Clicks”.
-
-
Always release the tension on the torque wrench to prevent “spring set” on adjustable or “clicker” type torque wrenches. This will ensure correct torque settings throughout the range of the tool.
-
Always allow the tool to reach room temperature.
-
Spring tension is the basis of “Clicker” type torque wrenches.
-
A spring’s tension changes with temperature.
-
-
Calibrate the tool on a regular schedule. Follow established local calibration processes.
-
Do not drop or shock the tool. Internal damage can occur. Calibration should be performed to ensure accuracy.
-
Do not attempt to straighten a bent “Beam” or non adjustable wrench. Replace it.
-
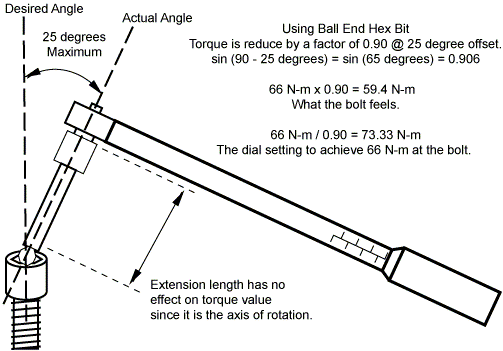
Never use a “Universal Joint” with a torque wrench. The angle of the universal joint can change the torque value by more than 50%.
-
Always use the torque wrench with a 90 degree angle whenever possible.
-
Figure 3 illustrates the effects not being perpendicular.
-
The 25 degree tilt is the physical limit of a Bondhus Ball End Hex key.
-
Use the specified torque value for the HV tank mounting fasteners. Do not attempt to calculate the sin angle correction.
There is less than 2% error for up to 10 degrees of tilt from the desired angle.
-
Minimize the angle as much as possible.
-
-
Always clean fastener threads to reduce friction. Cleaning their threads of Loctite or equivalent thread locking compound can be done with using a brass brush, compressed air or both. Fasteners (Nuts, bolts, studs and screws, etc.) should thread easily using finger pressure.
-
If you cannot clean securing compounds from fastener hardware (nuts, bolts, screws, etc.) replace the used fastener hardware with new fasteners.
-
If there is reason to doubt the integrity of any hardware fastener, do NOT use (or reuse) the fastener. Replace the fasteners (nut, bolts or screws). Do NOT attempt to repair the threads.
note: DO NOT ATTEMPT TO FIELD REPAIR THREADS OF ANY THREADED INSERTS. -
NEVER USE a tap to clean thread inserts or a die to clean studs, bolts or screws. It will damage them requiring replacement.
-
-
Never lubricate a fastener unless specifically instructed. Loctite or equivalent thread locking compound is considered in the design. It must be used when specified.
-
Replace Nylon nuts if they are finger loose.
-
All cable connectors should be finger tightened by alternating between the two thumbscrews, until snug avoiding excessive over torque. The thumbscrew design includes a screwdriver slot designed to ensure access. All cable thumbscrews are required to be finally tightened by using a torque wrench type screwdriver in accordance to the defined torque specification of 45N-cm, (4 in-lbf) for all #4-40 Thumbscrews and receiver hex standoffs.
-
When secured properly, cable connectors will still have slight side to side movement. This is a normal condition.
2 General Torque Cross Reference
The following table is provided as default references only. Use the appropriate replacement procedure to verify the correct torque requirement for each specific fastener.
The Parts List, which may contain Engineering drawings, should also be used as a reference. These drawings call out specific instructions as notations, where needed.
|
|
|
|
Many service operations on this CT scanner require a torque wrench. The use of a torque wrench may appear complicated because there are several standards and metrics. Using conversion factors can simplify that task.
First, only use a calibrated torque wrench. Use a torque wrench that is on a Calibration schedule and is approved by GEMS-AM Service. The kit that can be used that is on a regular Calibration schedule is kit number 46-268445G1. This torque wrench kit has wrenches that measure inch pounds and foot pounds.
Second, make any necessary conversions for the torque wrench you are using. The units of measure are typically marked on most torque wrenches. To make conversions to Kg-cm and Newton meters, use the following conversion factors.
TORQUE CONVERSION FACTORS
-
To convert Kgcm to foot-lbs, multiply Kgcm by 0.07233
-
To convert Kgcm to inch-lbs, multiply Kgcm by 0.8679
-
To convert Kg-cm to N-m, multiply Kgcm by 0.0981
-
To convert N-m to inch-lbs, multiply N-m by 8.8508
-
To convert N-m to foot-lbs, multiply N-m by 0.73756
-
To convert foot-lbs to N-m, multiply lbf-ft by 1.3558
-
To convert foot-lbs to kg-m, multiply lbf-ft by 0.1383
-
To convert inch-lbs to N-m, multiply lbf-in by 0.11298
-
To convert inch-lbs to Kg-cm, multiply lbf-in by 1.1539
3 Torque Formula
T = R x F x sin (angle)
Where:
-
T = Torque in N-m
-
R = Distance from axis of rotation
-
F = Force Applied
-
Sin(90) = 1
From this formula we can see that it is necessary to apply the force at a 90 degree angle to the axis of rotation to achieve accurate fastener torque. This same principle can be applied when using accessories with the torque wrench. See Figure 1 and Figure 2.
Figure 1. Formula to Adjust for Straight Line Accessory
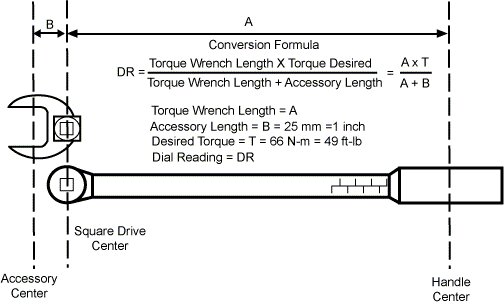
Figure 2. Formula for 90 Degree Accessory Usage
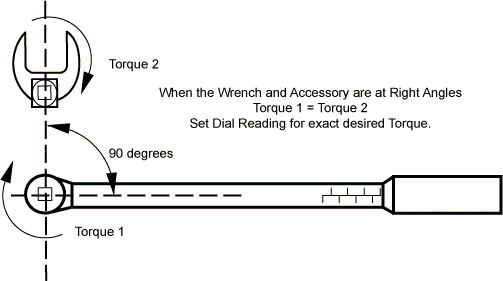
Figure 3. Formula when not at 90 Degree to Axis of Rotation
4 Torque Wrench Accuracy
It needs to be clearly understood that “torque” is an indirect measure of tension or “preload force”. The components of a bolted joint can be defined as,
-
Preload force (Fp), bolt stretch.
-
Tension force (Ft), resistance of bolted materials.
-
Clamping force (Fc), difference of preload and tension forces.
-
Shear force (Fs), sideways or sliding force of bolted materials.
Therefore, Fc = Fp - Ft
With shear force, a properly designed and tightened joint, the friction between the bolted materials absorbs the stress and the bolt itself feels little to no load.
There are other factors that need to be considered as well. Fastener material has a large effect on torque versus preload force. Lubricants can also significantly change the effects of torque versus preload force. Anti-seize compounds can reduce the needed torque up to 20%.
In short, torque measurement is an economical method of achieving a properly tensioned joint. Other methods are available, but training needs and tool expense increase.
Various studies have been performed on the effectiveness of torque wrench accuracy. The following conclusions have been made Table 3.
As demonstrated in Table 3, not using a torque wrench is the worst case event. The “feeling” method also changes with the tool. A 1/4” drive “feels” different than a 1/2” drive.