- Topic ID: id_16157594
- Version: 2.0
- Date: Nov 7, 2019 8:55:02 PM
Data Privacy (EA3 User Authorization) Configuration (17BW11.x or later)
1 Data Privacy
Globally, laws and requirements for patient data privacy have been enacted to protect the health information of individuals against access without consent or authorization. Examples of global privacy standards are: HIPAA - US, Data Protection Act - UK, PIPEDA - Canada, European Union Data Protection Direction - EU.
In order to implement the privacy of patient data, A Data Privacy (EA3 User Authorization) feature is supplied for the system. To enable this feature, it is necessary to configure the system using the System Configuration “reconfig” and EA3 Admin Browser Utilities.
2 Procedure Overview
Note: Procedure formally known as HIPAA Configuration
 |
|
|
|
When Data Privacy (User Authorization) is enabled (configured), the system will display Logon and Logout pop-ups that will require (or in the latter case optionally require) Users to enter account name and password.
Figure 1. Data Privacy (User Logon/Logout) Enabled – User Logon
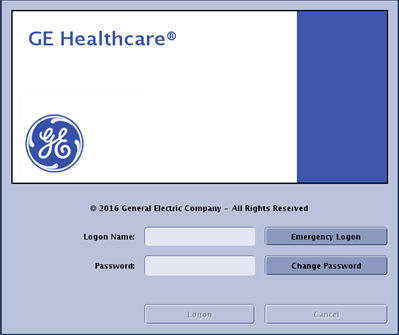
Figure 2. Data Privacy (User Logon/Logout) Enabled – User Logout
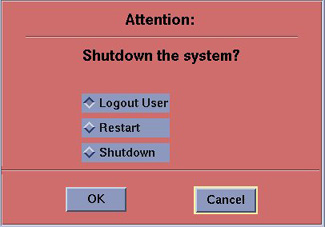
If Data Privacy (User Authorization) is disabled, the system will automatically start Applications and no pop-up window will appear requiring User ID.
3 Configuring Data Privacy (User Authorization – Configure HIPAA)
-
Open the Configure HIPAA in CSD Configuration menu. Enable “HIPAA ON” according to Configure HIPAA Procedure .
-
Reboot the system.
-
Upon the next System start up, a User Logon Pop-up window will appear, requiring User credentials.
-
Use Root logon: Logon Name : root, Password : Type root password
4 Configuring Data Privacy (User Authorization – EA3 Admin Browser Utility)
In order to enable Data Privacy (User Authorization) feature, the EA3 Admin Browser utility must be set such that the Enable Authorization preference is selected:
-
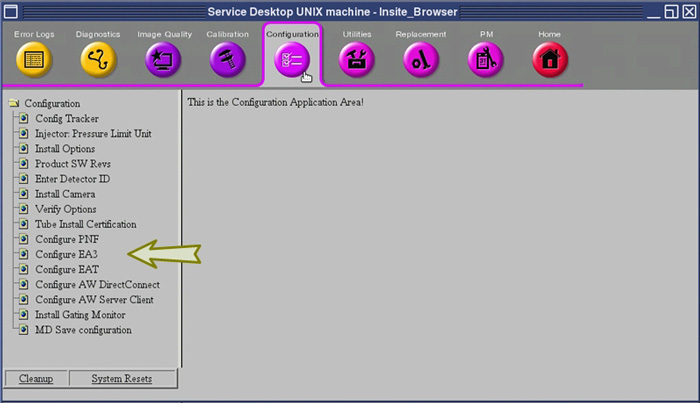
Click the Service Icon on the Display Monitor, and the Common Service Desktop (CSD) will appear.
-
Select the Configuration Tab on the CSD and find the Configure EA3 selection in the menu.
Figure 3. Common Service Desktop, Configuration Tab – Configure EA3
-
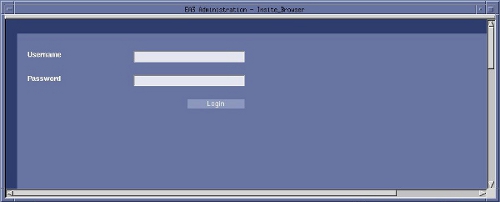
Click on the EA3 Admin Browser Menu item, and the EA3 Administration Logon Screen will appear.
Figure 4. EA3 Administration Logon Screen
-
Open the EA3 Admin Browser Utility by entering the Root logon credentials in the EA3 Administration Logon Screen.
-
Type: root for Username.
-
Type root password, and click Login.
-
-
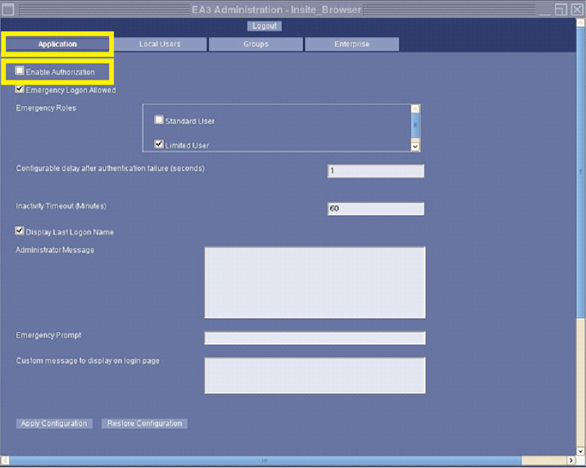
Select Enable Authorization option by clicking on the selection at the top of the Application Tab page of the EA3 Admin Browser.
Figure 5. EA3 Admin Browser, Application Tab – Enable Authorization Selection
-
Set Inactivity Timeout value (in Minutes)
Figure 6. EA3 Admin Browser, Application Tab – Inactivity Timeout
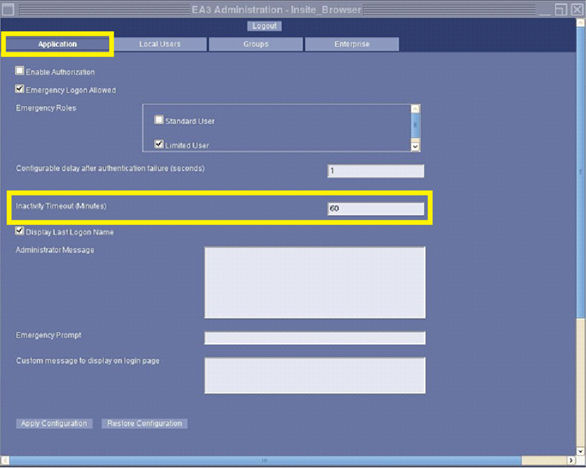 note: Inactivity Timeout value (in Minutes) controls the amount of time allowed for inactivity before the User that is automatically logout. This value is only used with the User Authorization feature and is typically set for 60 minutes. If Data Privacy (User Authorization) feature is not being implemented on the system, this value should be set to zero (0) minutes (default).
 -
Click Apply Configuration button and then click on Logout button to complete configuration.
note: Additionally or instead of, Enterprise User Authorization may be enable via the EA3 Enterprise Tab found in the EA3 Admin Browser.The last tab on the EA3 Admin Browser is the Enterprise tab. On this tab, you can configure the properties necessary to make a connection to an Enterprise directory server (i.e. MSAD, Novell, etc.). The Enterprise Tab is used by the site’s IT (Information Technology) and/or GE Service personnel. It provides connectivity to the site’s remote user database. If you do not have a network established in your hospital or clinic, this tab will not be used. Be prepared to assist the Customer with configuring the system to use the Enterprise Server feature. A detailed explanation and instructions on configuring the Enterprise Tab can be found in the System’s User or Learning and Reference Guide Manuals.
5 Initial Setup of EA3 Administrator Account using EA3 Admin Browser – Local Users Page
Service assistance is required for initial setup of User Accounts using EA3 Admin Browser. Until an Administrator Account is created, the Root User credentials (Username and Password) will be required. The following instructions are for creating an Administrator Account local on the system. The EA3 Admin Browser also supports the use of Enterprise Directory Server (i.e. MSAD, Novell, etc.) for importing User Account maintained elsewhere by the Customer.
Access the EA3 Admin Browser Utility for creating an Local Administrator Account on the system using the following processes:
-
Click the Service Icon on the Display Monitor, and the Common Service Desktop (CSD) will appear.
-
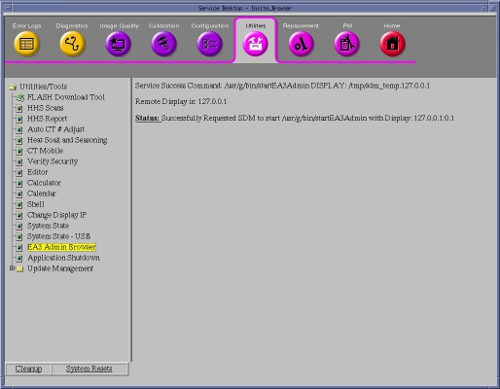
Select the Utilities Tab on the CSD and find the EA3 Admin Browser selection in the Utilities/Tools Menu.
Figure 7. Common Service Desktop, Utilities Tab – EA3 Admin Browser
-
Click on the EA3 Admin Browser Menu item in the CSD , and the EA3 Administration Logon Screen will appear.
Figure 8. EA3 Administration Logon Screen
-
Logon to the EA3 Admin Browser Utility by entering the Root Logon credentials in the EA3 Administration Logon Screen.
-
Type: root for Username.
-
Type root password and click Login.
-
-
The EA3 Admin Browser will appear.
-
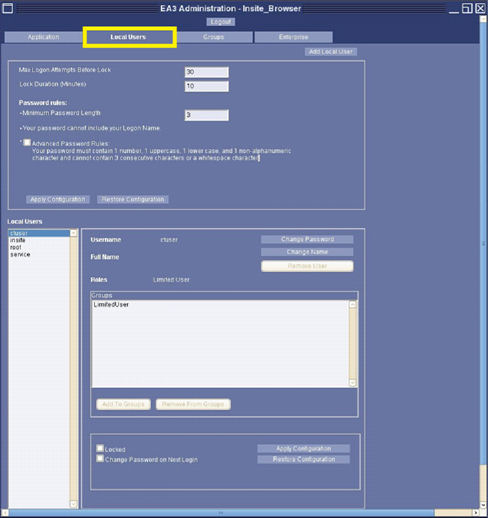
Select the Local Users Tab on the EA3 Admin Browser.
Figure 9. EA3 Admin Browser – Local Users Page
-
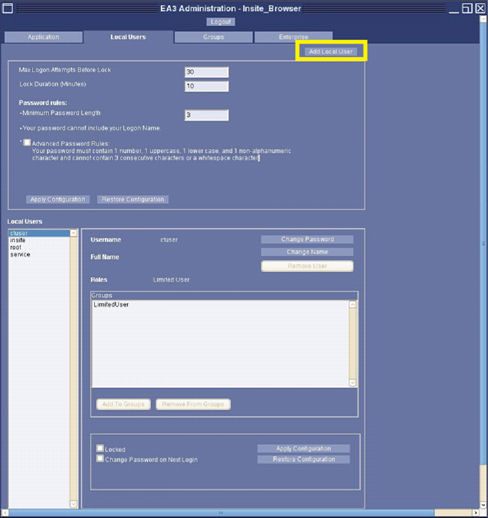
Click Add Local User, and Add User pop-up window will appear.
Figure 10. EA3 Admin Browser – Add Local User Button
-
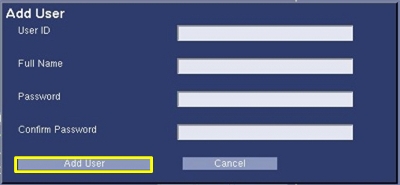
Enter User Information in the Add User pop-up window, then click Add User.
note: New check box was added about “Advanced Password Rules” in order to use higher security level of password setting.Figure 11. Add User Pop-up Window
 note: This User will be assigned EA3 Administrator role/permissions, for the purpose of managing all additional Users. Add Administrator User ID and Password supplied by Customer.
 -
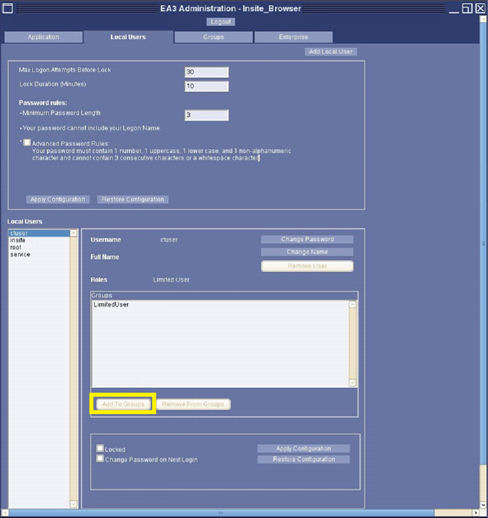
With the new User selected, click Add To Group button, and the Add Membership for User pop-up window will appear.
Figure 12. EA3 Admin Browser – Add To Group Button
-
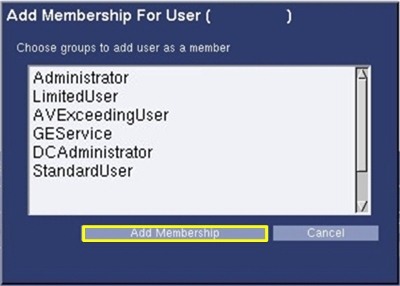
Select Administrator role and click the Add Membership button.
Figure 13. Add Membership for User Pop-up Window
-
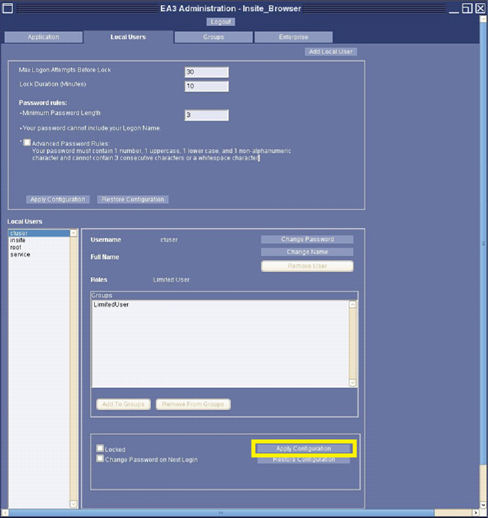
Click Apply Configuration button on the Local User Page.
Figure 14. EA3 Admin Browser, Local User Page – Apply Configuration
-
Logout and of EA3 Adminstrator Browser, by clicking on the Logout button.
-
Again select EA3 Admin browser from the CSD menu or the Dose Check Management Tool, this time logon using the Administrator Account credentials.
-
Turn over system to the Customer for creation of additional EA3 User Accounts and their group membership (roles).
Once an Administrator User Account is created, the use of the Root User Account will no longer be required.
6 Finalization
EA3 User Account information is backed up in System State. Make certain a current System State is saved after EA3 activities have been completed.