- Topic ID: id_2030491
- Version: 2.0
- Date: Sep 13, 2021 2:15:12 AM
MALWARE PROTECTION
1 Overview
Anti-virus is a software used to prevent, detect, and remove malware / viruses.
McAfee Endpoint Security for Linux Threat Prevention as an option. Once installed, the Antivirus software starts protecting your CT system from threats. The software uses the latest anti-malware engine from McAfee.
When enabled, the software checks for viruses, trojans, unwanted programs and other threats by scanning files and folders on local drives, network-mounted volumes and removable media whenever a file is created or accessed. On Access scans are disabled by default for performance reasons.
You can also run scans on demand. An on-demand scan can be initiated from the Security Center by clicking the Antivirus menu item in the left navigation area.
McAfee Endpoint Security (ENSL) is installed when “AntiMalware_McAfee_standalone” or “AntiMalware_McAfee_EPO” option is installed. ENSL can be configured to work in the two modes: Managed mode (i.e., with ePO Server) or Standalone mode (i.e., without ePO server). For managed systems - ePO administrator configures and manage the protection configuration policies using these servers.
- McAfee® ePolicy Orchestrator® (McAfee ePO™)
- McAfee® ePolicy Orchestrator® Cloud (McAfee ePO™ Cloud)
Following are the acronyms used in this section:
- DAT: McAfee DAT Signature Database
- ENSL: McAfee Endpoint Security for Linux
- EPO: McAfee ePolicy Orchestrator
- MSA: McAfee Security Agent
ENSL provides the following Virus Scan methods.
- Custom On-Demand Scan
Custom On-Demand scan must be scheduled from EPO. It schedules a task defined by the user to scan on files and directories at specific times.
- On-Access Scan
This type of scan is disabled because it causes high system load and affect CT functionalities.
- - Policy-Based On-Demand Scan client tasks
Run a Quick Scan or Full Scan on the client from McAfee ePO. Configure the behavior of these scans in the policy settings for an on-demand scan.
To integrate with ePO, additional configuration procedure is required in EPO side. Server-side procedure/methods for configuration of ePO Server are not in scope of this document and need to refer to McAfee Installation / Product Guide for details.
When ePO Server is configured, Virus signature database (DAT) should be updated or scheduled using ePO. Virus scans should also be scheduled from the ePO Server
 |
|

2 Managed Mode (Manage from ePO Server)
2.1 Installation of Anti-Malware solution
When “AntiMalware_McAfee_EPO” option is installed, McAfee Endpoint Security (ENSL) is installed by default.
2.2 Configure McAfee Agent for Managed Mode
Procedure
- Login as user with Administrator privileges in EA3.
- Launch Antivirus UI from Security Center. Click on Antivirus EPO Setup Tab.
Figure 1. Antivirus EPO Setup
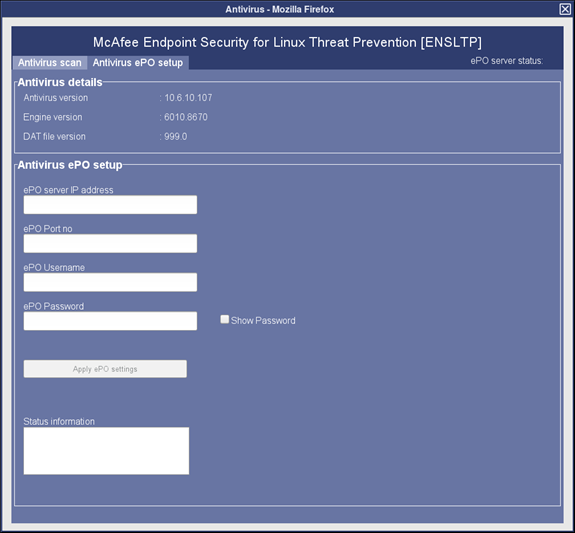 note: Antivirus version installed on the console may be different from the above screenshot version.
 - Fill in the following details
- EPO server IP address : ePO IP Address
- EPO port number : ePO port number
- User Name : ePO server administrator Username>
- EPO password : ePO server administrator Password>
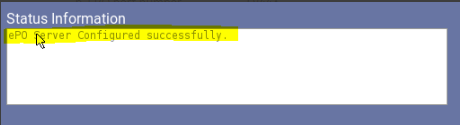
- Apply the configured EPO settings. Check the Status Information box
- Login to the ePO server
- Ensure that the configured system is listed in the system tree in ePO Servernote: McAfee Agent uses port 8081 and 8443 on EPO server and 8081 on CT for Agent-Client communication. Open port for access. Port can be configured in EPO server. If default port is not used, refer EPO server configuration and open appropriate port.
For managed systems, the configurations that you set using the command line is overwritten during the policy enforcement.
Refer to Firewall section on how to add ports 8081 and 8443 to whitelist in order to allow communication between ePO server and McAfee agent.
2.3 Schedule an On-Demand virus scan from ePO server
Refer to McAfee Installation / Product Guide for details on how to schedule an on-demand scan
2.4 Schedule creation for Virus Signature (.DAT file) update on ePO Server
Refer to McAfee Installation / Product Guide for details on how to schedule an on-demand scan.
3 Standalone license mode (when ePO server doesn’t exist)
3.1 Installation of Anti-Malware solution
When “AntiMalware_McAfee_standalone” option is installed, McAfee Endpoint Security (ENSL) is installed by default with a full license.
3.2 Launching McAfee Agent in Stand-alone Mode
Procedure
- Login as user with Administrator privileges in EA3.
- Launch Antivirus UI from Security Center. Click on Antivirus Non-EPO Setup Tab.
Figure 2. Launching Antivirus application in Stans-alone mode
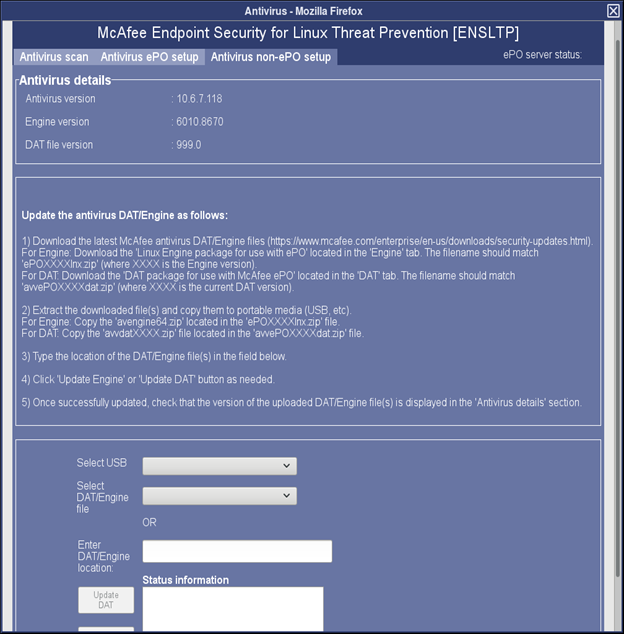 note: Antivirus version installed on the console may be different from the above screenshot version.
3.3 Stand-alone Mode Cron jobs
When “AntiMalware_McAfee_standalone” option is installed, a weekly cron job is scheduled to run the antivirus scans and engine & DAT updates.
The user can specify the antivirus scan time by running /usr/g/scripts/schedule_antivirus.sh. The default scan time is 3:00 AM every Friday.
3.4 Start Anti-virus scan manually
Procedure
- Login to EA3 as a user with Administrator or GE service privileges.
- From the system utilities Menu, select Service to open the service desktop application.
- Select Utilities Tab, select “Security Center”.
- Select Antivirus UI sub-menu item from the Application menu.
- Click on Antivirus Scan tab in Antivirus GUI.
- Click on “Start Scan” button.
Figure 3. Start Anti-virus scan in Standalone mode
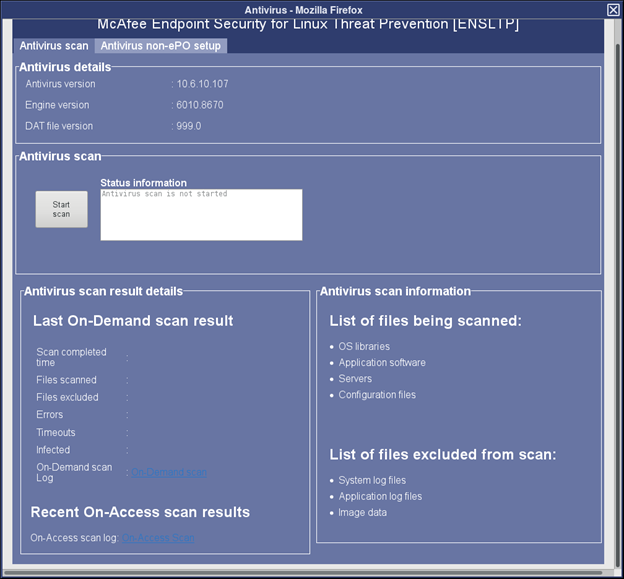
Once user click on “Start Scan” , Anti-virus scan will be running state.
Anti-virus scan will take 30min ~1 Hour or more based on System available resources. Please wait to complete anti-virus scan.
- Once Virus scan completed, message “Antivirus scan is completed” will be shown in Status Information pane.
Figure 4. Anti-virus scan completed in Standalone mode

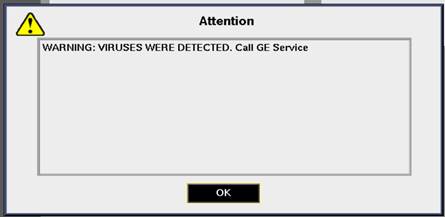
If any virus detected during anti-virus scan, then it will through attention pop-up with following message “WARNING: VIRUSES WERE DETECTED. Call GE Service”.
3.5 Procedure to update Anti-virus cron schedule
Procedure
- Launch Security Center and expand the Antivirus accordion by clicking on it.note: It will show current cron schedule for Antivirus scan.
- Click on pencil icon to edit schedule which launch Edit Job Schedule pop-up.
Figure 5. Anti-virus cron job schedule

- Click on Occurs drop down menu in Edit Job Schedule and choose the occurrence.
- Based on occurrence selection choose time accordingly.
- Click on Submit in Edit Job Schedule.
A message “Successfully updated” will be displayed to indicate that cronjob updated successfully or throw an error on why failed to update cron schedule.