- Topic ID: id_23554441
- Version: 3.0
- Date: Dec 22, 2021 11:14:07 PM
Samba Installation
Prerequisites
Overview
This procedure defines how to install Samba on to a system and map to a hard drive location on a Microsoft Windows based computer. The Advantage 4D Option uses a Microsoft Windows based system. Loading and enabling Samba on a system with Advantage 4D option allows for data to be quickly transferred between the Console and the Windows based system used by the Respiratory Gating Device software.
1 Confirming Network Connectivity Requirements
Procedure
- Make sure that an Ethernet cable is connected between the Respiratory Gating Device computer and the facility network (LAN).
- Check to make sure that the Respiratory Gating Device computer
has an IP address in a Command Window:
- From Windows select:
- Type: cmd
- Type: ipconfig
Figure 1. IP Address of Respiratory Gating Device Computer
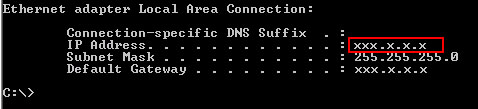
- Note the IP Address.
- Type: exit to close the command window.
2 Installing the Samba Software on the Console
2.1 Installing Samba Software
Procedure
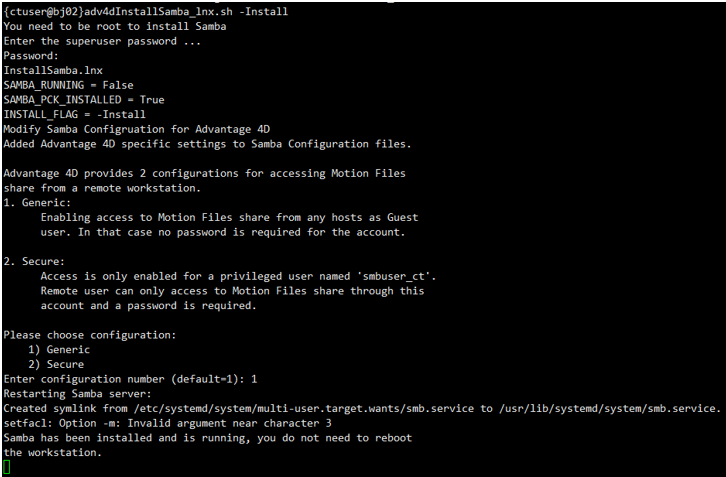
- Open a unix shell.
- Type: cd adv4d/scripts
- Type: adv4dInstallSamba_lnx.sh -Install
- Enter: <Password> (GE software root password).
- To proceed:
- If the Customer wants limited access to the respiratory files on the Respiratory Gating Device computer, type: 1 (No password will be required to establish a network between the Respiratory Gating Device computer and system Console.)
- If the Customer wants open access to the respiratory files on
the Respiratory Gating Device computer type: 2 (This option will require that the User types in a password to establish
a network connection between the Respiratory Gating Device computer
and system Console each time the Respiratory Gating Device computer
is turned on or rebooted.)
-
When asked, enter a unique password. (This password will need to be entered each time access to the Respiratory Gating Device computer is required.)
-
IMPORTANT! Write down the password. This password will be needed later in this procedure and must be given to the Customer for continued use.
Figure 2. Samba Installation Screenshot
-
- Press Ctrl + C in the command window.
- Type: exit to close the command window.
- (For 21BW19.24) Reboot the workstation must be performed.
2.2 File Transfer Setup
Procedure
- Go to the Service desktop.
- Select: CT Service desktop.
- Select: Configuration tab.
- Select: Configure PNF.
- Make sure Firewall is enabled.
- Select: Allowed Nodes option.
- Enter the IP address of the Respiratory Gating Device computer into the IP field.
- Select: ADD.
- Select: Apply.
3 Installing Samba Software on the Respiratory Gating Device Computer
Make sure the Ethernet cable is connected to the network and that the Respiratory Gating Device computer has an IP address.
Procedure
- (For Windows 7) On the Windows Desktop right click on the Network Neighborhood or My Network Place icon.
(For Windows 10) On the Windows Desktop right click on the File Explorer -> Network icon.
- Select: Map Network Drive. (Leave the selected drive as the window shows.)
- In the Folder field:
- Type: \\ipaddress of Console\adv4dexport
- Make sure that “Reconnect at Login” is checked.
- Select: Finish.note: If the User selected Type 1 for the Samba Installation on the Console, then no username or password will be required to establish the network connection between the Respiratory Gating Device Computer and System Console.
If the User selected Type 2 for the Samba installation, they will be prompted for the username, which is “smbuser_ct”, and the password, which was created during the Samba installation at the Console.
-
(For Varian RPM) To set the new drive as the default export directory for respiratory files:
- Open the Respiratory Gating Device software.
- Select: View.
- Select: System Configuration.
- Select: File Export tab.
- In the Export File Location, browse to find the newly added mapped network drive.
-
(For Anzai System) To set the new drive as the default export directory for respiratory files:
- Open Anzai software.
- Select: System.
- Select the 4th button, Data Acquisition.
- In the Data Save To, browse to find the newly added mapped network drive.
- This completes the setup.
4 Samba Protocal File
21BW19.24 supports Samba 1.0/CIFS and 2.0/CIFS, if the user wants to use 2.0/CIFS, proceed the following steps to disable 1.0/CIFS:
Procedure
- Click Start -> Settings.
Figure 3. Settings

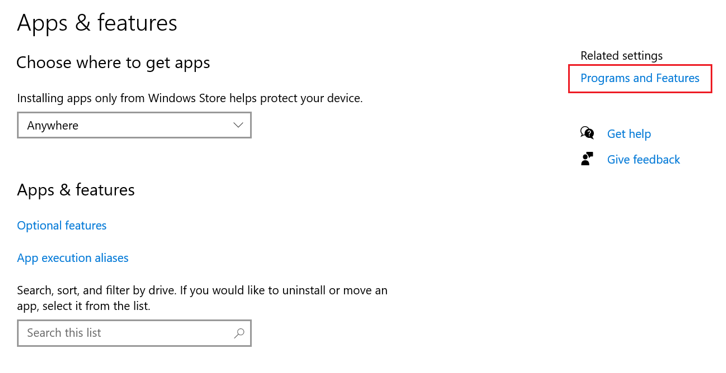
- Select Apps -> Programs and Features.
Figure 4. Apps
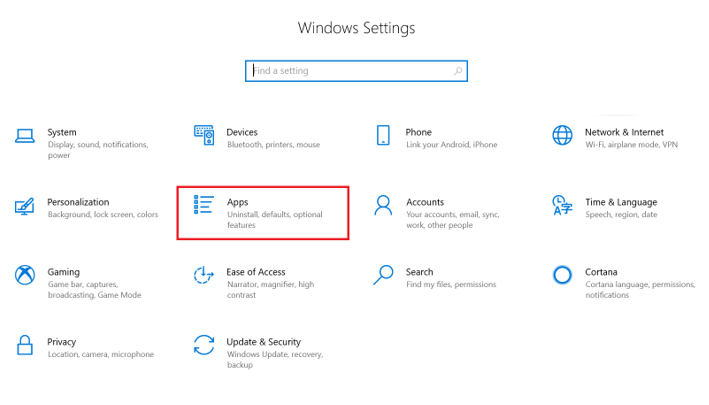
Figure 5. Programs and Features
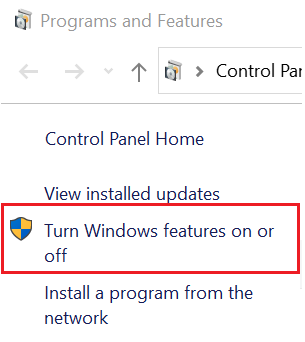
- Click Turn Windows features on or off, select Yes to allow app changes.
Figure 6. Turn Windows feature on or off
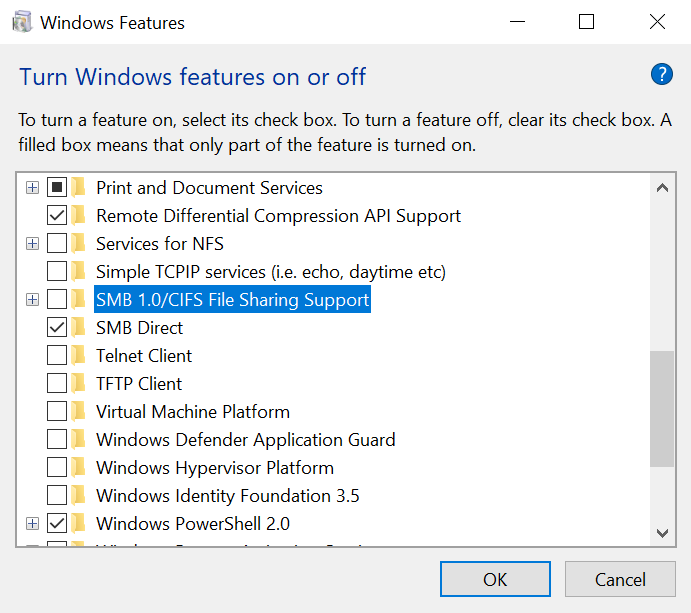
- Deselect check box SMB1.0/CIFS File Sharing Support, then click OK to wait windows reboot.
Figure 7. Windows feature