- Topic ID: id_23554587
- Version: 2.0
- Date: Sep 26, 2020 10:11:29 PM
ISO Alignment Procedure (RT)
Prerequisites
Overview
Procedure Effectivity:
1 Overview
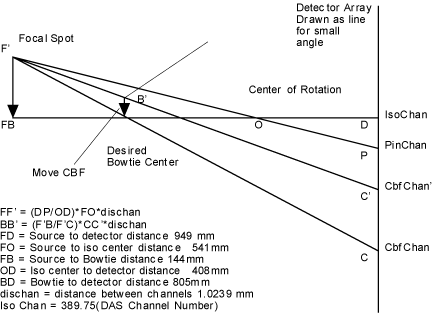
The geometry of ISO alignment is shown in Figure 1. The following computational software are required for ISO alignment:
Procedure
- Centroid calculation program as used by CT/I.
- ISO and CBF computation.
Figure 1. Geometry for CBF/ISO Adjustment
The scans required for ISO are the following:
-
Air scans:
-
80 kV/40 mA/ 4x500 FET Setting/4x500 aperture /4 sec/small spot/air filter/ rotating
-
80 kV/40 mA/ 4x500 FET Setting/4x500 aperture/4 sec/large spot/air filter/ rotating
-
-
Pin scans:
-
80 kV/40 mA/ 4x500 FET Setting/4x500 aperture/4 sec/small spot/air filter/ rotating
-
80 kV/40 mA/ 4x500 FET Setting/4x500 aperture/4 sec/large pot/air filter/ rotating.
-
For all above ISO/CBF scans, DAS gain should be set to its default level for that technique. After the scans are taken, the following computational steps should be carried out:
-
Normalize scan data 3 & 4 using air scans 1 and 2 respectively.
-
Compute centroid using data from scans 3 and 4 and average over all rows.
-
Average the two numbers obtained in step 2 for large and small spots. This is our average centroid value.
-
If the average value is at DAS Channel 389.75 ±.02 channels, the adjustment is done. Else move the tube by the following: move = (average value - IsoChan) *dischan* (FO/OD) mm
-
Where: IsoChan = 389.75
-
Dischan = channel to channel distance 1.0239 mm
-
FO = source to iso center distance 541 mm
-
OD = Iso center to detector distance 408 mm
-
Take scans 3 and 4 and repeat centroid computation. Please note that if the computed ISO channel is out more than 1 channel, all four scans must be taken for each successive iteration.
Please note that the ISO values for small and large focal spots must be saved for use by the reconstruction process.
-
2 Procedure
Procedure
- Launch the Calibration –>ISO Alignment tool from the Common Service Desktop.
- Perform Tube Installation Certification, if needed. Refer to SmarTube™ Setup.
- Execute Air scan (small spot).
- Execute Air scan (large spot).
- Place the 1/8 inch screw driver on the phantom holder (should be pointing into the Z direction).
- Execute pin scan (small spot).
- Execute pin scan (large spot).
- CALCULATE ISO center alignment.
- Mount dial indicators on the POR and ISO dial mounting brackets
used for tube alignments.
Make sure that you zero the indicators.
- Loosen the 4 M-12 bolts on the tube assembly about 1/2 turn.
- Adjust the tube UP / DOWN as indicated by the calculation. The
gold adjustment bolt is located near the top of the tube.
As you move the tube for ISO alignment, the POR dial will show that the tube also moves in the Z-direction. Since you zeroed a dial indicator at the POR position, you will be able to keep both POR and ISO in alignment. Often times, alternating between the two adjustment bolts helps keep the tube in place. Be patient while you are aligning, the slower you go, the less iterations this alignment will take.
note: You may need to do this at the 12 o’clock position. - Snug the four (4) M12 bolts and verify dial gauge still reads
the correct adjustment value.
Snug the bolts slowly, using a star pattern. Watch the dials to ensure that the tube is not moving during this process.
- Repeat steps 1 through 6.
- If the adjustments are within limit proceed to the next step, otherwise go to step 9.
- Tighten the M12 tube mounting bolts to the Pre-load torque specification.
Refer to Table 3.
- Apply final torque on all four M12 mounting bolts. Refer to Table 4.