- Topic ID: BJ_211012_Y01
- Version: 2.0
- Date: Dec 22, 2021 11:16:57 PM
Host Computer Image Database Reset (not applicable to SUSE)
Prerequisites
Overview
The follow procedure describes and illustrates the Host Computer Image Database Reset procedure commonly referred to as “resetImageDB_Linux” script. It is important to follow the steps listed below in order.
This script shall only be used as a last resort to clear corrupted data (images or database structure). All Image data stored on the Image Disk will be deleted and the Hard Disk Drive re-partitioned!
Procedure
- Reboot the Operator Console.
-
If Applications are running, reboot system by clicking the Shutdown ICON on the desktop and select the restart option. Or
-
Open a Terminal Window using the Toolchest.
Type: {ctuser@hostname} reboot ENTER
-
- Just after the Operating System finishes loading and before Applications start, Click Cancel in the Application Startup Window to stop the Application from loading.note: Application cannot be running when performing this procedure.
- Open a Terminal Window using the Toolchest.
-
Type: {ctuser@hostname} su – ENTER
-
Type the root password and press ENTER
-
- Launch the Host Computer Image Database Reset utility.
Type: [root@hostname] resetImageDB_Linux ENTER
- The Terminal Window will update, warning the User that all images stored in the Image Database on the Host Computer will be deleted. User is prompted to type “YES” to continue with the reset of database, or abort the script by either closing the Terminal Window or by pressing ENTER.
Figure 1. Terminal Window
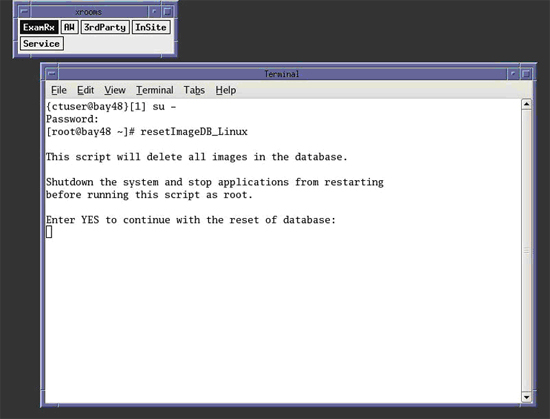
- Continue with Image Database Reset procedure. Type: [root@hostname] YES
ENTERnote: Must be all capital letters.
- The script will delete any images found, partition the Image Disk, and recreate the Image Database.
Figure 2. Terminal Window - Image Database Reset Finished

- After completing Image Database Reset, press Control - D to switch Terminal Widow user back to {ctuser@hostname}.
- Start application by typing {ctuser@hostname} st ENTER
Finalization
Refer to System Scanning Test to confirm proper operation.