If Applications are up, click on the Shut Down button.
Power OFF the Operator Console front switch, when instructed
to “Power Down”.
Remove left side console cover.
Remove console rear panel to access host computer rear panel.
Disconnect cables from host computer rear panel.
Remove and retain the four (4) front mounting screws.
Slide out the HP Host Computer module.
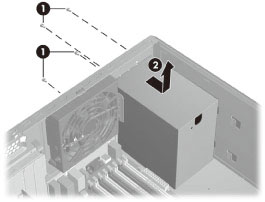
2 Remove Old Power Supply
Procedure
Remove the side access panel.
Write down the numbers on the cables to easily reconnect the
cables to the correct devices.
Disconnect power supply cables from the system board, drives,
and cards.
Remove the four screws from the host computer back panel. Refer
to Figure 1
Figure 1. Remove Power Supply
Slide the power supply toward the front of the chassis, and
then lift it out of the chassis.
3 Install New Power Supply
To replace the power supply, reverse the steps in the previous
section.
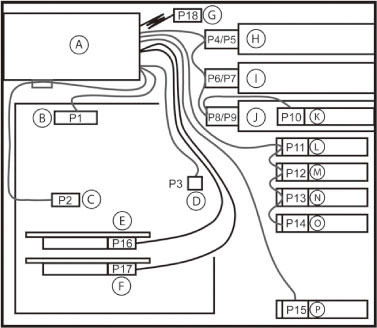
4 Power connections to system components
For help with identifying power cables, see below illustration
and Table . Ensure that all cables are routed or tied so they cannot
interfere with the processor heatsink fans.
Figure 2. Identifying the workstation power connectors for a typical
configuration
5 Finalization
Procedure
Take some scans, verify the image(s) reconstruct and are displayed.