- Topic ID: id_23554303
- Version: 3.0
- Date: Nov 27, 2020 2:18:44 AM
GTCN Replacement
Prerequisites
Procedure
- Raise the Table to maximum height.
- Move the Cradle and IMS to OUT limit position.
- Remove power from Table by turning off 120VAC, Axial Drive and HVDC switches on Service Switch Panel.
- Remove the following Table Covers:
-
Top Cover (Left)
-
- Cut any tie-wraps, and disconnect all cable connector from the GTCN Assy.
- Unscrew 6 screws, and remove the GTCN Assy.
-
(For Global PET/CT Table, GT1700 and GT2000 Table) Install the new GTCN Assy into place, and tighten the 6 screws.
One of the screws is used for Table type identification. Select the
appropriate screw position depending on your Table type.
(For High Capacity Table) Install the new GTCN Assy into place, and tighten the 7 screws. Two of the screws are used for identification of High Capacity Table at both Long and Middle location.
Figure 1. GTCN Assy
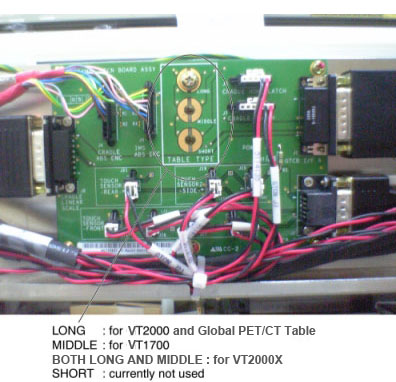 note:
note:Screws must tightened at both Long and Middle location for High Capacity Table.
- Re-connect all wires and cable connectors, and fix the cables using tie-wraps.
Finalization
- Re-install the Table covers.
- Power up the Table from the Service Switch Panel.
- Verify that the Cradle and IMS function is operating normally.