- Topic ID: id_23554230
- Version: 2.0
- Date: Sep 26, 2020 10:11:30 PM
Detailed Calibration Process
Prerequisites
Overview
Figure 1. Calibration Flowchart: Non-Bow-tie, Bow-tie, and Phantom Centering
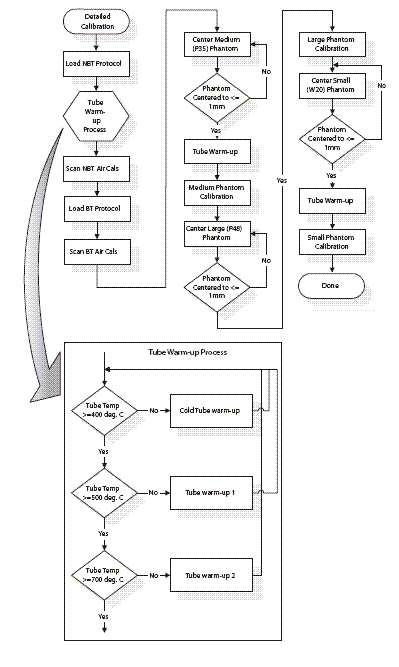
Figure 2. Calibration Flowchart: Non-Bow-tie, Bow-tie, and Phantom Centering
Calibration Flowchart.pdfProcedure
- System performs gantry balance check. If this test does not pass, it is not recommended that you perform calibrations until the balance issue is resolved.
- Bring up the main menu: It is represented as an icon located on the bottom of the screen labeled as SCANNER UTILITIES. Click the on-screen Scanner Utilities button (left head).
- The Main menu consists of the following three button selections:
-
Detailed Calibration - Brings up the Detailed Calibration screen.
-
Adjust CT Number - Not implemented at this time
-
Quit - Exits the application
-
- Detailed Calibration menu.
Click the on-screen button DETAILED CALIBRATION. The Detailed Calibration screen consists of several rows of toggle buttons that can be selected to build the desired techniques needed to perform detailed calibration processing. These buttons are located on the top left area of the screen.
-
kV toggle button selections: 80 kV, 100 kV, 120 kV, and 140 kV.
-
SFOV toggle button selections: Small/Head and Large/Body
-
Slice Collimation toggle button selections: 4x1.25, 4x2.50, 4x3.75, and 4x5.00.
-
Focal Spot toggle button selections: Small and Large.
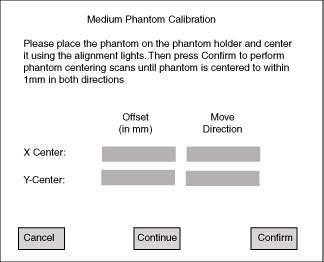
note: The defaults select all techniques and aperture settings. The customer has the option to select specific kVs that are used most often. It is preferred to calibrate all kV stations. All aperture settings must be calibrated or they cannot be used for scanning.Figure 3. Phantom Centering and Calibration Screen
 note: There is also an option to perform new non-bow-tie air calibrations whether data from previous non-bow-tie calibrations exist in the CAL database or not. New non-bow-tie air calibration data can be created by selecting the option button labeled as “Acquire Non-Bow-tie Air Scans” on the GUI. If this button is not selected, then the application performs a series of checks to determine whether non-Bow-tie air scans are necessary. Click the on-screen button CONFIRM.
 -
- Activation (Scan List) Screen:
Initially, the scrolled window on this screen displays a list of all scans that are performed for one of the following processes:
-
Tube Warm up processing: Cold Warm up, Warm up 1, or Warm up 2
-
Non-Bow-tie Air Calibration processing
-
Bow-tie Air Calibration processing
The Activation screen title changes dynamically to indicate which process is currently running.
If for any reason a problem is detected, the current scan and processing aborts and the last scan be reacquired. When a problem is detected, the Activation screen’s “Pause” button becomes a “Resume” button, scanning and processing of the current scan is aborted, and an error message may be displayed on the log.
At this point, selecting the “resume” button is recommended to reacquire the last scan in order to continue the detailed calibrations. This logic is implemented for all air and phantom scanning and processing.
-
- Phantom Centering and Calibration Screen: This screen is displayed
automatically after the air calibrations complete successfully. For
each Phantom there are two functions that must be accomplished on
this level of processing: phantom centering and phantom calibrations.
Medium, Large and Small phantom centering and calibrations are accomplished
respectively using this GUI window.
- notice
- Place the correct size phantom on the phantom holder of the Gantry.
- Align the phantom manually on the gantry by using the alignment lights as a guide.
- On the small water phantom, make sure the alignment lights are centered on the water section. The black markers on the phantom are centered on the resolution section and the center of the water section is 60mm (2-3/8 inches) in front of the markers.
- Select the CONFIRM button to calculate the accuracy of the alignment. A list of scans needed for phantom centering is displayed and executed. When this process completes, the Activation screen disappears and the x and y coordinate values are displayed in the “Offset” fields provided for the “X-Center” and “Y-Center” rows. These fields are located directly below the instructions field.
- If either x or y coordinate value is greater than 1mm, repeat steps 2 and 3 until both values are less than or equal to 1 mm. The values in the field “Move Directions” indicate where to move the phantom on the gantry to help in aligning the phantom more accurately.
- Once x and y coordinates are less than or equal to 1mm, the phantom is centered and ready to be calibrated. Select the “Continue” button to begin calibrations.
- The “Cancel” button may be selected at any time
while scanning is not in progress. This brings down the window and
re-displays the Detailed Calibration screen.note: As soon as the CONTINUE button is selected, the application checks the X-ray tube temperature to determine whether the tube needs to be warmed up before scanning can begin.

Finalization
No finalization steps.