- Topic ID: id_23554639
- Version: 2.0
- Date: Nov 27, 2020 2:09:19 AM
Connecting Laptop to Console
Prerequisites
Overview
This document describes the processes associated with connecting a laptop to the console in order to access the Common Services Desktop (CSD).
Telnet and FTP are no longer open on the backbone connection. You must use the network connection at the front of the console to access the CSD interface while performing calibrations in the room.
1 Console FE Service Port Setup
Procedure
- Open a UNIX shell on the console.
- Enter the following:
su -
#bigguy
note: Entries are case sensitive. - At the prompt type: enableFEport. Ouput similar
to the following example is returned:
root@bay47]# enableFEport
Console eth4 address is 10.44.22.20
Do not use 10.22.44.21 for laptop - EKG Monitor is using this address.
Do not use 10.44.22.22 for laptop - AW is using this address for DirectConnect.
2 Laptop Setup to Static IP 10.44.22.50
Procedure
- To configure a laptop for a static IP address, on the Desktop right click on My Network Places.
- Select Properties.
- Select Local Area Connection.
- Select Properties.
- Select Internet Protocol (TCP/IP). See Figure 1.
Figure 1. Local Area Connection Properties
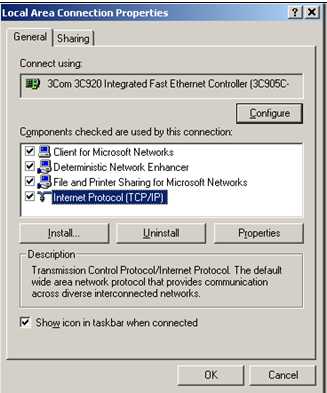
- Select Properties. The Internet Protocol (TCP/IP) Properties window opens.
- Select Use the following IP address and enter 10.44.22.50,Subnet
Mask 255.0.0.0. See Figure 2.
Figure 2. TCP/IP Properties
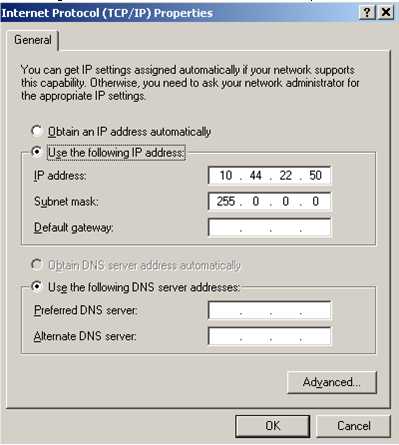
- Click OK to close the Internet Protocol (TCP/IP) Properties window.
- Click Close to exit the Local Area Connection Properties window.
3 Testing the Laptop to Network Connection
Procedure
- Connect the Cat 5 cable from the laptop to the FE service port at the front of the console.
- On the laptop, select Start > Run.
- Enter cmd and click OK. A DOS shell opens.
- At the “>” prompt enter telnet>10.44.22.20.
- Logon as follows:
User Name: ctuser
Password: 4$apps
- The laptop to network connection is established.note: This connection can be used to view Error Logs. When finished using the FE service port, reconfigure the laptop to DHCP (to obtain an IP address automatically).
4 Setting Up the Console Service Screens
Procedure
- On the console service desktop select the Utilitiesbutton from the top menu bar.
- Now select Utilities from the left navigation menu.
- Select Change Display IP.
- Write down the address the display is currently set to.
- In the blank boxes onscreen, enter 10.44.22.50 and
click Submit. The following message appears onscreen:
Display set to 10.44.22.50 successfully.
5 Launching Exceed
Procedure
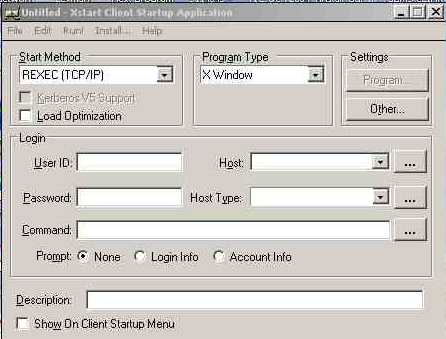
- Launch Exceed via Start > Programs
> Hummingbird Connectivity > Exceed > Xstart.
The Xstart Client Startup Application window opens (Figure 3).
Figure 3. Initial Exceed Screen
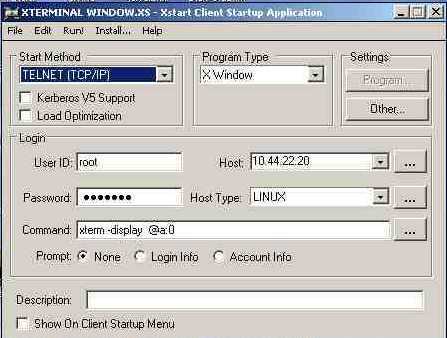
- Complete the cells in the Xstart Client Startup Application window
as follows (Figure 4):
-
Start Method: Select TELNET (TCP/IP) from pick list.
-
User ID: Enter root
-
Password: Enter #bigguy
-
Host: Select 10.44.22.20 from pick list.
-
Host Type: Select LINUX from pick list.
-
Command: Enter xterm –display @a:0
Figure 4. Completed Exceed Screen
-
- Save as Desktop > Laptop to Console 10.44.22.20
- Open file on Desktop. An xterm window opens.
- Enter service_browser. The service desktop is now accessible.
 caution
- When you are finished using the service tool, reconfigure the Change Display screen to the original address you wrote down in Section 4, Step Step 4.
 |