- Topic ID: id_16157901
- Version: 4.0
- Date: Nov 27, 2020 2:17:01 AM
Broken Interposer Pin Removal
Prerequisites
Overview
If you are reading this you are in desperate trouble. A male pin is broken off in a female socket. You have two choices:
-
Replace the DAS Chassis if pin is in the backplane BGA connector or replace the Detector if pin is in a flex lead.
-
Attempt to remove the broken pin.
note:Do not break a pin off a good interposer so it will fit. Microphonics noise and/or image artifacts will result.
There is no specific procedure for this action. These are suggestions that may save you significant time and expense.
-
Procedure Objective
-
Use the sharp pointed tool to raise the broken pin out of the female socket. Raise it enough so that a fine tipped wire cutter can extract the pin fully.
-
You will need a magnifying glass, ESD protection, Nitrile gloves and very sharp strong pointed tools.
-
Use ESD wrist strap & Nitrile gloves to prevent further damage to detector FETs or DAS electronics.
-
-
Procedure Summary
-
Lower table and lock gantry at the 6 O’clock position.
-
Steady your hands on your knees or other surface.
-
Carefully raise broken pin out of the female socket.
-
Remove broken pin.
-
Install new interposer.
-
Verify proper operation.
-
Procedure
- Move the table to its lowest position.
- Place the DAS near 6 O’clock and lock it in place. This will allow you to sit comfortably and use your knees as a resting place to keep your hands steady.
- notice
- Turn OFF Axial Enable, HVDC, and 120VAC switches on the Service Switch panel.
- Lock the gantry in position, using the rotational lock.
- Use the magnifying glass to closely inspect the broken male pin. A small section should be visible since the female socket is cone shaped. Male pins generally break off at the base.
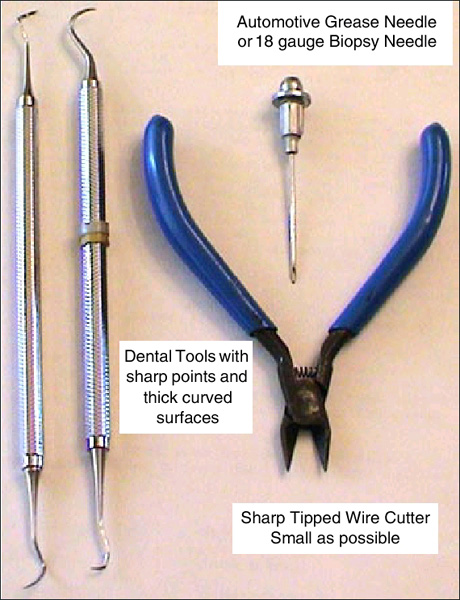
- Use a biopsy needle (18 gauge or larger) or a dental pick with a thick
working surface. See Figure 1.
Figure 1. Emergency Interposer Pin removal tools
 note:
note:Note the following:
-
Biopsy needles can be found in most medical facilities.
-
Dental tools can be obtained from most Dentist offices. They regularly discard older utensils.
-
A grease needle can be purchased at an automotive parts store.
-
- notice
- Remove raised pin with side cutters or needle nose pliers.
- Install new interposer.
 |
|
Finalization
-
- notice
- Do the following:
-
Assemble gantry and restore power.
-
Allow DAS to warm up for 1 hour.
-
Perform Image Quality testing.
-