- Topic ID: id_23554527
- Version: 2.0
- Date: Sep 26, 2020 10:10:39 PM
AW Server Client Installation on CT Console
Prerequisites
Overview
This procedure applies to the CT site that has GE AW Server (AWS) which has authorized to access to CT Console. This procedure is to describe the extra information and procedures of AW server configuration on CT console and also provides a guideline of the client installation on CT console. FE should follow AW Server Installation Manual to install the AW server and client.
1 Pre-requisite
Procedure
- AW Server should be installed at your site.
- Your site should have purchased the "Basic Front End - 3rd Party integration" option. The license key will be used later steps.
- Make sure that AWS Server configuration and software version
is a supportable one of the CT scanner.
-
CT Console supportable AW Server: HP ML350 based AWS2
-
Compatible AWS Software version: aws-2.0-5.0
-
- Record the IP address of AWS Server and the User Name and Password
for configuration on CT console in later steps. note: The User Name and Password are one of the accounts configured on AW server. Consult with the site IT admin for which one assigned to this use.
2 Install AWS Client Software
Procedure
- Launch the Mozilla web browser.
Open a shell and input mozilla
Select Default User.
If there is no “default user” profile,create a new profile to start Mozilla.
- Enter the AW Server’s IP address (for example, http://3.70.211.201) into the browser’s address bar, then press ENTER. The AW Server main page will display.
- Download Linux Client and save the file to /root.
- When the client installer file has downloaded completely, open
a Command Window (Terminal tool) and type:
su - <Enter>
Enter the root password
Run the command: /usr/g/scripts/InstallAWSClientOnConsole
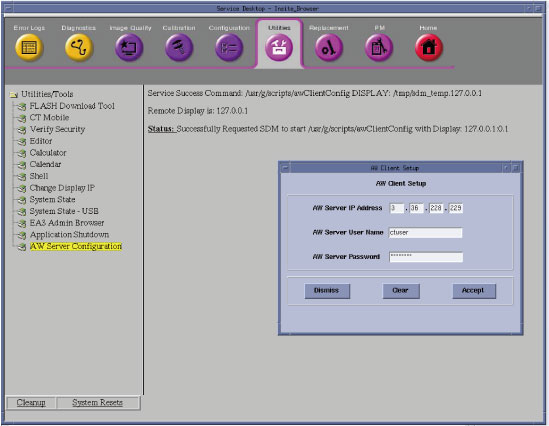
- After the installation finished successfully, the "Configure AWS client" window popup automatically. Input the AW Server IP Address, User Name and Password and click Accept, refer to Figure 1.note: The configuration can be updated under Service Desktop -> Utilities -> AW Server Configuration.
Figure 1. AW Server Configuration
- Shutdown and restart Application on CT console.
- Save System State.
AWS Configuration will be saved. Leave a newly saved system state DVD at site.
- Declare AWS on the CT System.
On CT Console, select ImageWorks ->Network ->Remote Hosts, enter the required Parameters and select save.
3 Enable Integration
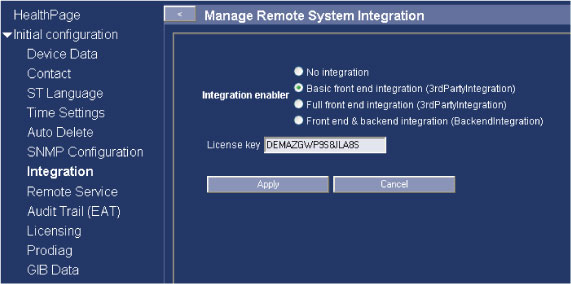
Open a shell, type: mozilla AW Server’s IP address to launch AWS web. Enter service tool, select Initial configuration -> Integration, select Basic front end integration (3rdPartyIntegration) as Integration enabler. Input License key and Click Apply. refer to Figure 2
Figure 2. Initial configuration
4 Test starting AWS Client on CT Console
Switch to ImageWork desktop Browser, "Applications" button exists on Image browser. This button is to start AW server from CT Console. Follow Client Test in AW Server Installation manual to complete the installation.
5 How to uninstall AWS Client on CT Console
Procedure
- Open a shell and change to be 'root', input a command: /usr/g/scripts/UninstallAWSClientOnConsole
- Shutdown and restart Application on CT Console.
- Switch to ImageWork desktop Browser and confirm the "Applications" button is removed.