- Topic ID: id_18480130
- Version: 4.0
- Date: Jan 20, 2020 8:34:31 PM
NIO64 Host Computer (Z820) Scan Data HDD Replacement
Prerequisites
Overview
This procedure shall be followed when replacing the Scan Data Hard Disk Drive in the NIO64 host computer (Z820).
1 Z820 Computer Removal
Procedure
- Shutdown system. Select one of the following methods to Power
OFF the Console:
-
If Applications are up, click on the [Shut Down] button on desktop display and select [Shutdown].
-
If Applications are down, open a Terminal Window. Type: halt , then press ENTER.
-
When halt command has finished, power Off the console at the front panel switch.
-
- Apply LOTO. See Equipment Service - Lockout-Tagout-PPE procedure.
- Remove Front and Top covers from NIO64 console.
Refer to Replacement → Console (RIO) → Console Cover Removal and Installation.
- Remove the Z820 computer from the NIO64 console chassis.
Refer to Replacement → Console (NIO64) → HP Host Computer Z820 Replacement
2 Scan Data HDD Removal
Procedure
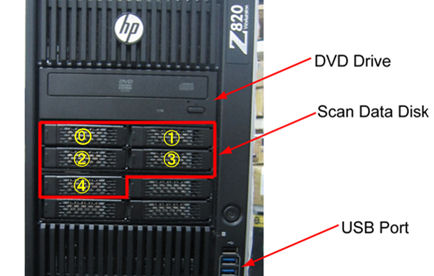
- Locate the Scan Data HDD referencing the Illustrations below.
Figure 1. Scan Data Disk Physical Layout
- Release the Scan Data HDD Tray by pressing the Tray Removal
Lever Release button in the Icy Dock® Bay.
Figure 2. Scan Data Disk Removal
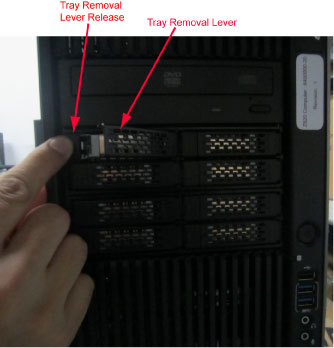
- Remove the Scan Data HDD with Tray assembly from Icy Dock® bay using the Tray Removal Lever.
- Remove the Scan Data HDD with Tray assembly out the front of the Z820 computer and set aside.
3 Scan Data HDD FRU Preparation
Procedure
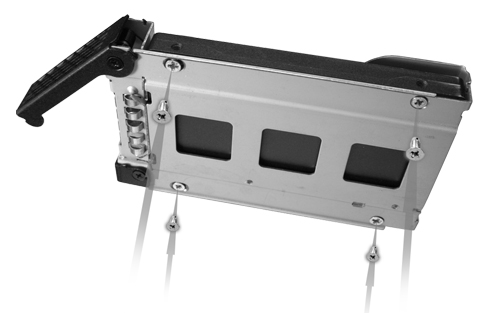
- The replacement Scan Data HDD does not come with the Icy Dock® Tray. Remove the Scan Data HDD from the original Scan Data HDD with Tray assembly.
- Mount the replacement Scan Data HDD onto the original Icy Dock®
Tray, reusing the mounting hardware.
Figure 3. Scan Data HDD Mounting in Tray Assembly
4 Scan Data HDD Install
Procedure
- Slide the replacement Scan Data HDD with Tray assembly into the Icy Dock® bay in the Z820 computer.
- Fully seat the Scan Data HDD in the Icy Dock® bay by closing and latching the Tray Removal Lever.
5 Finalization
Procedure
- Power ON the operator console. Start up sequence stops before application start up.
- Run “Reconfig” ,and select “Recreate Scan
Disk Array” (2 or more HDD replacement) or “Rebuild Scan
Disk Array” (only one HDD replacement), and press “Accept”.
Refer to System Configuration - NIO64 for the details.note:
Rebuild Scan Disk Array takes approximately 20 minutes.
- System reboots automatically and stops before application.
- Open shell window and type st to start up application.
- Perform the Functional Checks → System Scanning Test instructions from the procedure list.
- Install console front cover.
Refer to Replacement → Console (RIO) → Console Cover Removal and Installation Procedure.