- Topic ID: id_17423044
- Version: 4.0
- Date: Jan 20, 2020 8:32:05 PM
Gantry Microphone with MIC Cover Replacement
Prerequisites
Overview
This procedure defines the steps necessary to replace Gantry MIC with MIC Cover.
Procedure
- Remove gantry right side cover.
Refer to Parts Replacement → Gantry → Enclosure → (Cover Removal Procedures).
- Stop the rotor of X-ray tube in case of Liquid Bearing Tube before HVDC off. Refer to Liquid Bearing Tube Rotor stop procedure for details.
- Turn OFF the Axial Drive, HVDC and 120 VAC switches on the gantry’s Service Switch Panel.
- Remove the gantry left side cover, top covers and scan window.
- Remove the front cover.
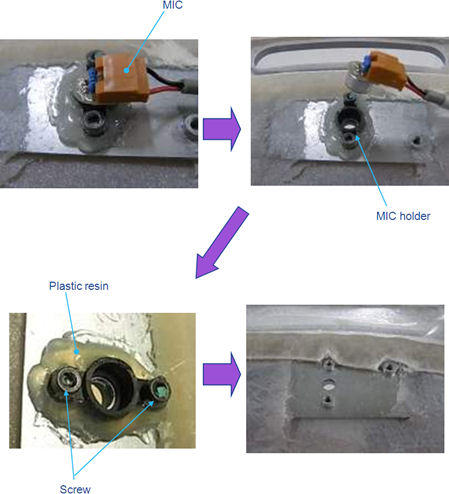
- Remove MIC with cable from MIC holder.
- Remove MIC holder, two screws and plastic resin of hotmelt from
gantry cover.
Figure 1. Microphone Removal
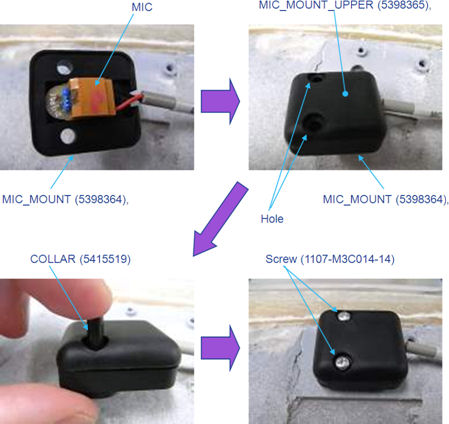
- 1.Place MIC to MIC_MOUNT(5398364), and put MIC_MOUNT_UPPER (53983645) on MIC_MOUNT.
- Insert two COLLARs to holes on MIC_MOUNTs.
- Fix MIC MOUNTs by two screws with Loctite242/243.
Figure 2. New Microphone Installation
Finalization
- Restore the gantry covers.
- Make sure gantry intercom functionality works correctly.