- Topic ID: id_15460127
- Version: 4.0
- Date: Apr 9, 2020 8:42:41 PM
GSCB and Intercom Functional Checks
Prerequisites
Overview
The following is a procedure for checking the functionality of the GSCB Assembly and Intercom functionality on VCT FREEdom / Cj M40 / HP60-Zeta system for proper operation.
Figure 1. Global Scan Control Module (GSCB)
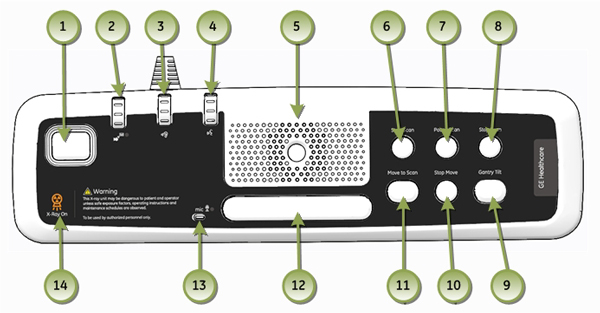
1 Emergency Stop
Procedure
- Start any basic CT scan, wait till X-Ray exposure has started
and then press the Emergency Stop Button (1).
The following three items shall occur.
- Any Gantry or Table motion shall stop.
- Any X-Ray exposure in process shall stop; Exposure Indicator (14) shall not be illuminated.
- Reset Gantry key on Gantry Control Panel shall flash once every two seconds.
- Press Reset Gantry key on Gantry Control
Panel to return System to normal operation.
2 Intercom (ICOM)
Allows communication with the Scan Room. The following, tests individual buttons and checks volume levels associated with the Intercom feature of the system.
Requires assistant to be in Scan Room.
Procedure
- Press Talk Bar (12) and speak towards the Microphone (13).
-
Volume Control Operator to Patient (4).
This dial controls the volume of the Operator’s voice to the
Patient. Speak into the Microphone (13) and
vary the dial, with assistant listening in Scan Room.
- An upward adjustment of the dial increases the volume on Speaker in Gantry.
- A downward adjustment of the dial decreases the volume on Speaker in Gantry.
-
AutoVoice Volume Control (2). This
dial controls the volume of the AutoVoice to the Gantry. Select Protocol
Management / AutoVoice on the Scan Monitor and play a pre-recorded
voice message.
- An upward adjustment of the dial increases the volume on Speaker in Gantry.
- A downward adjustment of the dial decreases the volume on Speaker in Gantry.
-
Volume Control Patient to Operator (3).
This dial controls the volume of the patient’s voice to the
operator. Have assistant talk in Scan Room close to Gantry.
- An upward adjustment of the dial increases the volume on Speaker in Operator Room (5).
- A downward adjustment of the dial decreases the volume on Speaker in Operator Room (5).
3 Audible Beeper
Requirements in some locations globally state that an audible warning must be emitted from the system when X-Ray exposure is taking place. (See GSCB Configuration and Intercom Setup).
Procedure
- If Configured On: Operator Room Speaker (5) will emit a beeping tone when X-Ray exposure is taking place.
- If Configured Off: No beeping tone will be present on Operator
Room Speaker during scanning.
4 Scan Controls
The following, tests individual buttons associated with gantry control.
Procedure
-
Start Scan (6). Setup and run any basic
CT scan with a prescribed Gantry tilt and Cradle start position.
- The Start Scan indicator flashes green once the tube has reached exposure speed.
- Start Scan will flash for 30 seconds before timing out.
- If Start Scan times out, press the solid green Start Scan button to bring the system back to the ready state.
- Pressing Start Scan while it is flashing begins the scan.
-
Pause Scan (7).
- Pressing Pause Scan causes the system to pause scanning, once the current scan is completed.
- Resume the scan by selecting Resume from the view/edit screen.
-
Stop Scan (8).
- Pressing Stop Scan aborts the scan immediately.
- Resume the scan by selecting Resume from the view/edit screen.
-
Move to Scan (11).
- The Move to Scan indicator flashes green indicating that the system is ready to advance the cradle into the starting position.
- Move to Scan will flash for 180 seconds before timing out.
- If Move to Scan times out, pressing the solid green Start Scan button again to bring the system back to the ready state.
- Pressing the Move to Scan button will advance the cradle.
-
Stop Move (10).
- Pressing Stop Move button stops cradle motion in/out.
- Resume the scan by selecting Resume from the view/edit screen.
-
Prescribed Tilt (Remote Tilt) (9).
- Pressing Prescribed Tilt button and hold the button down until the prescribe tilt is achieved.
- The Remote Tilt button on the GSCB can be used to return the Gantry to zero tilt once all the prescribed scans for the exam have been acquired.
5 Finalization
No finalization steps.