- Topic ID: id_18480150
- Version: 2.0
- Date: Dec 21, 2018 2:36:39 AM
GSCB Replacement (NIO64)
Prerequisites
Overview
This procedure shall be followed when replacing the GSCB assembly in the NIO64 console.
1 GSCB Removal
Procedure
- Select one of the following methods to Power OFF the Console:
- If Applications are up, click on the Shut Down button on desktop display and select Shutdown.
- If Applications are down, open a Terminal Window. Type: halt , then press Enter.
- When halt command has finished, power Off the console at the front panel switch.
- Apply LOTO for console. For procedures, see Equipment Service - Lockout-Tagout-PPE.
- Remove the console rear chassis cover.
Refer to .
- Disconnect the GSCB cable assembly from the host computer and
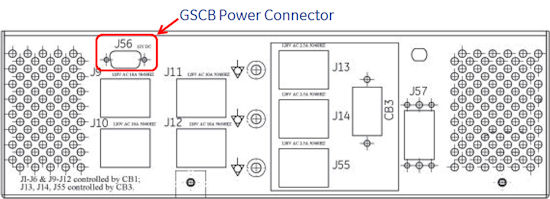
GSCB Power Module located at the rear of the console.
Figure 1. Z820 Rear Port
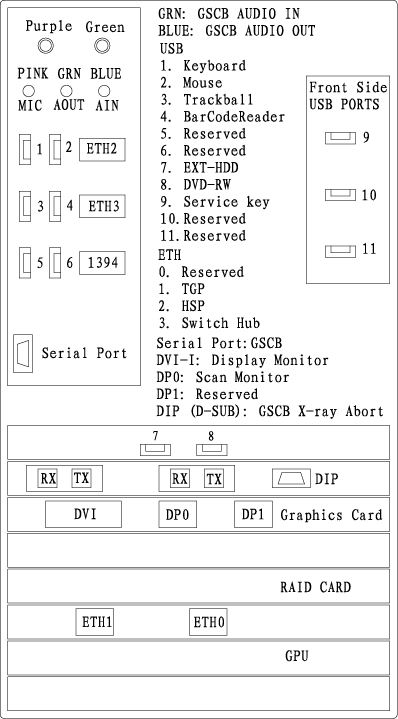
Figure 2. GSCB Power Connection
- Remove the Keyboard from the GSCB Keyboard Mounting Plate and
set aside.note:
The keyboard will need to be unplugged/disconnected from the Console Bulkhead Panel.
2 Replacement GSCB Preparation
Procedure
- Transfer Keyboard Mounting Plate to new GSCB.
Figure 3. GSCB Keyboard Mounting Plate
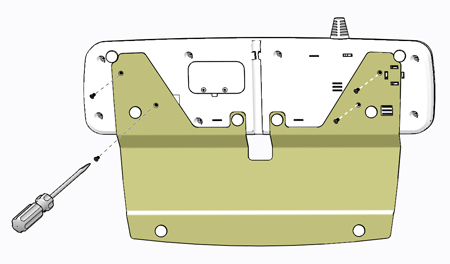
- Remove the four (4) Flathead Phillips screws to remove the Keyboard Mounting Plate from the original GSCB Assembly and transfer the mounting plate to the replacement GSCB using the same four (4) screws removed from the original assembly.
- Open Service Access Panel on the rear of the GSCB and set configuration
switches as necessary. See GSCB Configuration in the GSCB Configuration and Intercom Setup procedure
for necessary configuration settings.
3 GSCB Install
Procedure
- Mount the Keyboard to the replacement GSCB Keyboard Mounting Plate removed earlier.
- Place the replacement GSCB assembly on the console top and route the GSCB Cable to the rear of the console.
- Reconnect all cables removed earlier.
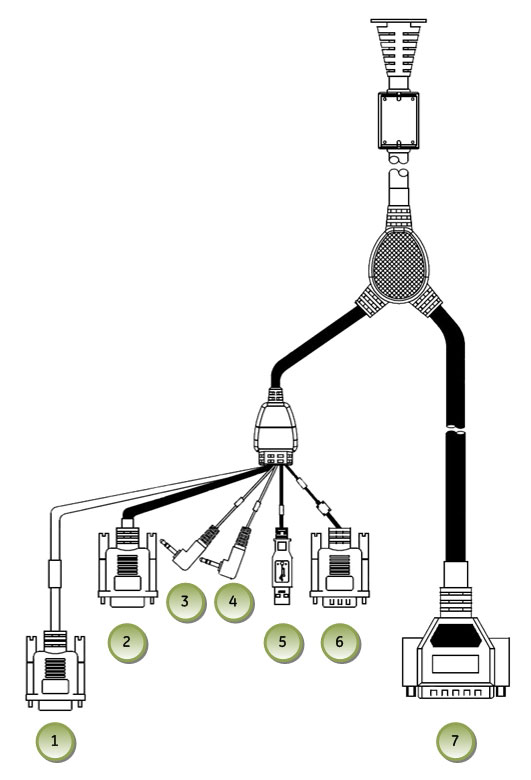
Figure 4. GSCB Cable Connections
- Remove LOTO on console. For procedures, see Equipment Service - Lockout-Tagout-PPE.
4 Functional Checks, Alignments and Setups
Procedure
- Power On console.
- Perform GSCB Intercom Setup procedure. See GSCB Configuration and Intercom Setup procedure for System Intercom setup.
5 Finalization
Procedure
- Perform the instructions from the procedure list.
- Install console rear cover. Refer to .
- Perform the instructions from the procedure list.