- Topic ID: id_11038903
- Version: 4.0
- Date: Dec 3, 2019 1:46:57 AM
DICOM Filming Devices Setup
Prerequisites
Overview
Use this procedure to configure DICOM filming devices (cameras, printers) on the system.
1 Declaring Filming Devices on the System
Procedure
- Click on the SERVICE DESKTOP button.
- On the Desktop toolbar, select CONFIGURATION and INSTALL CAMERA.
The Install Camera window appears, along with a warning message pop-up box, to remind you that all filming queues must be empty before you begin to update or delete a camera.
Figure 1. Warning

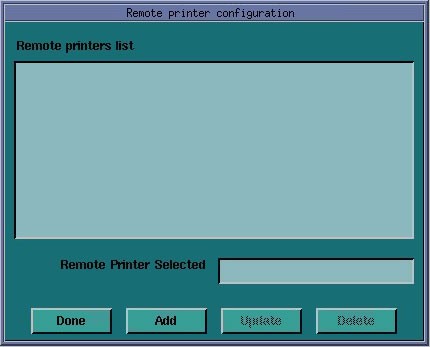
- A list of cameras installed is displayed.
- To add a new camera, click the ADD button.
Figure 2. Remote Printer Configuration
- A dialog window for the camera type (POSTSCRIPT* / DICOM) appears.
*POSTSCRIPT devices must use the setup procedures shipped with the option.
Figure 3. Dialog Box for Camera Type
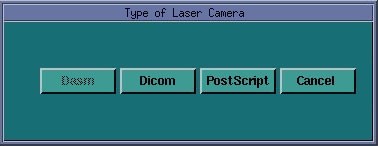 note:
note:Digital/Analog DASM is not supported with this product.
- To add a new camera, click the ADD button.
- Select the appropriate model from the list and click SELECT. Clicking SELECT presets all the parameters to that model except the Network parameters.
Figure 4. DICOM Camera Model Dialog
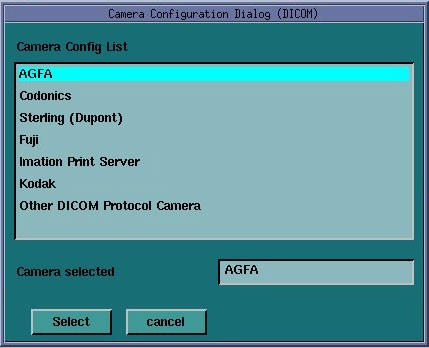
Selection of a different camera model clears the Image Quality parameters, because these are camera manufacture dependant.
note:It is advised to recheck the preset information with the camera manufacturer's representative.
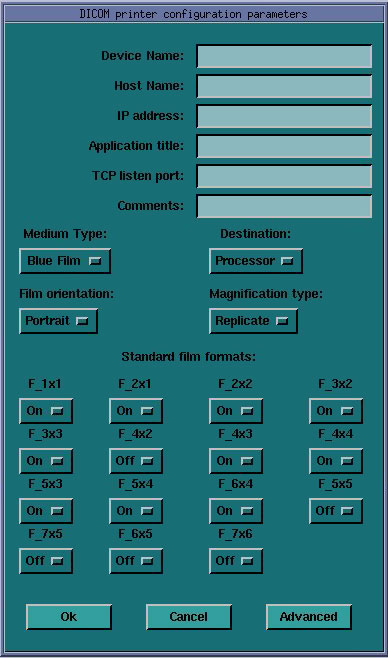
- Enter the NETWORK PARAMETERS:
-
Device Name
A unique name used to identify the camera.
-
Host Name
DICOM print server host name, as defined by the hospital.
-
IP Address
DICOM print server IP address, as defined by the hospital.
-
AE Title
DICOM print server application entity title, as defined by the print server. You should consult the manufacturers DICOM Conformance Statement.
note:The Application Entity Title for the camera may be site specific. Make sure that you check with the Camera Manufacturer's Representative and the hospital network administrator to ensure you are using the correct AE Title for the destination DICOM Print Camera.
-
TCP/IP Listen Port
DICOM print server TCP/IP listen port, as defined by the server. You should consult the manufacturers DICOM Conformance Statement.
-
Comments
Optional comments used by the DICOM print server.
Figure 5. DICOM Camera Configuration
-
- Medium Type: specifies the type of film being used. Currently, only BLUE FILM and CLEAR FILM are supported.
- Set Destination to the final location for film output: MAGAZINE or PROCESSOR.
- Orientation selects film orientation. Only PORTRAIT is currently supported.
- Set Magnification Type. This parameter selects the algorithm used to interpolate pixels for proper film resolution. Set this parameter after consulting the camera manufacture to ensure optimal image quality. Choices are describe below:
-
None - No interpolation. This option is not suported by all cameras.
-
Replicate - Adjacent pixels are interpolated. This can result in "pixelized" images. This algorithm is not normally preferred.
-
Bilinear - A 1st order interpolation of pixels. Results in images usually described as blurred. This algorithm is not normally preferred.
-
Cubic - A 3rd order interpolation. Used with a large number of possible formulations. Camera manufactures define parameters called "smoothing type" to set coefficients used in this algorithm. The implementation of these "smoothing coefficients" is camera dependent.
-
- Set the Standard Film Formats. Chose the film formats by selecting On in the pulldown menu box located below each selection. Valid film formats are set by the camera manufacture. IMATION for example, doesn’t support 4x4, 2x4 or 1x2 and AGFA does not support 2x4. The DICOM print convention designates film formats by column and row (e.g. 12 on 1 film is 3x4).
- Click the ADVANCE button, after configuring the camera. This creates the camera device file for you automatically and pops up the Advanced Parameters screen.
Figure 6. Advance Parameters
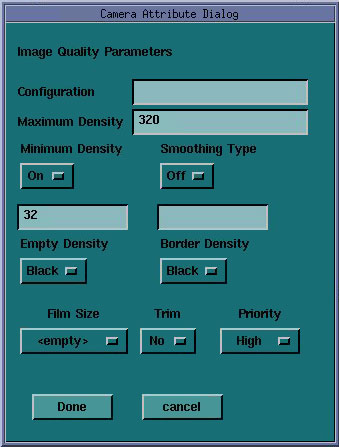
2 Advanced Camera Parameters Settings
Procedure
- Advanced camera parameters control the image quality of filmsnote:
For more information on the proper settings for these parameters, please see the camera’s DICOM Print Device Conformance Statement or the Camera Manufacturer Representative.
You may need to refer to a copy of the Conformance Statement as you are working with the Camera Manufacturer’s Representative, to correctly set up the DICOM Print Camera I/Q and Time-out Settings.
-
Configuration - This parameter is manufacturer
dependent as is typically used to specify the image contrast. The
Configuration field may be up to 1024 characters long. The field will
scroll automatically as text is entered. To review your entry, simply
click and hold the middle mouse button, while the cursor is in the
field, and drag the mouse towards the right (or left) as needed.note:
Recommended Configuration setting values:
-
Agfa Drystar (MG3000): PERCEPTION_LUT=KANAMORI (100)
-
Imation Dryview (8700): LUT=0,7
-
Kodak Laser Printer 190: CS434\CN0\PD1.20
-
-
Smoothing Type - Set Smoothing
Type to On, and input the selected
value. This parameter is used when the magnification type is CUBIC.
It represents the coefficient for the image resolution algorithm.
This parameter is camera manufacturer dependent, and should be re-verified
with your radiology department.note:
Recommended Smoothing Type Starting Values and Ranges:
-
Agfa DryStar (MG3000) - Start Value: 140 Range: 137-150
-
Imation Dryview (8700) - Start Value: 3 Range: 3-13
-
Kodak Laser Printer 190 - Start Value: Enhanced Range: Normal
-
-
Maximum Density and Minimum Density - Used to set brightness of the images on film. The range of values
is 0-4095, although the valid range for a specific camera is manufacture
dependent. For Maximum Density, input the correct
value into the text box. For Minimum Density,
set it to On and input the correct value in
the text box.note:
Recommended Minimum and Maximum Density Starting Values:
-
Agfa Drystar (MG3000) - Min: 20 or 23 Max: 300
-
Imation Dryview (8700) - Min: (Blank) Max: 300
-
Kodak Laser Printer 190 - Min: 20 Max: 300
-
- Empty Density - This parameter sets the density for empty film viewports. Typically, Black is used but White is an available option. The minimum and maximum density values are used as the representation.
- Border Density - This sets the density for the border used around the film viewports. Typically, Black is used but White is an available option. The minimum and maximum density values are used as the representation.
- Film Size - Allows the system to specify a particular film size, if selected.
- Trim - Yes produces a white (clear) box surrounding each image.
- Priority - This sets the print priority.
- When you have completed entry of advanced parameters, select Done.
3 Finalization
Procedure
- Camera Data Tables: To locate install camera information Click on the SERVICE DESKTOP button. On the desktop toolbar select CONFIGURATION and INSTALL CAMERA. The install camera window appears.
- Select each of the cameras that are installed from the list of installed cameras, and click on UPDATE to view the camera's settings.
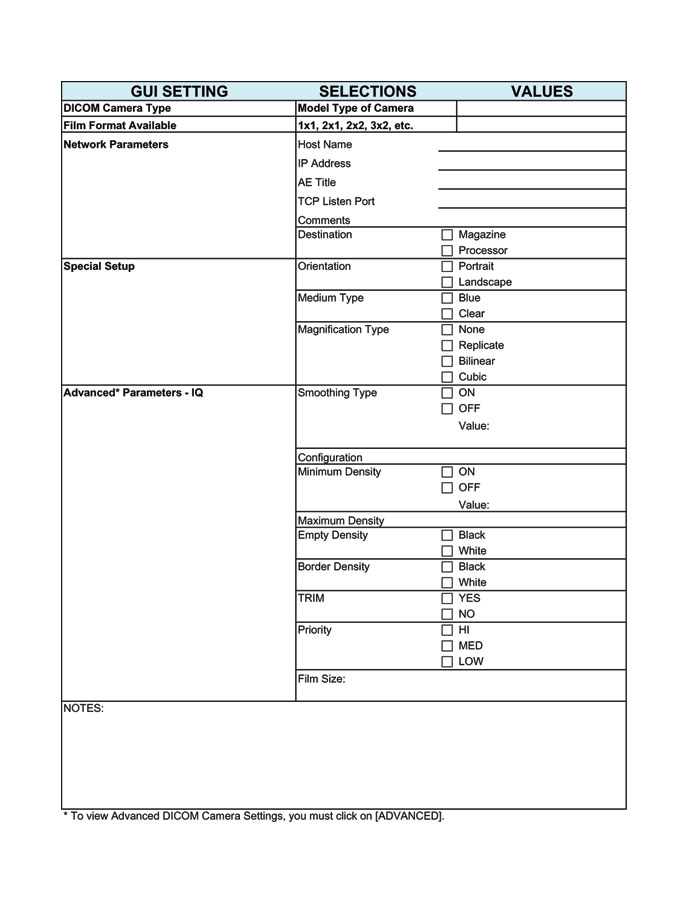
- Record the values used to set up each camera in the table that
follows:note:
Additional information maybe required.
Record this information in the Note section of the table.
note:You can determine the information by looking at the contents of the file located at:
/user/g/ctuser/app-defaults/devices/name.cfg where name.cfg is the camera device name from the printer configuration GUI.
Figure 7. Print to record information on this form.
- Test each DICOM Filming Device by sending a sample image to the device and verify film output is acceptable to customer.