- Topic ID: reference_xtm_kqd_pkb
- Version: 2.0
- Date: May 22, 2020 4:01:37 AM
Z820 / Z840 RAID Analysis and Configuration
1 Overview
The following explains processes for evaluating a Scan Data RAID in a HP Z820/Z840 and steps to remedy it if needed.
Hard drives are not hot swappable. Removing a drive while the workstation is on results in the hard drive being marked bad. This procedure can guide you to get a drive such as this back online.
2 Troubleshooting
The following command shows the Scan Disk status. Use “gre-raid -q” command at root user.
Open Terminal, and logon as root.
(Example)
[root@host]# gre-raid -q
Check Consistency on VD #0 is not in progress.
Background Initialization on VD #0 is not in Progress.
Number of Physical Drives on Adapter 0: 5
Disk Array Chassis Layout - Current
Top
|====================||====================|
| 0: Passed || 1: Passed |
|====================||====================|
| 2: Passed || 3: Passed |
|====================||====================|
| 4: Passed || 5: Not used |
|====================||====================|
| 6: Not used || 7: Not used |
|====================||====================|
Bottom
Virtual Drive State: Good
gre-raid: success
There are four status of result “gre-raid -q”.
-
Passed: Good and Recognized
-
Failed: Disk is unconfigured bad or failed.
-
Empty: Disk is not inserted or not recognized.
-
Unconfig good: Good but need to rebuild.
3 Resolution
The following procedures provide solutions to RAID issues based on the results of Troubleshooting. After each, return the “gre-raid -q” command in Troubleshooing.
- If all drives are marked Passed
- If all drives are marked Empty
- The load from cold may have failed.
- See Appendix IV: All Drives Empty.
- If one or more drives are marked Failed
- See Appendix I: Clear RAID Configuration.
- If hard drive continues to be marked Failed, replace hard drive.
- If a drive slot reports Empty but has a drive in the slot
- Ensure hard drive is fully inserted into RAID slot or reseat hard drive. Clasp should fully lock shut, and hard drives should be flat on the front.
- Confirm the cable connection between the disk and RAID controller card.
- Then see Appendix III: Reconfig for more information.
- If one or more drive is marked Unconfig Good
- Run “reconfig” and select Rebuild Scan Disk Array or Recreate Scan Disk Array
- See Appendix III: Reconfig for more information.
4 Appendix I: Clear RAID Configuration
All scan data will be deleted.
-
Shut down the system and recycle the console power.
-
Press [F10] when HP logo is displayed.
-
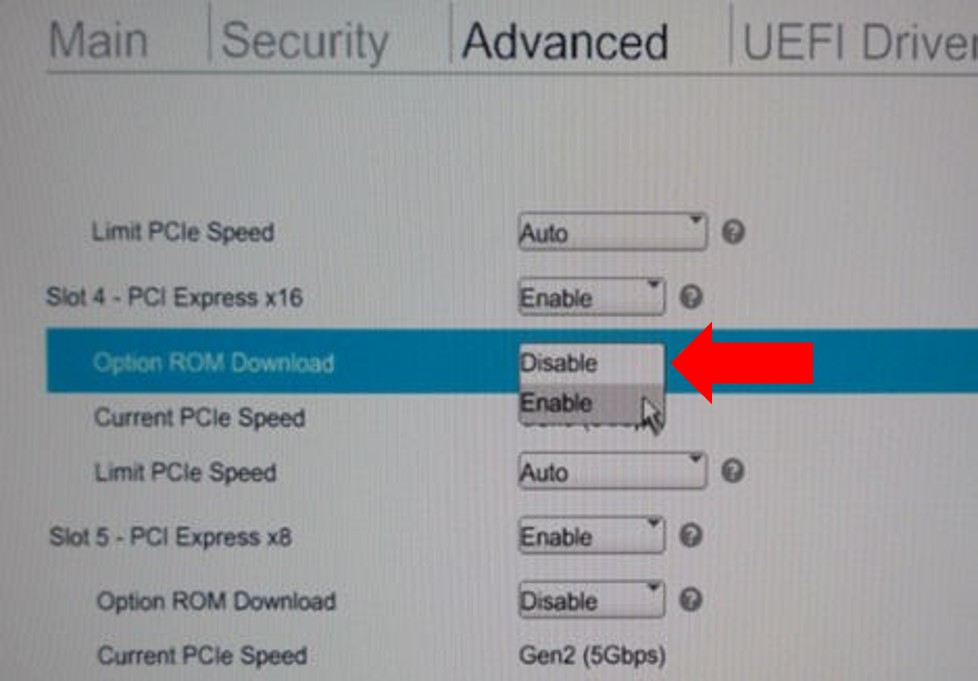
In Hewlett-Packard Setup Utility, select Advanced → Slot Setting.
Figure 1. Hewlett-Packard Setup Utility (Z820)
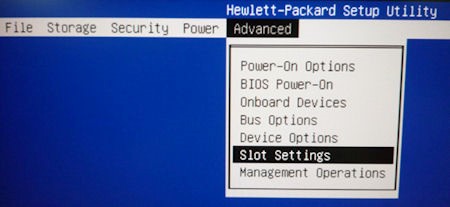
Figure 2. Hewlett-Packard Setup Utility (Z840)

-
In the Slot Settings menu, change the Slot 4 (RAID controller) Option ROM Download setting to Enabled. And hit F10 key to accept the change.
note:Do not change the slot 2 setting.
Figure 3. Slot Settings Menu (Z820)
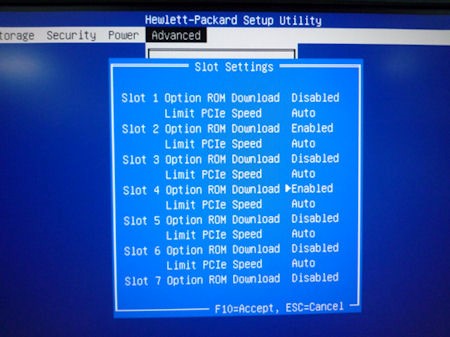
Figure 4. Slot Settings Menu (Z840)
-
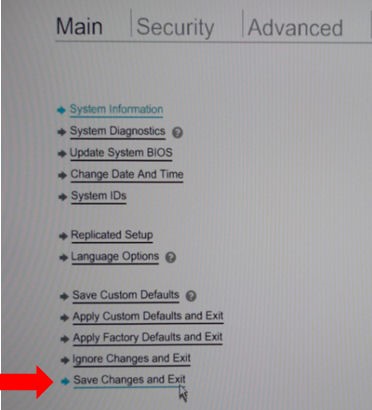
Select File (or Main) → Save Changes and Exit to exit Hewlett-Packard Setup Utility.
Figure 5. Menu of Hewlett-Packard Setup Utility (Z820)
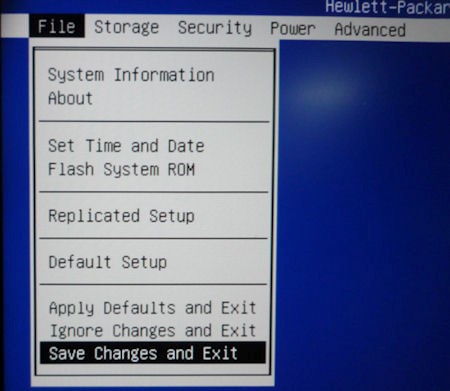
Figure 6. Menu of Hewlett-Packard Setup Utility (Z840)
-
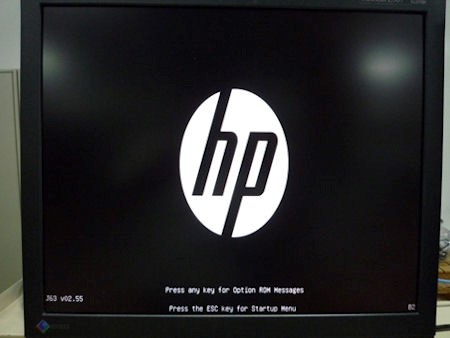
When HP logo is displayed, hit Enter key.
Figure 7. HP Logo
-
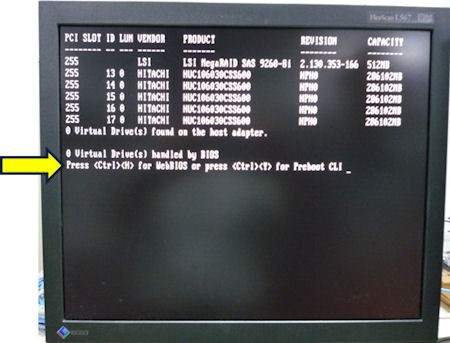
When the following RAID information is displayed, press CTL+H.
Figure 8. RAID Information
-
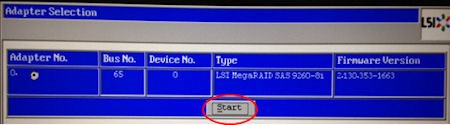
Click “Start” in Adapter Selection screen.
Figure 9. Adapter Selection screen
-
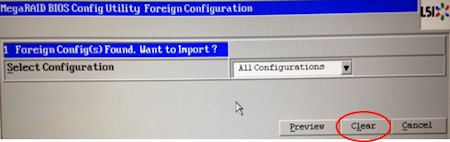
Click “Clear” in the next screen.note:
If this page doesn't appear, go to step 11.
Figure 10. Clear Foreign Config
-
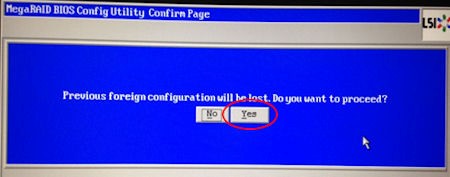
Click “Yes” in the next screen.note:
If this page doesn't appear, go to step 11.
Figure 11. Confirm Page
-
The WebBIOS screen will be displayed as follows.
Figure 12. WebBIOS Screen
-
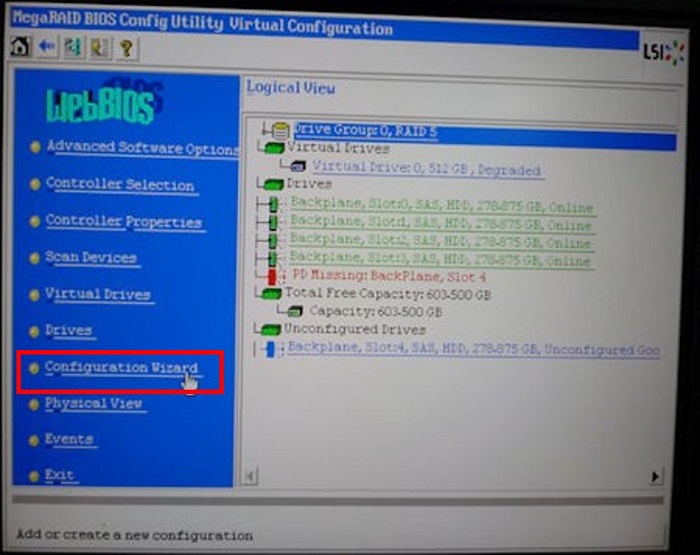
Click Configuration Wizard from left side menu.
-
In the Configuration Wizard menu, select Clear Configuration.
Figure 13. Configuration Wizard

-
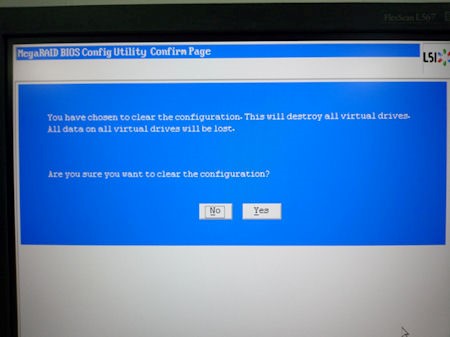
In the next screen select Yes.
Figure 14. Configuration Wizard - Confirm Page
-
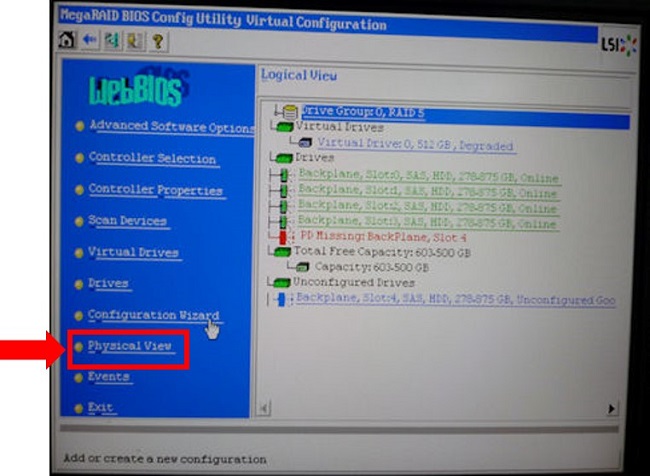
Enter Physical View.
Figure 15. Enter Physical View
-
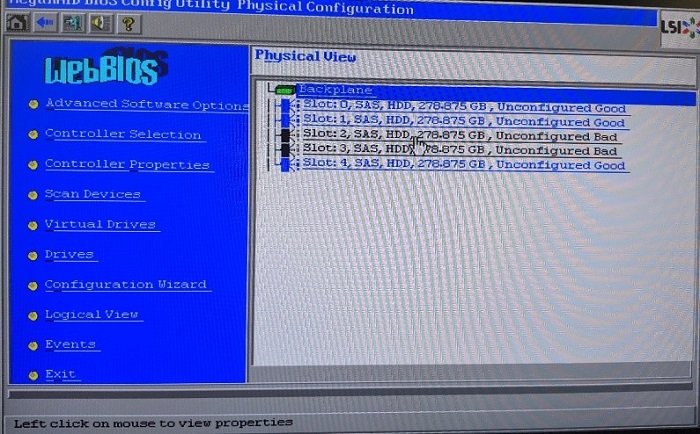
After the Configuration wizard completes the Physical View will display all drives as “unconfigured Good” or “unconfigured Bad”. The bad drives will need to made good, and then erased.
-
Click on the Unconfigured Dad drives.
Figure 16. Physical View showing Unconfigured Bad drives
-
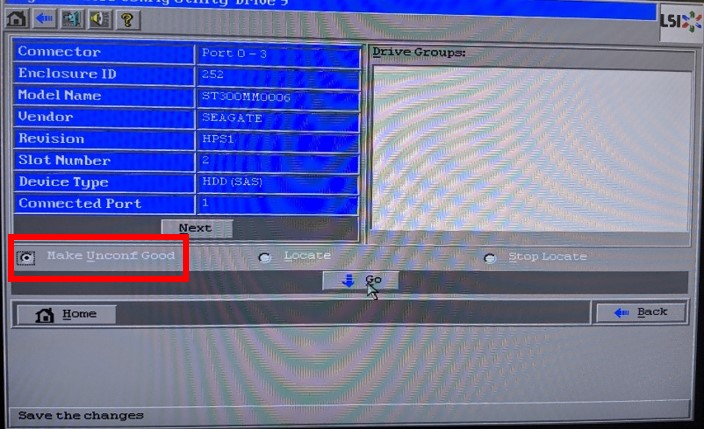
Click on “Make Unconf Good”, then click “Go”
Figure 17. Individual drive menus
-
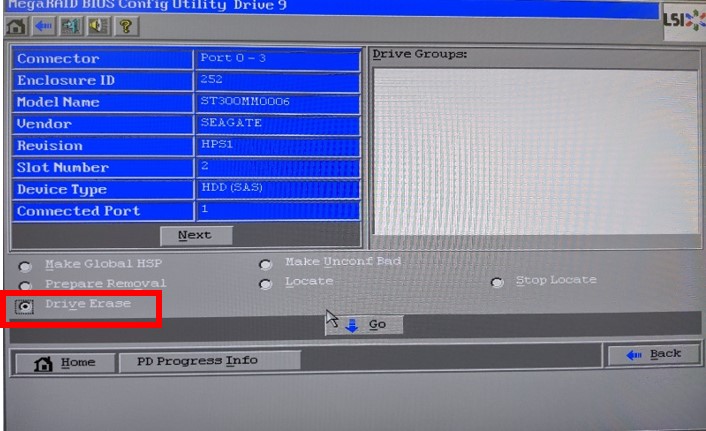
Click on "Drive Erase", then click "Go".
Figure 18. Drive Erase option
-
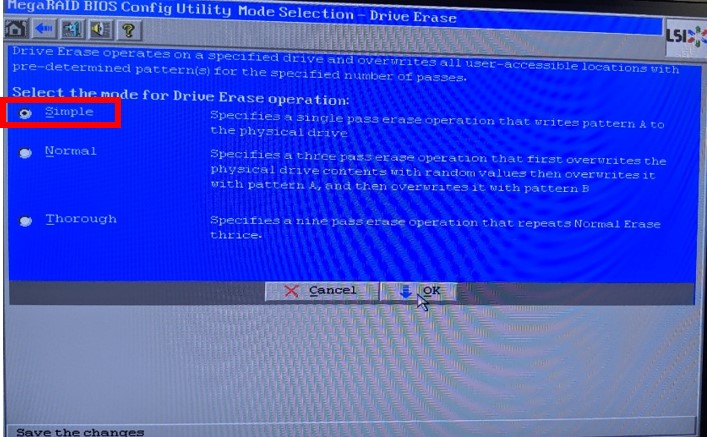
Click "Simple", then click "OK".
Figure 19. Drive Erase
-
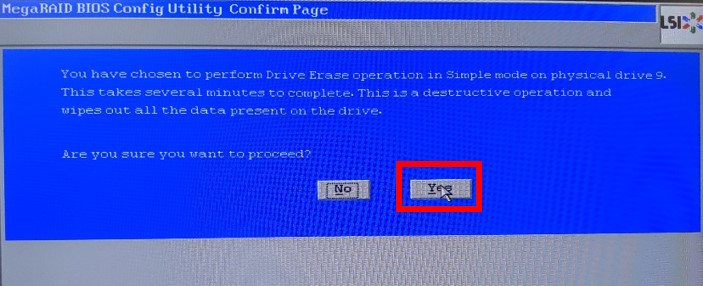
Click "Yes".
Figure 20. Drive Erase confirmation
-
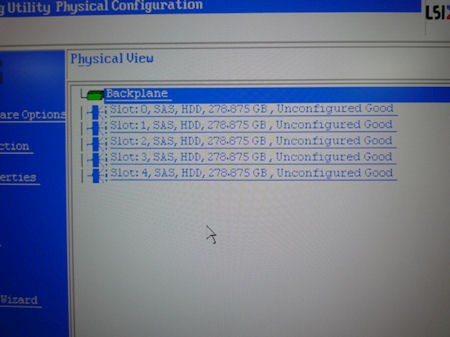
Confirm all Scan Data disk shows Unconfigured Good in Physical View screen.
Figure 21. Physical View
-
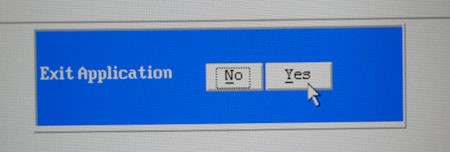
Click “Exit” from the menu and select Yes in the next screen.
Figure 22. Exit Application
-
Reboot the system by pressing CTL+ALT+DEL keys.
-
Press [F10] when HP logo is displayed.
-
In Hewlett-Packard Setup Utility, select Advanced → Slot Setting.
Figure 23. Hewlett-Packard Setup Utility (Z820) - Slot Setting

Figure 24. Hewlett-Packard Setup Utility (Z840) - Slot Setting

-
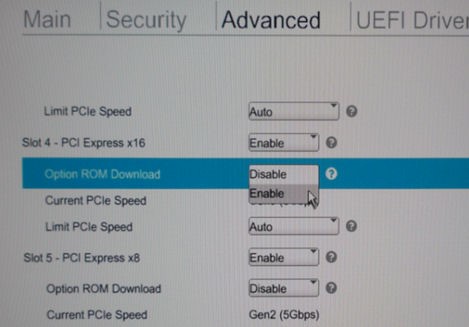
In the Slot Settings menu, change the Slot 4 (RAID controller) Option ROM Download setting to Disabled and hit F10 key to accept the change.
note:Do not change the slot 2 setting.
Figure 25. Slot Settings Menu (Z820)
Figure 26. Slot Settings Menu (Z840)
-
Select File (or Main) → Save Changes and Exit to exit Hewlett-Packard Setup Utility.
Figure 27. Menu of Hewlett-Packard Setup Utility (Z820)
Figure 28. Menu of Hewlett-Packard Setup Utility (Z840)
5 Appendix II: RAID Performance Test
The following command tests the performance of the RAID array. Use “gre-file-perf -s 25 -c /raw_data” command at root user. This command will take approximately 10 minutes.
[root@host]# gre-file-perf -s 25 -c /raw_data
Running RAID Performance test command during data collection could cause the recon engine to fail and interrupt data collection. Therefore, wait until the exam is over before running the command.
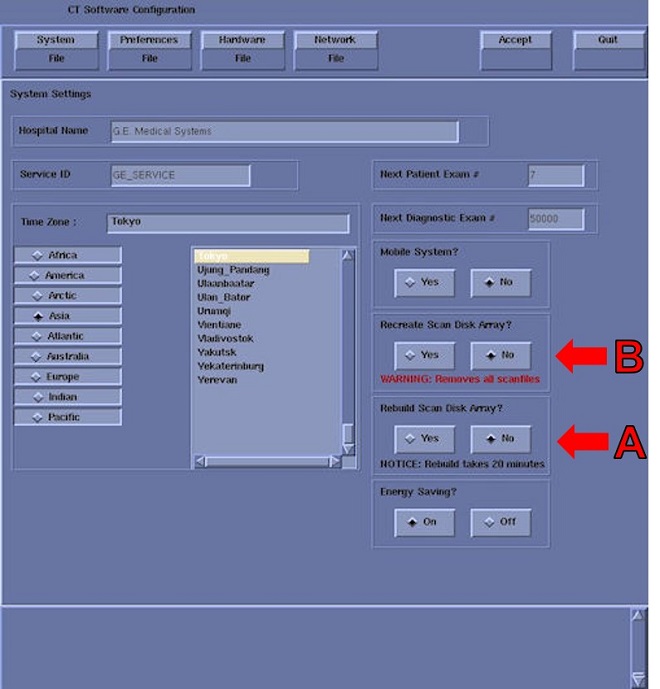
6 Appendix III: Reconfig
When all drives are marked either Passed or Unconfig Good, use “reconfig”command at root user.
If “Rebuild Scan Disk Array?” is available, use that. Otherwise use “Recreate Scan Disk Array?”.
-
A: Rebuild Scan Disk Array will repair the Disk Array if only one drive has encountered an issue
-
B: Recreate Scan Disk Array will destroy all raw scan data on the Disk Array and rebuild.
Figure 29. Reconfig Menu
7 Appendix IV: All Drives Empty
If all drives are marked empty and these additional lines of text appear as seen in the picture below:
Figure 30. All Drives Empty
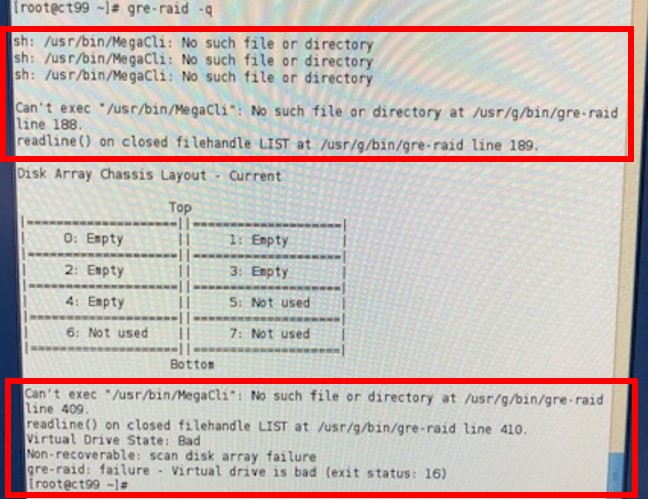
The load from cold failed to install all required packages. A load from cold is required to fix this.