- Topic ID: concept_nyf_vkh_hkb
- Version: 5.0
- Date: Mar 2, 2022 10:16:02 PM
AW Server Feature Connection
The following description is an overview of each method and should be used as a guide. Be sure to check and implement formal procedures before proceeding.
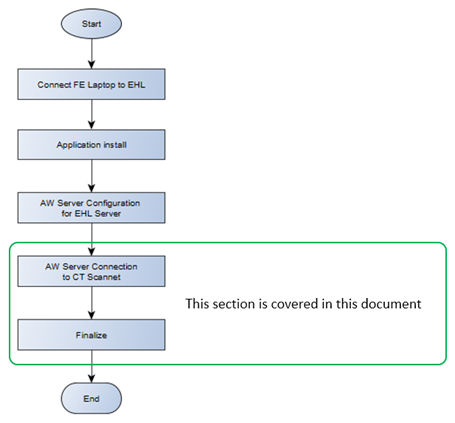
1 Smart Subscription AW Server Installation Flow Chart
Purpose:
This document describes the settings of the CT part in Smart Subscription AW Server installation. The examples for each chapter are described, but please be sure to refer to the related Service document for details.
Figure 1. Flow Chart
2 Prerequisite
- Installation AWS application to EHL has been completed.
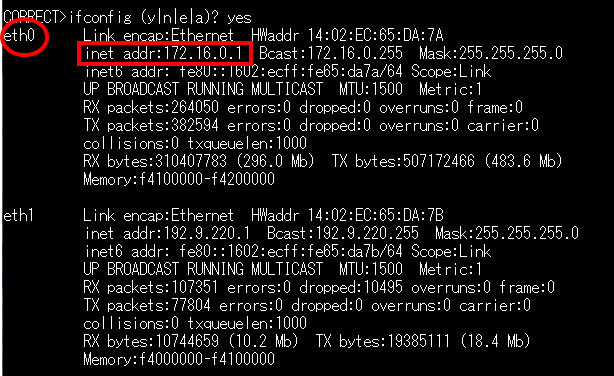
3 Check CT eth0 IP Address
- Open shell.
- Type ifconfig and press [Enter].
- Record the eth0 inet addr:
eth0 inet addr: _____________
- Type exit and press [Enter] for close shell.
Figure 2. eth0 is 172.16.0.1
4 [SmartSubscription -AW Server] option installation
The [SmartSubscription -Connection] CT option must be installed before this option install, there have been dependency.
Even if the AWE option already exists in the CT system, there is no need to uninstall the AWE option.
- Install [SmartSubscription -AW Server] CT option.
Refer to Software→ Software Installation Procedure (LFC) → Install Software Options by eLicense in [Service Methods]
- Confirm the AW Server Configuration window will appear, enter the Edison private proxy IP to IP Address field and AW Server Host Name to Host Name field.
*The < Edison Private Proxy IP > is recorded in the [Check Private Proxy IP address of EHL] section of [ SmartSubscription AW server Installation Manual ]
*The <AW server Host Name> is recorded in the [Network configuration] section of [ SmartSubscription AW server Installation Manual ]
IP Address Host Name 172.16.0.120 aws-11 Figure 3. AWS Configuration
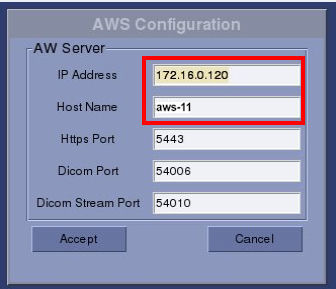
- Click Accept.
- Reboot the CT Console.
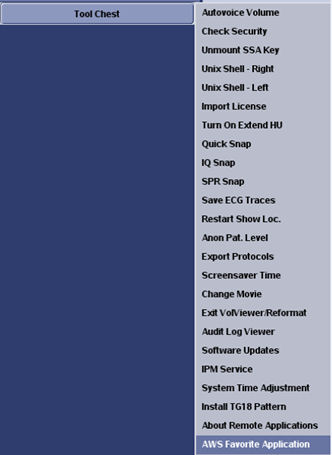
- Click on “AWS Favorite Application” pull down menu in Tool Chest
Figure 4. Tool Chest Menu
- Put Check in any Application.
* They appear as launch buttons in the Image Work Browser.
Figure 5. AWS Favorite Application
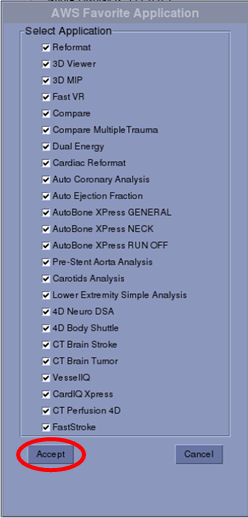
- Restart browser automatically after Click Accept.
- Confirm the selected applications by previous step are added to Browser menu with AWS prefix.
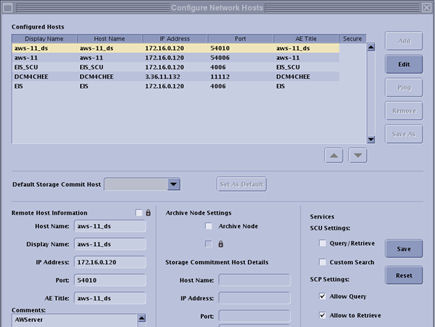
- Confirm the two remote hosts are added in Network Configuration of ImageWorks Browser.
Figure 6. Added Remote Host 1
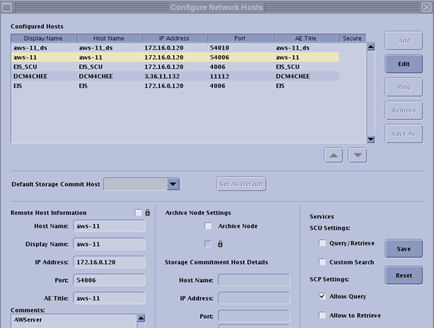
Figure 7. Added Remote Host 2
5 Finalize
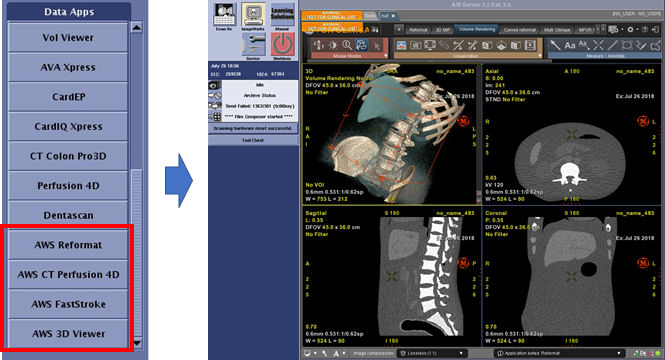
- Select the image(series) properly for launch the application of Volume Viewer.
And click any application from AWS prefix.
- Confirm the AWS is launch on image monitor of CT console.
Figure 8. Image Monitor of CT Console
- Execute System State: [Save All] of CT Scanner for backup.