- Topic ID: id_11038876
- Version: 2.0
- Date: Jan 30, 2019 9:43:02 PM
HV Tank Feedback Resistor Verification (Pro, RT, VCT)
Prerequisites
This procedure is performed to ensure that the system is properly controlling scan parameters. By using the bleeder, verification is made on the secondary side of the HV tank and can be compared to selected scan parameters.
Procedure
 warning
- Remove gantry power. Be certain to follow appropriate Lockout/Tagout procedures.
- Remove gantry right side cover.
- Turn OFF all 3 switches (AXIAL DRIVE ENABLE, HVDC ENABLE, 120 VAC) on the Service Switch Panel.
- Remove and set aside the top and front gantry covers.
- Rotate the gantry such that HV Tank assembly is in the 3 o'clock position.
- Lock the gantry in position, using the rotational lock. Ensure that gantry rotation is locked by attempting to rotate the gantry by hand.
- Free the HV cable.
- Carefully cut ty-raps securing HV cable. Note HV cable routing.
- Loosen the cable's locking ring with a spanner wrench.
- Pull cable terminal stick out of its receptacle on HV tank.
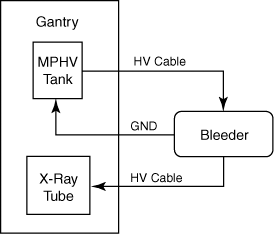
- Install the HV bleeder between the tank and the tube. Use the sling/hoist
to suspend the bleeder. See Figure 1.
Figure 1. Bleeder Connection Block Diagram
- notice
- Turn ON the 120VAC and HVDC ENABLE on the Service Switch Panel.
- Wait about 2 minutes for the gantry display to reset. No flashing lights on the gantry display should indicate this.
- Clear the E-Stop condition by pressing the DRIVES RESET button
on the Service Switch Panel or
 on the gantry control panel.
 - Setup the oscilloscope:
- To minimize noise and obtain a common ground, you should plug the oscilloscope into either the gantry or the console.
- Use 10x probes
- Connect channel one probe to the positive (red) output of the bleeder and ground to the negative (black) output of the bleeder.
- Set horizontal scale = 200 ms, vertical scale = 10V/div
- Trigger channel one, negative slope, DC couple, trigger mode normal.
- Launch kV and mA Tool.
- Verify the following scan parameters:
-
X-Ray test type = manual
-
Gantry = Disabled
-
Exposure time = 1s
-
No of scans = 1
-
Focal Spot = Large
-
kV = 80kV
-
mA = 50mA
-
- Press RUN and take scan.
- Measure the channel 1 mean from just inside the front edge to just inside the back edge of the waveform, using cursors on the oscilloscope.
- Repeat the measurements for 100, 120, and 140kV scans.
- Verify internal scan timer:
- Change trigger slope on oscilloscope to positive. Adjust trigger level to TTL if necessary.
- Take the following scan:
-
X-Ray test type = manual
-
Gantry = Disabled
-
Exposure time = 1s
-
No of scans = 1
-
Focal Spot = Large
-
kV = 100kV
-
mA = 40mA
-
- Measure the output
Using cursors on the oscilloscope, measure the scan time (Dt) from just inside the front edge to just inside the back edge of the waveform.
- notice
- Reconnect HV cable from tube to tank. Make sure you overfill the receptacle. Reference: Securing HV Cable (Pro 16).
 |
|
Finalization
- The scale factor for your kV measurements is 10kV/volt (e.g. 8V => 80kV).
- To pass the kV check, all three of the following conditions must be
met:
The scope reading must be within 3% of the desired kV.
The kV mA Tool screen reading must be within 3% of the desired kV.
Both measurements (scope and screen) must be within 2% of each other.
- The internal scan timer measurement should be within +/- 4%.
- Record the results on the HHS data sheet and / or take appropriate service action.