- Topic ID: id_11038809
- Version: 2.0
- Date: Jan 30, 2019 9:43:02 PM
Equipped FAN Inverter Replacement
Prerequisites
-
Remove old Fan Inverter
-
Replace new Fan Inverter
1 Equipped Fan Inverter Removal
Procedure
 danger
- Move table to its lowest elevation.
- Turn OFF all 3 switches (Axial Drive, HVDC, 120VAC) on the Service Switch Panel.
- Remove power at main disconnect (A1) panel. Use proper Lockout/Tagout procedure.
- Remove side top and front gantry covers.
- Turn OFF all 3 switches (Axial Drive, HVDC, 120VAC) on the Service Switch Panel.
- Remove power at main disconnect (A1) panel. Use proper Lockout/Tagout procedures.
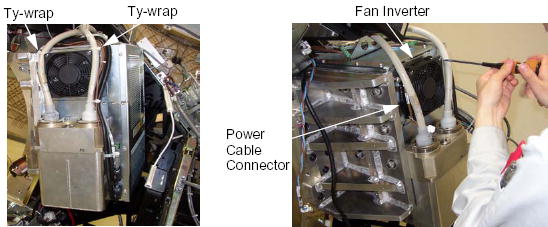
- Cut any ty-wraps holding the cables to the Fan Inverter.
- Disconnect the power cable connector of the Fan Inverter.
- Unscrew the 2 screws, and remove the Fan Inverter from the Power
Unit.
Figure 1. Equipped Fan Inverter Removal
2 Equipped Fan Inverter Installation
Procedure
- Place the new Fan Inverter on the Power Unit.
- Connect the power cable connector of the Fan Inverter.
- Fasten the cables to the Fan Inverter using tie-wraps.