- Topic ID: id_16158042
- Version: 2.0
- Date: Jun 10, 2020 2:23:13 AM
AWE Connection Option Installation
1 Personnel Requirements
2 Overview
This procedure outlines the process required to install and set up the AW Server Client software on Optima CT540 systems.
3 Preliminary Requirements
3.1 Pre-requisite
-
AW Server should be installed at your site.
-
Your site should have purchased the "Basic Front End - 3rd Party integration" option. The license key will be used later steps.
3.2 Required Conditions
3.3 Verified Software Version
4 4 Procedure
4.1 Install AWE Connection Software Option
Install the supplied “AWE connection” software key according to the Install software Option procedure.
4.2 Install AWS Client Software
-
Record the IP address of AWS Server and the User Name and Password for configuration on CT console in later steps.
note:The User Name and Password are one of the accounts configured on AW server.
Consult with the site IT admin for which one assigned to this use.
-
Open a Unix shell and login as root.
Type: su-ENTER
Type the root password and press ENTER.
-
Type the following:
firefox xxx.xxx.xxx.xxx
note: “xxx.xxx.xxx.xxx” is AW Server’s IP address. -
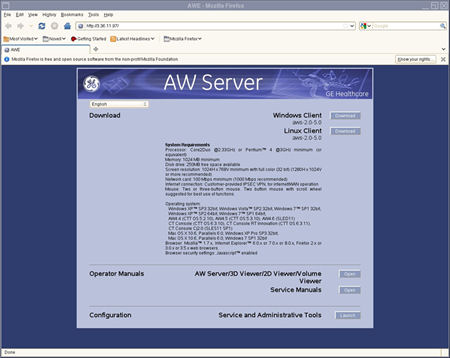
The AW Server Download screen appears.
Figure 1. AW Server Download Screen
-
Click the “Linux Client” Download button.
-
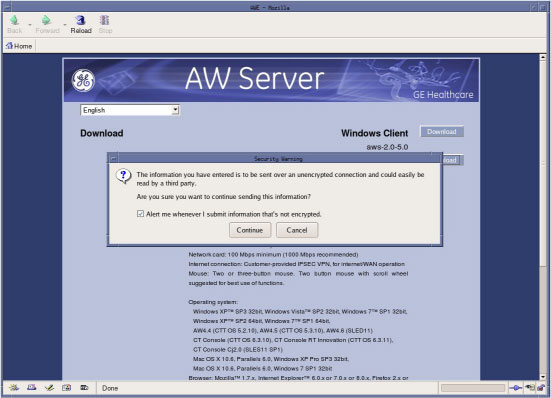
Click the “Continue” button.
Figure 2. AW Server Download Screen
-
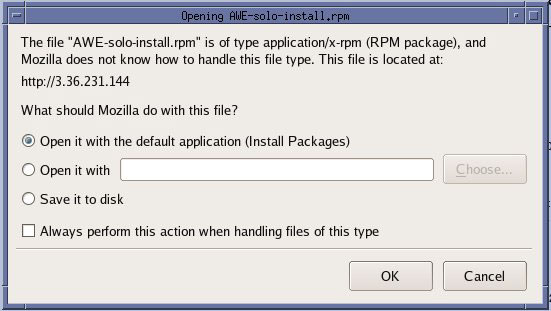
Select “Save it to Disk”, then click the “OK”.
Figure 3. Opening AWE - solo-install.rpm
-
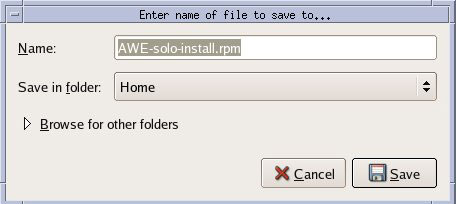
Confirm that “Home” is selected as Save in folder and click the “Save” button.
Figure 4. File Name Entering
-
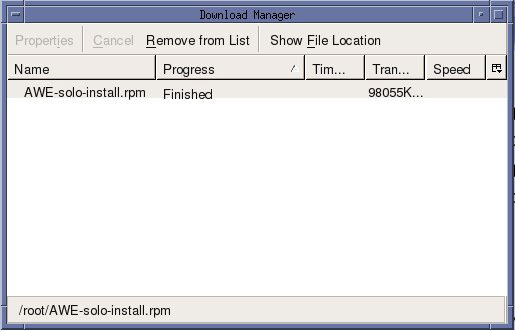
When download is completed, the following window appears. Close this window.
Figure 5. Download completed window
-
Close the AW Server Download screen.
-
Open a Unix shell and login as root.
Type: su–ENTER
Type the root password and press ENTER
-
Type the following:
/usr/g/scripts/InstallAWSClientOnConsole
-
After the Client software installation, the "Configure AW Server Client" window appears automatically.
-
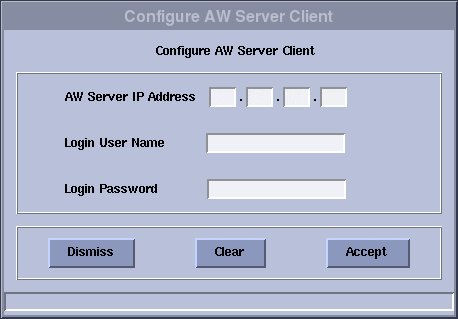
Input the AW Server IP Address, User Name and Password and click Accept.
Figure 6. Configure AW Server Client
-
Confirm that “AWS client software installation is finished” message appears in Unix shell.
-
Reboot the System. Select [Shutdown] on the Desktop and select [Restart], then [OK] on the Attention Window.
-
Declare AWS on the CT System.
On CT Console, select ImageWorks ->Network ->Remote Hosts, enter the required Parameters and select save.
4.3 Enable Integration
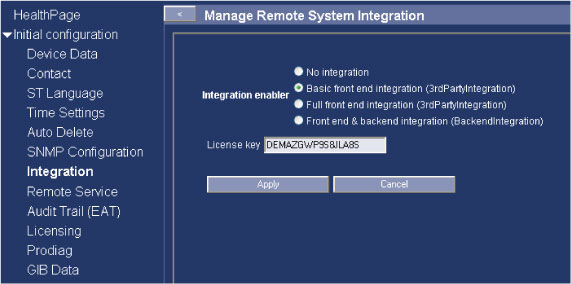
Open a shell, type: mozilla AW Server’s IP address to launch AWS web. Enter Service tool, select Initial configuration -> Integration, select Basic front end integration (3rdPartyIntegration) as Integration enabler. Input License key and Click Apply. refer to Figure 7
Figure 7. Initial configuration
4.4 Test starting AWS Client on CT Console
-
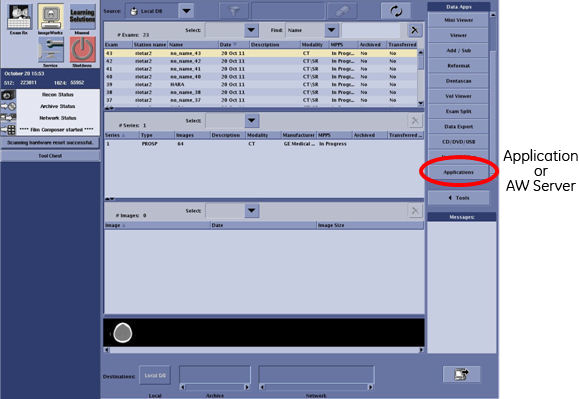
Open ImageWorks desktop Browser.
note: Before launching the AW server application, the selected exam and series in the console exam list needs to be transferred to AW server. -
Confirm that "Applications" button exists on Image works browser and can launch the AW server from CT Console by clicking the “Application” button.
Figure 8. Desktop Browser
-
Execute the System State Save to save the AWS Configuration.
5 Finalization
No finalization steps.