- Topic ID: id_15460796
- Version: 2.0
- Date: Nov 8, 2018 1:36:49 AM
Z400 Host PC BIOS Setup
Prerequisites
Overview
The BIOS of the computer is a collection of machine language programs stored as firmware in ROM. The BIOS ROM includes such functions as POST, PCI device initialization, Plug 'n Play support, power management activities, and the BIOS Setup (F10) Utility. The BIOS Setup (F10) Utility enables you to change factory default settings and set or change the system configuration based on the Host Computer hardware or system functionality requirements.
The BIOS Flash Code for programming the Host Computer BIOS ROM is available from HP in the form of a zip file which contains the necessary “bin” binary file along with a CD image (ISO) file, which is used to create the above-mentioned BIOS CD. The binary file included in the zip file may be stored directly on a USB Media (Memory Stick). The Z400 Host Computer supports direct access to external USB memory devices and no longer requires that the USB device be “bootable”.
Effective August 2009, HP Z400 Host Computer's (with chipset revision B3) will be configured with BIOS Revision 786G3 v01.14.
Effective March 2011, HP Z400 Host Computer's (with chipset revision C2) will be configured with BIOS Revision 786G3 v03.04.
1 HP Z400 BIOS Flashing and Recovery
(For HP Z400 BIOS Revisions 786G3 v01.14 and 786G3 v03.04)
The following information covers the necessary procedures for flashing and recovering from corrupted or incomplete flashing of the Host Computer’s BIOS ROM. This is not to be confused with the BIOS Settings discussed later. The BIOS firmware code flashed to the BIOS ROM is the executable portion of the BIOS ROM code, which includes a default set of configuration settings. Later, customize these settings for the Host Computer’s specific configuration details. You can save and restore these customized settings on USB storage media for quick restoration in the event of BIOS ROM corruption or BIOS updating.
1.1 Z400 BIOS ROM Flash Update Procedure
Procedure
- Power on the Host Computer.
- Insert the BIOS CD into the DVD drive or insert USB Media in any of the USB ports on the Host Computer.
- Reboot the Host Computer. Press Ctrl+Alt+Delete or cycle power.
- Press F10 as soon as your display is active
and the text F10=Setup appears in the lower right
corner of the screen.note:
If you do not press F10 at the appropriate time, you must try again. Restart the Host Computer and press F10 again to access the utility, or press Ctrl+Alt+Delete prior to boot if you miss the opportunity to press F10.
- Select your language from the list and press Enter.note:
Use the up and down arrow keys to select the language option.
- Select File > Flash System ROM.note:
In the BIOS Setup (F10) Utility menu, five headings are displayed: File, Storage, Security, Power, and Advanced. Use the left and right arrow keys to select the appropriate heading, then press Enter.
- Select the Optical Disk option and follow instructions on the screen to flash BIOS ROM.
- Remove the BIOS CD from DVD drive or USB Media.
- On the File submenu, select File > Save Changes and Exit. The Host Computer will reboot.
- Proceed to Z400 BIOS Setup (F10) Utility Procedure
1.2 Z400 BIOS Recovery Procedure
NOTE: This procedure should rarely be required. The FailSafe Boot Block ROM enables system recovery in the unlikely event of a ROM flash failure. For example, if a power failure occurs during a ROM upgrade, the Boot Block uses a flash-protected section of the ROM to verify a valid system ROM flash when power is restored to the workstation.
-
If the system ROM is valid, the system starts normally.
-
If the system ROM fails the validation check, the FailSafe Boot Block ROM provides enough support to start the workstation from a BIOS image CD. The BIOS image CD programs the system ROM with a valid image.
-
When Boot Block detects an invalid system ROM, the workstation power LED blinks red eight times and the workstation beeps eight times; then the workstation pauses for two seconds. On some models, a Boot Block recovery mode message appears.
Procedure
- Insert the BIOS CD into the DVD drive.
- Reboot the Host Computer.note:
If no BIOS CD is found, you are prompted to insert one and restart the Host Computer. If the workstation starts from the CD and successfully reprograms the ROM, three keyboard lights illuminate. A rising-tone series of beeps also signals successful recovery.
- Remove the BIOS CD and reboot the Host Computer.
2 Z400 BIOS Setup (F10) Utility Procedure
The BIOS Setup (F10) Utility enables you to do the following:
-
Change factory default settings and set or change the workstation configuration, which might be necessary when you add or remove hardware.
-
Determine if all devices installed on the workstation are recognized by the system and functioning.
-
Determine information about the operating environment of the workstation.
-
Solve system configuration errors detected but not automatically fixed during the Power-On Self-Test (POST).
-
Establish and manage passwords and other security features.
-
Modify or restore factory default settings.
-
Set the workstation date and time.
-
Set, view, change, or verify the workstation configuration, including settings for CPU, graphics, memory, audio, storage, communications, and input devices.
-
Modify the boot order of installed mass storage devices such as SATA, SAS, diskette drives, optical disk drives, network drives, LS-120 drives and USB boot devices.
-
Configure the boot priority of SATA and SAS hard-drive controllers.
-
Enable or disable Network Server Mode, which enables the workstation to start the operating system when the power-on password is enabled with or without a keyboard or mouse attached. When attached to the workstation, the keyboard and mouse remain locked until the power-on password is entered.
-
Enable or disable POST Messages to change the display status of POST messages. POST Messages disabled suppresses most POST messages, such as memory count, product name, and other nonerror text messages. If a POST error occurs, the error is displayed regardless of the mode selected. To manually switch to POST Messages Enabled during POST, press any key except F1 through F12.
-
Specify an Ownership Tag, which appears when the workstation is powered on or restarted.
-
Specify the Asset Tag or property identification number assigned by the company to this workstation.
-
Enable power-on password prompts during system restarts (warm-starts) and power on.
-
Hide or show the integrated I/O functionality, including serial, USB, or parallel ports, audio, or embedded NIC. Hidden devices are inaccessible, which increases system security.
-
Enable or disable removable media boot ability.
-
Enable or disable removable media write ability (when supported by hardware).
-
Replicate the workstation setup by saving system configuration information on CD or diskette and restoring it on workstations.
-
Execute self-tests on specified SATA and SAS hard disk drives (if supported by the drive).
To access the BIOS Setup (F10) Utility menu, perform the following steps:
Do not power off the workstation while the ROM is saving the Computer Setup (F10) Utility changes, because the Complementary Metal-Oxide Semiconductor (CMOS) could become corrupted. After you exit the F10 Setup screen, you can disconnect power from the workstation.
Procedure
- Power on or reboot the Host Computer.
- Press F10 as soon as your display is active
and the word F10=Setup appears in the lower right
corner of the screen.note:
If you do not press F10 at the appropriate time, you must restart the Host Computer and try again. Alternatively, you can press Ctrl+Alt+Delete prior to boot if you miss the opportunity to press F10.
- Select your language from the list, and press Enter.
- In the BIOS Setup (F10) Utility menu, select File>Default Setup>Restore Factory Settings as Default. Press F10 to accept the changes, and then select Apply Defaults and Exit. This restores the original factory system defaults. The Host Computer will reboot.
- Enter the BIOS Setup (F10) Utility again.
- Reset the following BIOS Settings for specific Z400 Host Computer
application.
- In the BIOS Setup (F10) Utility menu, five headings are displayed: File, Storage, Security, Power, and Advanced. Use the left and right arrow keys to select the appropriate heading. Use the up and down arrow keys to select the option you want, and press Enter.
- Differences From Default Settings:note:
Navigate through the BIOS Headings and change the default values for the shown in Table 1.
- On the File submenu, select File > Save Changes and Exit. The Host Computer will reboot.
3 Z400 BIOS Settings Save and Restore Procedures
Perform the following procedures to save the Host PC’s BIOS Settings (after proper configuration is set).
3.1 Saving BIOS Settings Using USB Media
Procedure
- Insert a USB Memory Stick in any of the Host Computer's USB ports.
- Reboot the Host Computer, and press F10 as soon as your display is active and the word F10=Setup appears in the lower right corner of the screen.
- Select File>Replicated Setup>Save to Removable Media. and follow the instructions on the screen to save the Settings on
USB media device.note:
The Host computer will save a text file on the USB Media which contains the saved settings. This file can be copied and saved for future use. File name on USB Media: “cpqsetup.txt”.
3.2 Restoring BIOS Settings Using USB Media
Procedure
- Insert a USB Memory Stick (which contains the Settings text file) in any of the Host Computer's USB ports.
- Reboot the Host Computer, and press F10 as soon as your display is active and the word F10=Setup appears in the lower right corner of the screen.
- Select File>Replicated Setup>Restore from Removable Media and follow the instructions on the screen to restore the Settings from USB media device.
4 Z400 BIOS Settings Clear / Reset Procedure
Although rare, the BIOS Settings portion of the Host PC’s BIOS can corrupt, causing Host PC boot issues and POST errors. In the event that you suspect the BIOS Settings is corrupted, perform the following steps to clear/reset the setting to the HP factory default values.
Procedure
- Shut down the operating system, and power off the Host Computer and any external devices.
- Disconnect the power cord of the Host Computer. Press and hold the Host Computer Power Switch for several seconds to bleed off any stored power in the Host PSU.
- Disconnect the keyboard, monitor, and any other external devices that are connected to the workstation.
- Remove the access panel.note:
Pushing the CMOS (BIOS Settings) button resets CMOS values to HP factory defaults and erases any customized information, including passwords, asset numbers, and special settings. It is important to back up the Host PC BIOS settings before resetting them in case they are needed later. It is also important to back up the Host Computer’s BIOS Setting before BIOS corruption occurs, otherwise you need to configure the BIOS setting manually.
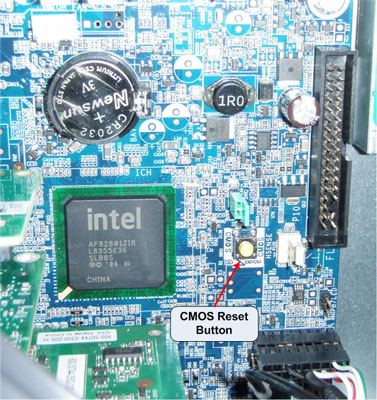
- Locate, press, and hold the CMOS button in for five seconds.note:
Be sure that the AC power cord is disconnected from the power outlet. Press and hold the Z400 Host Computer's Power Switch for a few seconds to bleed off PSU. The CMOS button does not clear CMOS if the power cord is connected.
Figure 1. Z400 CMOS Button Location
- Replace the access panel.
- Reconnect any external devices.
- Plug in and power on the Host Computer.note:
The workstation passwords, and any special configurations, along with the system date and time, must be reset.
- Restore the saved BIOS Settings from the locally-created BIOS Setting file, or manually configure the BIOS settings.
- To apply and save changes, select File > Save Changes and Exit. The Host Computer will reboot.
5 HP Z400 BIOS Settings ( v1.14)
Procedure
- Click the media file link for a listing of proper BIOS (version
1.14) Settings for the Z400 Host Computer.
Figure 2. Version 1.14 BIOS Settings
PDF File: 786G3 v01.14 BIOS Settings
6 HP Z400 BIOS Settings (v3.04)
Procedure
- Click the media file link for a listing of proper BIOS (version
3.04) Settings for the Z400 Host Computer.
Figure 3. Version 3.04 BIOS Settings
PDF File: 786G3 v03.04 BIOS Settings
7 Finalization
After running any of the procedures in this document, ensure that BIOS settings conform to those shown in linked media files of Sections 4.5 or 4.6 depending on BIOS version installed.
The linked media files show the BIOS Settings in a text format as seen when saved to USB media. See Section 4.3 above.