note: This procedure is only for systems that have a new liquid bearing tube. Do not use with other products due to the risk of permanent damage. Older liquid bearing tubes should be able to self sustain the vacuum pressure.
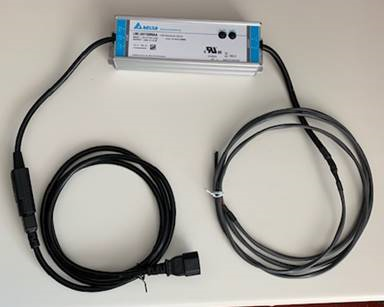
The procedure uses the Pressure Recovery Kit (PRK) (PN 5859019-2) for the Performix VCT plus (Nessus) or Performix HD Plus (Nessus HD) X-ray tube (liquid bearing tube). The PRK kit can be ordered as a FRU. The kit connects to the getter on the X-ray tube and, when power is applied, activates the device to absorb gas molecules to achieve improved X-ray tube vacuum pressure.
Figure 1. PRK
1 Hardware configuration
important:DO NOT connect power supply to the gantry until instructed to do so.
Procedure
The getter interface is on the back side of the tube.
Figure 2. PRK interface and pin location
Obtain the pressure recovery kit and locate the two (2) leads that connect onto the getter pins.
Figure 3. Pressure recovery kit diagram
Carefully connect the two (2) leads to the two (2) pins. DO NOT bend pins.
caution
Equipment damage
Use extreme care when connecting the power leads to the tube getter pins. Tube damage may occur if the pins are bent and possible loss of tube vacuum pressure.
Figure 4. Connecting the leads to the Pins
note: There is no polarity or specific order when attaching the pins.
2 Prepare the System
Procedure
Move the table to its home position.
Remove the right side gantry cover.
note:Do Not Turn OFF HVDC or 120 VAC if the TubeCare indicator is in the Green zone.
Wait until TubeCare indicator is in the Yellow or Blue zone.
Use rotor_ctrl -stop to stop rotor.
“This action will stop the tube rotor. Do not Proceed if the TubeCare indicator is in the Green zone. Continue to stop rotor? (Yes/Quit)”
Select Yes to continue stop rotor.
Do Not Turn OFF 120 VAC (need to wait about 11 mins after rotor begins to coast).
Turn off HVDC ENABLE, AXIAL DRIVE ENABLE, and 120 VAC ENABLE switches on Service Switch Panel.
Remove scan window, gantry left side cover, gantry top covers and gantry front cover.
Rotate gantry such that X-ray tube is in 2 o'clock position. This position allows access to the getter interface.
Engage rotational lock. See Equipment Service - Lockout-Tagout-PPE from Safety section.
Locate the getter interface on the backside of the tube. If necessary, use a cell phone camera or a mirror to assist in locating the getter interface.
Figure 5. PRK interface and pin location
3 Connect the PRK
Procedure
Obtain the pressure recovery kit and locate the two (2) leads that connect onto the getter pins.
Carefully connect the two (2) leads to the two (2) pins. DO NOT bend pins.
caution
Equipment damage
Use extreme care when connecting the power leads to the tube getter pins. Tube damage may occur if the pins are bent and possible loss of tube vacuum pressure.
Figure 6. Connecting the leads to the pins
note: There is no polarity or specific order when attaching the pins.
4 Activating the pressure recovery kit
notice
Power supply is powered ON when connecting to the gantry.
important: This process produces considerable heat to all of the surrounding areas of the tube exterior.
Procedure
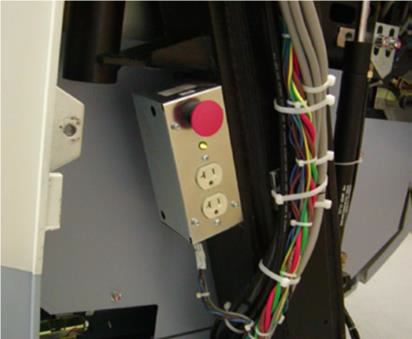
Locate the AC power cord for the recovery kit.
From the Service panel, turn ON 120 VAC, if it is off.
Plug in the AC power cord and the adapter plug to the service outlet on the gantry.
note: The power supply automatically turns ON (there is no power switch) and starts the pressure recovery process within the vacuum tube getter when plugging in the power cord.
Figure 7. Connecting power to the gantry
Confirm the power supply automatically turned ON when plugged in (there is no power switch).
note: All component surfaces, coolant hoses and connections are very hot during the tube pressure recovery process.
Keep the power supply ON for at least 15 minutes, but no longer than 20 minutes.
note: There is no benefit keeping the power on longer than 15 minutes. The longer the power is on, may produce excessive heat.
After 15 minutes, unplug the tube pressure recovery kit power supply from gantry service outlet. DO NOT unplug the two (2) lead pins from the tube until an additional 15 minutes has passed to allow for proper cool down.
5 Removing the kit
notice
All component surfaces, coolant hoses and connections are very hot during the tube pressure recovery process.
Procedure
Disconnect the two (2) leads. The leads may be warm to the touch.
caution
Equipment damage
Use extreme care when dis-connecting the power leads.
Put the pressure recovery kit back into original shipping box for storage.
Resume using the X-ray tube as before this service procedure was required. Execution of the Pressure Recovery Kit service procedure can be retried if symptoms persist.
Only run to the PRK kit additional times after attempting to resume normal scanning. This is to determine benefit of previous runs of PRK kit. Running the PRK kit more than three total times is not recommended in one intervention (more than 3 runs does not provide additional benefit).
After resuming scanning and up to 3 runs of PRK kit, if symptoms persist, replace the tube.


 caution
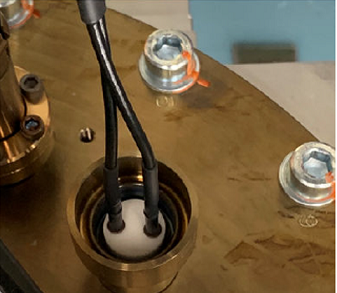 note: There is no polarity or specific order when attaching the pins.
 note: There is no polarity or specific order when attaching the pins.