- Topic ID: id_15460696
- Version: 2.0
- Date: Nov 8, 2018 1:36:37 AM
MOD Archive & SCSI Card Option Installation
Prerequisites
Overview
This procedure describes and illustrates the steps necessary to install the MOD Archive Option along with SCSI Card into a GOC6.5 Operator Console
Please review Section 3.5, Required Conditions, before proceeding with this option installation procedure.
1 Power Off (Shutdown) GOC6.5 Console
Procedure
- Select one of the following methods to power off the Operator
Console:
- If Applications are running, click on the [Shut Down] icon and select [Shutdown].
- If Applications are down, open a Unix Shell using the Toolchest.
Type:
{ctuser@hostname} haltENTER
The Operator Console monitor will display a System Halted message when it is acceptable to power off the Operator Console.
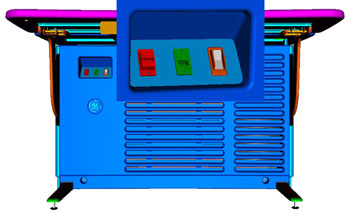
- Power OFF the Operator Console at the front panel switch (Figure 1).
Figure 1. Console Power Switch
- Perform Lockout / Tagout as described in Safety – Equipment
Service – Lockout / Tagout / PPE on the Safety menu of the
service publication. For added protection, disconnect the Twist-N-Lock
Main Power Cable from rear of console.
2 Remove GOC6.5 Console Covers
Procedure
- Move the console away from the wall to allow clear access around the console.
- Remove console’s front and rear covers and set aside.note:
Refer to Console Cover Removal and Installation procedure located on the Replacement > Console menu of the service publication for more details.
- Remove the console’s Keyboard Tabletop and set aside.
This will allow better access to the console’s computer rack.
3 SCSI Card Option Installation (Host Computer - HP Z400)
Procedure
- Remove the Host Computer from the GOC6.5 console.
- Unplug the power cord to the rear of the Host Computer chassis.
- Remove the cable connections to the HP Z400 Host Computer chassis.note:
Verify that all cables are labeled and clearly marked. If necessary, add a label for clarity.
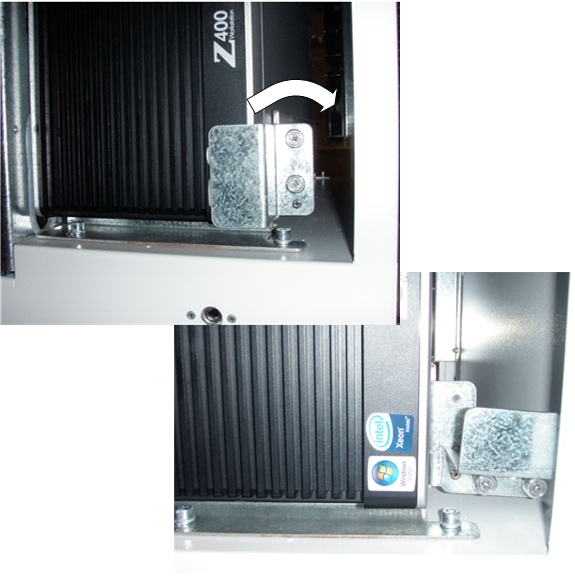
- Loosen the two (2) cap screws on the retaining bracket at the
lower right front of the Host Computer chassis, which holds the Host
Computer in place in the Operator Console right side compartment.
Figure 2. HP Z400 Console Mounting
- Slide the Host Computer forward (out the front of console) and
set aside.
- Install SCSI Controller Card in Host Computer (HP Z400)
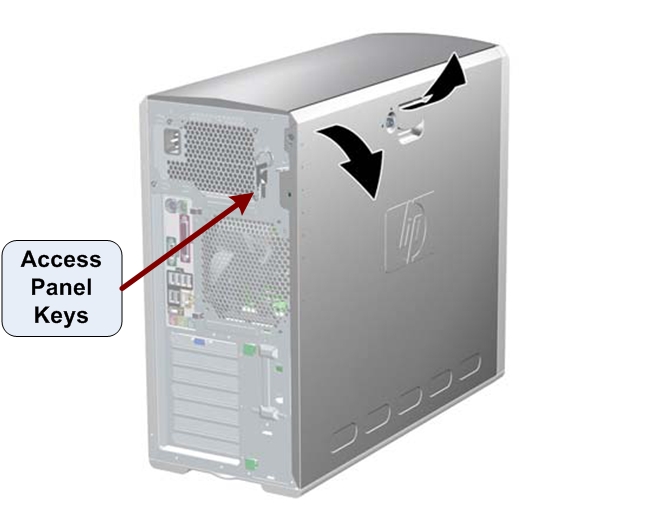
- Remove the Host Computer's access panel.
Figure 3. Access Panel Cover Removal
- Lay the Host Computer on its side with the system board facing up.
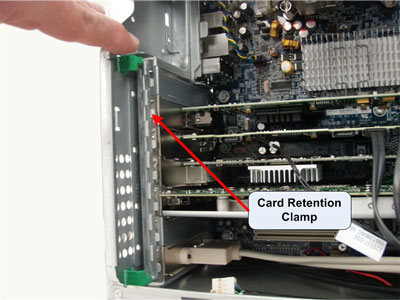
- Unlatch the Retention Clamp that holds the Expansion Cards in
place.
Figure 4. Expansion Card Retention Clamp Removal
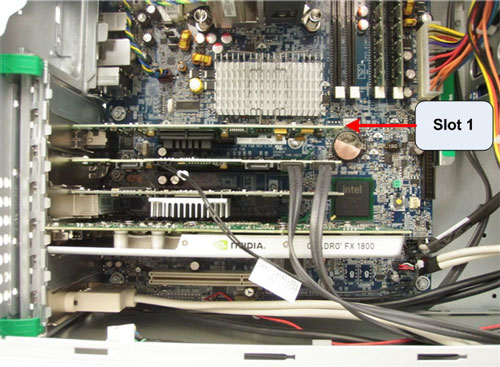
- Insert the SCSI Controller Card in Slot 1 of the Host Computer.
Make certain the SCSI Card is fully seated in the motherboard.
Figure 5. SCSI Controller Card Location
- Latch the Retention Clamp that holds the Expansion Cards in place.
- Remove the Host Computer's access panel.
- Reinstall Host Computer (HP Z400) in GOC6.5 Console.
- Slide the HP Z400 Host Computer into the Operator Console from the front.
- Hand tighten the two (2) cap screws on the retaining bracket to secure the Host Computer chassis to the Operator Console right side compartment.
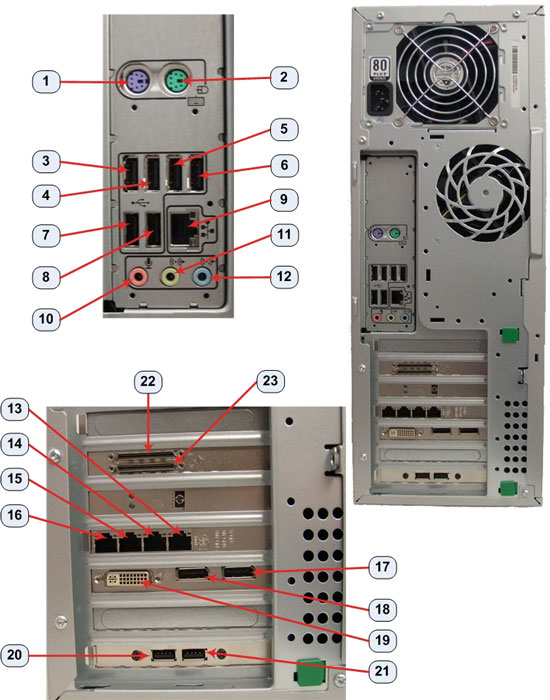
- Replace the rear cable connections.
Figure 6. HP Z400 Cable Connections
- Mount the power cord to the rear of the Host Computer chassis.
4 MOD Archive Peripheral Tower Option Installation
Procedure
- Set the MOD Peripheral Tower on top of the existing DVD Peripheral Tower on the console table top. The Towers are made to be nested together.
- Connect the supplied SCSI Communication Cable between the MOD
Peripheral Tower and the Host Computer SCSI 1 Port. Route the cable
as shown in the following illustration.
Figure 7. MOD Archive Peripheral Tower Connections
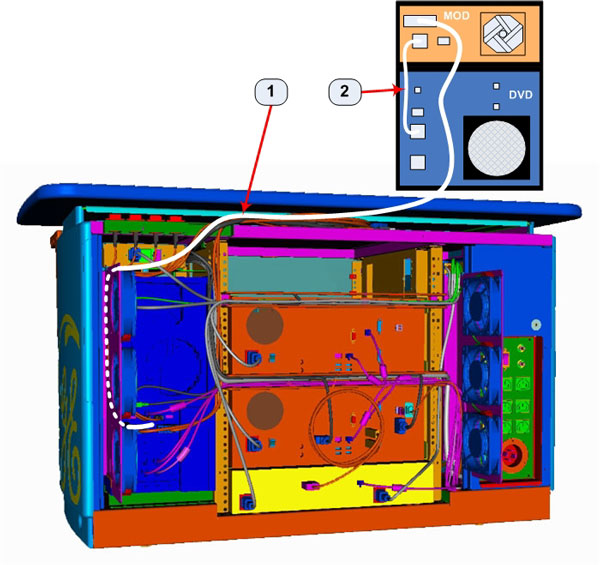
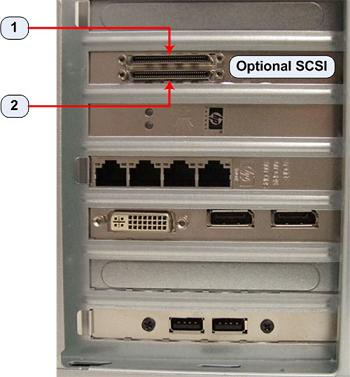
Figure 8. GOC6.5 Host Computer (HP Z400) Optional SCSI Card Ports
- Connect the MOD Archive Peripheral Tower Power Cable between
the MOD and DVD Peripheral Towers. See Cable # 2 in illustration above.
The MOD Archive Peripheral Tower receives its power from the DVD peripheral
Tower.
5 Console Power Up Checks
Procedure
- Reconnect the Twist-N-Lock Main Power Cable at rear of console and remove the Lockout / Tagout protection applied earlier.
- Power on the Operator Console at the console’s front panel switch.
- Do not allow Applications to start. During boot-up, cancel Application Startup when the CT Software Auto-start pop-up window appears.
- Verify that the Host Computer has powered up and is not displaying
or sounding any POST Errors.
6 System Configuration (“reconfig”)
In order to ensure proper operation of the SCSI Controller Card and the MOD Archive Peripheral Tower, it is necessary to perform the following System Configuration process.
Procedure
- Open a Terminal window and log on as Root.
Type: {ctuser@hostname} su – ENTER
Type the root password and press ENTER
- Launch the System Configuration utility:
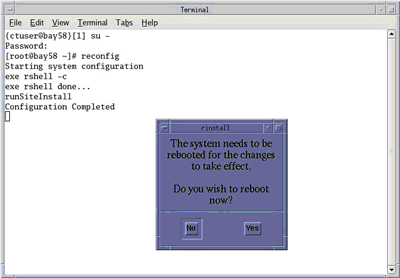
Type: [root@hostname] reconfigENTER
- The System Configuration Utility launches.note:
No changes are required in the System, Preferences, Hardware, or Network Tab settings. The utility needs to be executed in order for the automated scripts to run. During the reconfig process the Host Computer is configured to support the new SCSI Controller Card and MOD Archive Peripheral Tower.
- Click Accept Tab to start the reconfig process.
- When the configuration changes are complete, the system displays
a prompt to reboot. Click YES.
Figure 9. Configuration Complete Window
- After Rebooting, the system will automatically log in as ctuser.
- If the Autostart Disabled popup message
appears, select OK and open a Terminal Window.
Type: {ctuser@hostname} stENTER
7 Functional Checks
Procedure
- Perform the MOD Archive Drive tests in Peripheral Tower Functional Tests located on the Functional Checks > Console menu of the service publication to confirm proper MOD Archive Option operation.
- Perform the tests in System Scanning Tests
located on the Functional Checks > System Level menu of the service
publication to confirm proper system operation.
8 Console Cover Installation
Procedure
- Reinstall Console Front and Rear Covers.note:
Refer to Console Cover Removal and Installation procedure located on the Replacement > Console menu of the service publication for more details.
- Reinstall Console Keyboard tabletop.
9 Finalization
Refer to System State Save & Restore procedure on the Software menu of the service publication and save a new System State.