- Topic ID: id_15460808
- Version: 2.0
- Date: Nov 8, 2018 1:39:31 AM
HSDA RAID Controller Firmware Upgrade
Prerequisites
Overview
This procedure describes and illustrates the steps necessary to upgrade the High Speed Disk Array (HSDA) RAID Controller Firmware from version “363B” to “371E”.
In order to support the latest SATA II Hard Drive FRUs, an upgrade of the HSDA’s internal RAID Controller Firmware is required. The new firmware will be installed in all forward production systems starting 1st Quarter 2011. The Installed Base systems will also require the new firmware to support the use of these new drives. FMI’s are planned for the installed base to distribute and flash the new firmware. (Note: this is a one time only process. Once flashed with new firmware, the HSDA will not require additional repeated flashing when the service corrective actions are required. Example Load From Colds).
With the new firmware installed, the HSDA will support any combination of old verses new SATA II Hard Drives. The new Hard Drive (5308760-2) will not work in HSDA’s still running the older (original) firmware unless all 8 drives are replaced at the same time. The new firmware supports the mixed mode.
The system’s scan database will be destroyed by the firmware flashing process. Make sure any patient data still on the system has been archived!
1 HSDA RAID Controller Firmware Check
Procedure
- Shutdown CT Applications.
Select Application Shutdown from Utilities Tab of CSD.
- Open a terminal window on the system.
Click Terminal Window button on Desktop Toolchest.
- In Terminal Window, start a secure shell session on the DIG
or DIG2 computer.
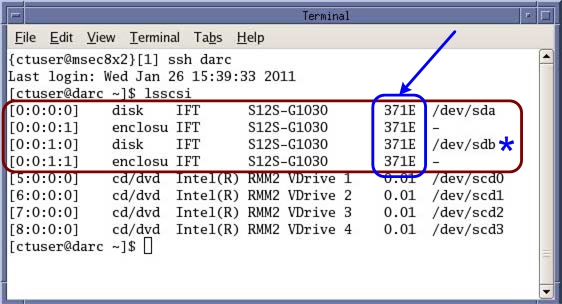
Type: {ctuser@hostname} ssh darc Enter.
- Enter “lsscsi” command in shell session.
Type: {ctuser@hostname} lsscsi Enter.
- The HSDA’s RAID Controller Firmware Revision will be display.
See following Illustration.
Figure 1. HSDA's RAID Controller Firmware Revision Example
 note:
note:If the firmware revision displayed is version “363B”, Hard Drive FRU 5308760-2 can not be used. The Firmware must be upgraded to version “371E” before using Hard Drive FRU 5308760-2. Hard Drive FRU 5308760, may still be used on the older firmware. If Hard Drive FRU 5308760-2 is the only available FRU, the firmware must be upgraded first.
note:“/dev/sdb” is only present on CT 750HD systems, which has two HSDA’s. “/dev/sdb” will not be present on VCT GOC6 & 6.5 consoles.
- Close the Terminal Window.
2 HSDA’s Firmware Upgrade (Flashing) Procedure
Procedure
- Remove GOC6 or 6.5 Console’s front cover.
- Install GOC6 & 6.5 HSDA Firmware Update Application Disk (5413299) in Host PC’s DVD Drive.
- Shutdown CT Applications (if not already shutdown).
- Open a terminal window on the system.
Click Terminal Window button on Desktop Toolchest.
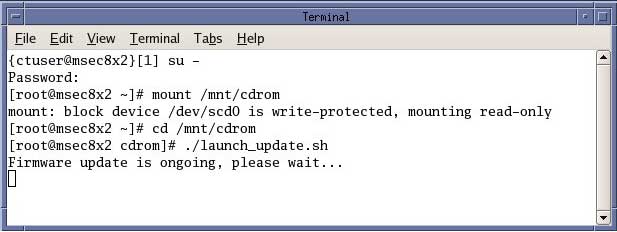
- Log on a root.
-
Type: {ctuser@hostname} su – Enter.
-
Enter password Enter.
-
- Mount the GOC6 & 6.5 HSDA Firmware Update Application Disk.
Type: [root@hostname ~] mount /mnt/cdrom Enter.
- Change directory to mounted CD.
Type: [root@hostname ~] cd /mnt/cdrom Enter.
- Execute the Firmware Update script.Type: [root@hostname ~] ./launch_update.sh Enter.
Figure 2. HSDA Firmware Flash Command
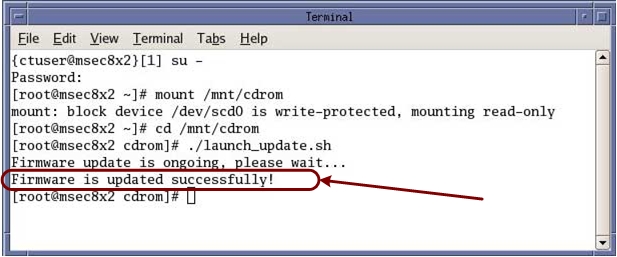
- Check success of firmware flash process.Upon completion, the message “Firmware updates successfully” should appear.
Figure 3. HSDA Firmware Flash Status
 note:
note:Flashing process will take approximately 20 minutes.
note:If “Firmware update failed” message appears, view the following log file for further details. Log file can be found in the /var/log directory. Log file name: hsda_fm_update.log Repeat ” launch_update.sh” script.
- Unmount the GOC6 & 6.5 HSDA Firmware Update Application
Disk and removed CD from Host Computer.
In Terminal Window:
-
Type: [root@hostname cdrom]# cd / Enter.
-
Type: [root@hostname /]# umount /mnt/cdrom Enter.
-
Remove CD from Host Computer.
-
- Close Terminal Window.
3 Finalization
Procedure
- Perform System Configuration “reconfig” to recreate
Disk Array and Scan Database.note:
If this Firmware Upgrade is being performed as part of a HSDA Hard Drive replacement, return to the HSDA Hard Drive Replacement procedure and continue with drive replacement.
-
Open a Terminal Window, and log on as root.
-
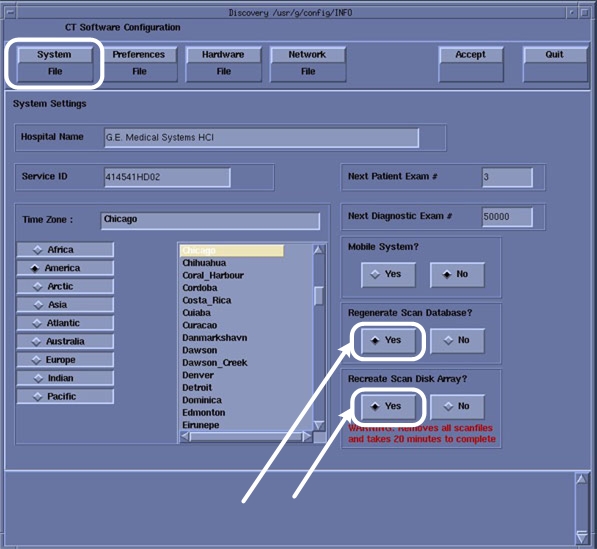
Type: [root@hostname ~] reconfig Enter.
-
On System Tab of reconfig utility, select Yes for both Regenerate Scan Database and Recreate Scan Disk Array.
Figure 4. System Configuration “reconfig” – System Tab
-
Click Accept tab.
-
On Completion of the System Configuration “reconfig” Utility and Reboot is required. Click Yes in the Reboot Pop-Up Window.
-
- Refer to System Scanning Test to confirm proper operation.
- Reinstall Console Front Cover.