- Topic ID: id_15460356
- Version: 5.0
- Date: Dec 22, 2021 11:23:42 PM
Gantry Scan Window Removal and Re-Install
Prerequisites
Overview
This procedure explains how to remove and re-install the CT Gantry Scan Window.
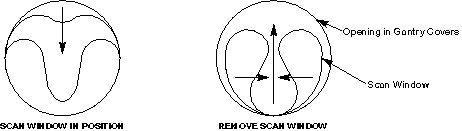
1 Remove Scan Window
Procedure
- Grab the window at the top and pull firmly downward.
- Pull the scan window down from the top center and then grasp
both sides of the scan window, move them together and lightly pull
upward, until you can free the window from between the front and rear
covers. See Figure 1.note:
You may need to use the tip of a flat blade screwdriver to pull down the top edge of the scan window away from the cover in order to grab it with your fingers. Be careful not to push the screwdriver in too far as the gasket can be damaged.
Figure 1. Scan Window Removal
2 Install Scan Window
Procedure
- notice
- Install the front and rear covers if not already done.
- Inspect the outside diameter of the scan window to make sure the gaskets are clean and clear of any debris or contrast. The gaskets must be clean to ensure a good seal against any future liquid spills.
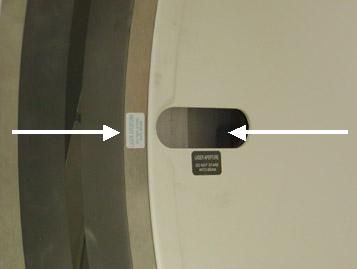
- Flex the scan window, as shown in Figure 2, and nest the scan window at the bottom of the opening between the front and rear covers, (Figure 3) aligning the laser port labels with the lasers at the 3 and 9 o'clock positions (left and right side).
- After you complete the initial seating of scan window, let the
window slowly unfold, and work both sides of the window into position,
starting at the bottom and finishing at the top. Make sure you position
the window with the laser port labels aligned at the 3 and 9 o’clock
position. See the following illustrations for reference.
Figure 2. Install Scan Window
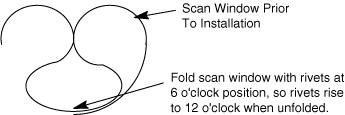
Figure 3. Scan Window Nested Between Front and Rear Cover

Figure 4. Laser Port Alignment to scan window
- Visual inspect the scan window shall be no wrinkles after installation.
 |
3 Finalization
Procedure
- Perform retest scans per the procedure that caused the covers
to be removed. If removing the scan window independent of performing
any other service procedure, then scan the water phantom. Perform
(20) Axial slices at 5mm aperture. Inspect all images for ring or
band artifacts.note:
Scans must be run to verify the scan window is not causing any issues.