- Topic ID: id_15460124
- Version: 3.0
- Date: Jun 15, 2020 11:00:26 PM
GOC6.6 VCT Host Computer (Z820) DVD Drive Replacement
Prerequisites
Overview
This procedure shall be followed when replacing the DVD Drive in the Z820 computer on a GOC6.6 VCT Console.
1 Z820 Computer Removal
Procedure
- Shutdown system. Select one of the following methods to Power
OFF the Console:
-
If Applications are up, click on the [Shut Down] button on desktop display and select [Shutdown].
-
If Applications are down, open a Terminal Window. Type: halt , then press ENTER.
-
When halt command has finished, power Off the console at the front panel switch.
-
- Apply LOTO. See Equipment Service - Lockout-Tagout-PPE procedure.
- Remove Keyboard Tabletop, Front, Rear and Top covers from NIO64
console.
Refer to Replacement → Console (RIO) → Console Cover Removal and Installation.
- Remove the Z820 computer from the NIO64 console chassis.
Refer to Replacement → Console → NIO64 Host Computer (Z820) Replacement
2 DVD Drive Replacement
Procedure
- Open the Z820 computer side access panel.
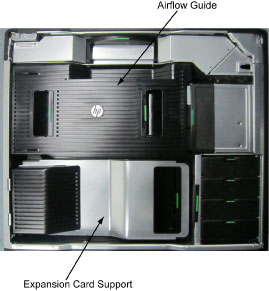
- Remove the Expansion Card Support and the Airflow Guide.
Figure 1. Z820 Airflow Guide and Expansion Card Support
- Disconnect the cables for DVD drive.
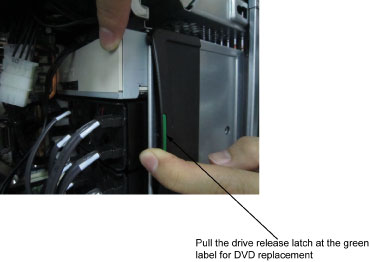
- Pull the drive release latch, and pull out DVD drive.
Figure 2. Drive Release Latch
- Replace the existing DVD drive with new one.
- Reinstall all removed components, and reconnect any cables that have been disconnected.
3 Restore the Console
Procedure
- Fully slide the Z820 computer back into the console chassis, until mounting brackets are flush against the console chassis.
- Remove and store the Service Platform.
- Install and torque the four (4) 3mm socket cap screws that mount
the Z820 computer in the GOC6.6 console.note:
Torque each the for (4) 3mm socket cap mounting screws to:
- Reconnect all cables removed earlier to the Z820 computer.
- Remove LOTO on console.
4 Finalization
Procedure
- Install console covers and Keyboard Tabletop assembly.
Refer to Replacement → Console (RIO) → Console Cover Removal and Installation Procedure.