- Topic ID: id_15460100
- Version: 3.0
- Date: Jun 15, 2020 10:54:38 PM
(12HW14.6) Service Pack 1.1 Installation Procedure
Prerequisites
Overview
This describes the procedure to install and uninstall SP1.1 for 12HW14.6 (Epsilon).
1 Preparation for Installation
Procedure
- Check the current software version by the following command.
{ctuser@hostname} swhwinfo
Example: 12HW14.6_V40_H_HS64_G_GTL
If the output contains SP1-1-1, SP1.1 is already installed. No need to install it.
If the output contains SP1-0-1, SP1.0 is installed, need to uninstall it.
If the output is not equal to 12HW14.6, system software version is different, do not execute the procedure.
- Check Exam Split Type. (Skip this step if SP1.0 Installation
is done with 12HW14.6 LFC at the same time.)
Type swokinstall -p
If Exam Split option is displayed, execute the following
Type ls –l ~ctuser/ves/.hesMode
If there is .hesMode file, it’s HES mode.
If not, It’s VES mode.
This will be used at reinstall option.
2 Service Pack 1.1 Installation
For the options to function correctly, it is necessary to uninstall the options listed below before installing SP1.0, then re-installing them after SP1.0 Installation.
Procedure
- Perform Save State.
- Uninstall the following options (if installed) using the Install
Options menu in the Configuration Tab in Common Service Desktop.
-
AdvVesselAnalysis
-
AutoBone
-
CardEP
-
CardIQPlus
-
CTColonoPro
-
CTPerfusion4
-
CTPerfusion4Neuro
-
VolumeViewer
-
- Open a Unix shell.
- Shutdown Application (if up). Type cleanMon ENTER .
- Insert the Service Pack 1.1 CD-ROM into the Host DVD drive.
- Delete the old patch file, type the following commands.
- su - ENTER to be root user.
- mount /mnt/cdrom
- /mnt/cdrom/scripts/remove_oldrpm
- Confirm that the command prompt is displayed.
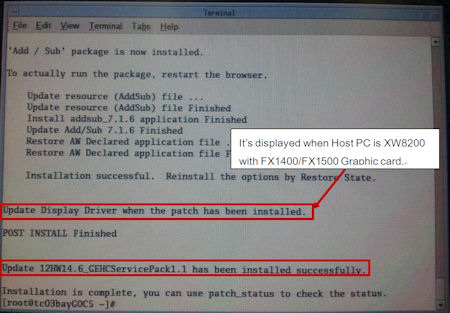
- Type patch_install –c ENTER. Follow the instructions displayed on the screen.note:
It may take 3~4 min., please wait.
- Verify “Successful” message is displayed.
- When the Host PC is XW8200 with FX1400/FX1500 Graphic card,
the following message is displayed. In this case, execute the following
steps to update Display Driver. If the message is not displayed,
type reboot [ENTER] and skip to step 15.
Figure 1. Message Window
- Type init 3 ENTER to shut down the [X Window]. The monitor will be changed to a black screen, and will appear with a text of shutdown.
- Hold down the Alt key and then press the F6 key once, the login prompt will appear, and login as root. (It takes about 1 min. to log in.)
- Type patch_nvdriver ENTER .
After displaying a “Successful” message and a reboot request message, press Enter to reboot.
- Remove Patch CD-ROM from Host DVD drive.
- Open a Unix shell and type swhwinfo ENTER .
The output should contain “SP1.1” and will look similar to this: 12HW14.6SP1-1-1.V40_H_HS64_G_GTL.
- Restore State (Reconfig Info only) to reinstall the options previously removed, then restart the system.
- Confirm the following options has been reinstalled.
-
AdvVesselAnalysis
-
AutoBone
-
CardEP
-
CardIQPlus
-
CTColonoPro
-
CTPerfusion4
-
CTPerfusion4Neuro
-
VolumeViewer
-
- Execute a test scan to confirm system functionality. Perform a minimum of one scout and 20 images helical or axial scans.
3 Service Pack 1.1 Uninstallation
Procedure
- Save System State.
- Open a Unix shell and check Exam Split type.
Type swokinstall –p ENTER
If the Exam Split option is installed, execute the following.
Type ls –l ~ctuser/ves/.hesMode ENTER
If there is .hesMode file, it’s HES mode.
If not, it’s VES mode.
This will be used at reinstall option.
- Uninstall the following options (if installed) using the Install
Options menu in the Configuration Tab in Common Service Desktop.
-
AdvVesselAnalysis
-
AutoBone
-
CardEP
-
CardIQPlus
-
CTColonoPro
-
CTPerfusion4
-
CTPerfusion4Neuro
-
VolumeViewer
-
- In a Unix Shell, type cleanMon ENTER to shutdown application.
- Type su - ENTER to be root user and type init 3 ENTER to shut down the [X Window]. The monitor will be changed to a black screen, and will appear with a text of shutdown.
- Hold down the Alt key and then press the F6 key once, the login prompt will appear, and login as root. (It takes about 1 min. to log in.)
- Type patch_nvdriver –u ENTER .
After displaying “NVIDIA driver has been updated” message and a reboot request message, press Enter to reboot.
- Press Cancel button before the application launches.
- Open a Unix Shell and type su - ENTER to be root user
- Type patch_install -u ENTER . Follow the instructions displayed on the screen.note:
It may take 3~4 min., please wait.
- Verify “Successful” message is displayed, then type reboot ENTER to reboot the system.
- Open a Unix shell, and type swhwinfo ENTER. Confirm that the output does not contain “SP1.1” and will look similar to this: 12HW14.6.V40_H_HS64_G_GTL.
- Perform a Restore System State (Reconfig Info Only) to re-install the options previously removed, then restart the system.
- Confirm that the following options has been reinstalled.
-
AdvVesselAnalysis
-
AutoBone
-
CardEP
-
CardIQPlus
-
CTColonoPro
-
CTPerfusion4
-
CTPerfusion4Neuro
-
VolumeViewer
-
- Execute a test scan to confirm system functionality. Perform a minimum of one scout and 20 images helical or axial scans.
4 Finalization
No finalization steps.