- Topic ID: id_15460929
- Version: 2.0
- Date: Nov 8, 2018 1:37:16 AM
Linux Utilities
1 Setting Date and Time
-
Open a Unix Shell
-
Login as root:
-
Type: su – Enter
-
Password: #bigguy
-
-
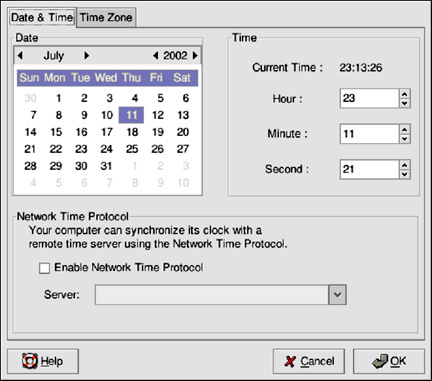
Type: dateconfig.
A GUI will appear, similar to that shown below.
-
To change the date, use the arrows to the left and right of the month to change the month. Use the arrows to the left and right of the year to change the year, and click on the day of the week to change the day of the week.
-
Click the OK button.
-
To change the time, use the up and down arrow buttons beside the Hour, Minute, and Second in the Time section. Changes will not take place until you click the OK button.
2 2 Reconfigure the Database with resetImageDB_Linux
resetImageDB_Linux removes all DICOM images on the scanner, include PET images, and makes a new empty image database. Thus, it destroys patient data (images) and should only be run when all image data is already archived or the system image database is completely in need of repair.
-
Open a Unix Shell
-
Login as root:
-
Type: su – Enter
-
Password: #bigguy
-
-
Shutdown Applications
-
Type: resetImageDB_LinuxEnter
3 Running storelog
Storelog is run when there is insufficient disk space on the OC disk to bring up the system to Applications Level. During Applications startup, the disk management process checks for adequate disk space; if there is insufficient space, storelog will come up automatically in a shell prompting the user. The threshold level for the OC that prompts the need for storelog is when the partitions approach 97-98% full.
Storelog is a tool that recovers system disk space by removing files not essential to the operation of the system. Storelog provides an option to save the files, (core, log, data) to MOD prior to removing them from the system disks. Removing these “system log” files does not add image space, but should allow the applications to startup.
The storelog tool can be run standalone in a shell by simply typing storelog, or from the Service Desktop select ERRORLOG, and choose STORELOG.
4 Running sprsnap
The use of the sprsnap is primarily intended for debugging. The purpose of the tool is to capture the state of the system prior to the system crash. This includes core files, log files and configuration files. To initiate the program, open a shell and type the following:
> sprsnap
A series of questions will appear. Save the files to MOD.
In addition to saving system information, sprsnap removes core files.
FILES SPRSNAP SAVES
Core files from the OC
/usr/g/service/log/core*
/usr/g/bin/core*
/usr/tmp/core*
UNIX kernel core files from the OC
/var/adm/crash/*
/usr/g/service/log from the OC
/var/adm/*SYSLOG* files from the OC
/var/adm/install*
Install log files from the OC
/usr/g/ctuser/logfiles/sdclog
SDC log files from the OC
ScanRx info files from the OC
/usr/g/service/log/exam*.protocol
/usr/g/service/log/exam*.scan.request
/usr/g/service/log/gesys_`uname -n`.log
/usr/g/queue
Miscellaneous information such as disk space, process status and showprod in Queue directory.
Scan files
/usr/g/data_management/ex*/ex*_hdr
SDC log from the OC
/usr/g/ctuser/logfiles/sdclog
Miscellaneous files from OC
/usr/g/service/log/*.timers
/usr/g/bin/*.timers*
/usr/g/en_US/app_defaults/archive/SCSI.fol
/usr/g/en_US/app_defaults/devices/camera.dev
/usr/g/config/INFO
/usr/g/config/dataacq.cfg
/usr/g/config/dataacq.init
/usr/g/config/scan_file_mgr.cfg
/usr/g/config/scan_disk_io.cfg
/usr/g/config/scanfilemgr.init
5 Initializing a Maxoptics MOD
If you have a MOD upon which you want to put system files, this is different from image files. You prepare the MOD by making a file system on it. System State and DD File Analysis will detect this condition and prepare the MOD in the drive for you. To prep a system MOD under other circumstances, open a shell and type: mkfsMOD (formatting takes about 3-5 min).
mkfsMOD will not work on DICOM image and options MODs.
6 Saving System State
To save the system configuration information, characterization, calibration, protocols, etc. to a System State DVD, perform the following tasks:
-
Bring the system up if it is not already up.
-
Insert the System State DVD (or MOD).
-
Click on the SERVICE DESKTOP.
-
Click on the PROACTIVE/PREVENTIVE/PLANNED MAINTENANCE icon.
note:On systems with GOC3 Console that have newer software (e.g. GOC3 Common Applications software version 04MW13.4 or later), the System State selection is located under UTILITIES.
-
Click on SYSTEM STATE.
-
Click on ALL. This will highlight Cals, Characterization, Reconfig Info, etc.
-
Click on SAVE.
The save will take a few minutes. Review the output for errors or missing files; the scroll bar on the right works only when the tool isn’t busy performing some task, it may take a little while. If you see any missing files or failures, then refer to the note below.
-
Click on DISMISS.
7 Saving and Restoring Scan Files
Saving scan files to MOD requires that the media first be formatted for a Linux (or UNIX) file system. Refer to Initializing a Maxoptics MOD for formatting the MOD. Saving scan file function reads the scan files from the Scan Data Disk and lists them in the GUI for choosing. Saving scan files onto the MOD puts the scan files in the following directory path on the MOD: /MOD/service_mod_data/SFfiles<suiteid>.exam.series.scan file,. The scan files are saved as an iq. (referred to as a .iq file) in the Sfiles directory.
Restoring scan files function reads the MOD directory path: /MOD/service_mod_data/Sfiles and presents the files in a list/select GUI for restoring. Restoring the scan files takes a copy of .iq file on MOD and puts it into the scandata disk partition.
Both the Save and Restore Scan files functions reside under RECON MGMT on the top level ExamRx Desktop.
7.1 Saving Scan Files to MOD
Perform the following steps for Saving scanfiles to MOD:
-
Place a formatted MOD in the drive.
-
Bring up Recon Management main menu: Select RECONMGMT.
-
Select SAVE SCAN DATA.
-
Click on the Exam, Series, Scan file(s) desired.
-
Select SAVE SELECTED FILES.
-
When the save operation is complete, a pop-up reports “xx scanfiles saved” - select OK.
-
Select QUIT.
7.2 Restoring Scanfiles from MOD
Perform the following steps for Restoring scan files from MOD.
-
Place the MOD into the drive.
-
Bring up Recon Management main menu: Select RECONMGMT.
-
Select RESTORE SCAN DATA.
-
Click on the Exam, Series, Scan file(s) desired to be restored.
-
Select RESTORE SELECTED SCAN FILES.
-
When the restore operation is complete, a pop-up comes up reporting ‘xx scanfiles restored’ - select OK.
-
Select QUIT.
8 Reserve/Release Scan Data
The reserve function allows you to prevent the overwriting of scan data files. The files can then be selected at a later time for future storage and reconstruction. Otherwise, eventually new scan data overwrites all of the existing scan data files. The release function unreserves any scanfiles previously reserved, freeing that scan file to be overwritten.
8.1 Reserving Scan Files
Perform the following steps for Reserving scan files:
-
From the top level ExamRx Desktop, select RECONMGMT.
-
Select RESERVE SCAN DATA.
-
A list of exam/series/scans currently unreserved is presented.
-
Click on the Exam/Series/Scan(s) desired to be reserved, then select RESERVE SELECTED SCANFILES.
-
Operation is complete when a pop-up stating "xx scanfile reserved" comes up. Select OK.
-
Select QUIT.
8.2 Releasing Scan Files
Perform the following steps for Releasing scan files:
-
From the top level ExamRx Desktop, select RECONMGMT.
-
Select RELEASE SCAN DATA.
-
A list of exam/series/scans currently reserved is presented.
-
Click on the Exam/Series/Scan(s) desired to be released, then select RELEASE SELECTED SCANFILES.
-
Operation is complete when a pop-up stating ‘xx scanfile released’ comes up. Select OK.
-
Select QUIT.