- Topic ID: id_15460406
- Version: 2.0
- Date: Nov 8, 2018 1:36:51 AM
Intercom Adjustments
This module contains the following sections:
-
Overview - Overview
-
Intercom Board Adjustments - Intercom Board Adjustments
1 Overview
The Intercom block enables communication between the console operator and the patient on the table. The communication direction through the Intercom can be switched by depressing the TALK button on the SCIM keyboard. The operator can speak to the patient by depressing the TALK button (ON). When the TALK button is released (OFF) the operator can then listen to the patient.
When Auto-voice is playing, the operator can listen through the Console speaker on the Auto-voice R channel while the TALK button is released (OFF). At the same time the patient can listen through the Table speaker on the Auto-voice L channel.
If the operator depresses the TALK button (ON) while Auto-voice is playing, the Intercom will disable the Auto-voice sound and will switch the sound source to the Console microphone output. The Console microphone output is amplified and routed to the Host computer's audio input for the Auto-voice recording. The Auto voice recording will be managed by the host computer's software. It will be up to the software to start and stop recording the sound.
2 Intercom Board Adjustments
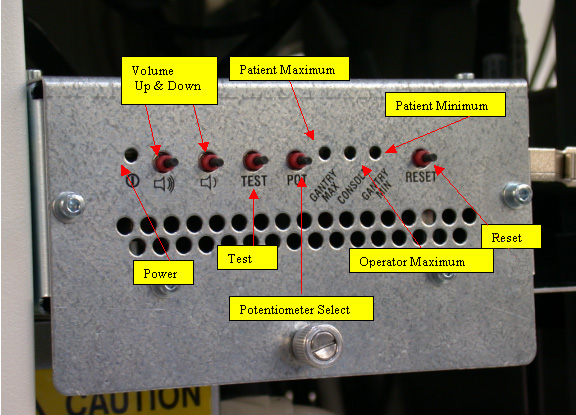
The GOC 4 console intercom board has been completely redesigned from the GRE console. It is no longer located in the SDDA. It also has new potentiometer adjustment controls. See figure below.
Figure 1. Intercom Board Adjustments
-
Volume Adjust
Press the Up and Down controls to adjust the selected volume.
-
Test Button
Press the Test button to play a test tone.
-
Potentiometer Select
Tap to cycle through the volume control potentiometers, Patient Minimum, Operator Maximum, and Patient Maximum.
-
Patient Maximum
This is the maximum volume that the patient will here in the room from the operator or from Auto Voice. Select this POT to control the volume to a level that is the loudest/highest volume the patient can receive.
-
Operator Maximum
This is the maximum volume that the operator will here from the patient or from Auto Voice. Select this POT to control the volume to a level that is the loudest/highest volume the operator can receive.
-
Patient Minimum
This is the minimum volume that the patient will here in the room from the operator or from Auto Voice. Select this POT to control the volume to a level that is the quietest/lowest volume the patient can receive.
-
Reset
Resets the volume to the factory presets.
The Silkscreen symbols are as follows:
Figure 2. Silkscreen Symbols
Front panel symbols (see Figure 3 for corresponding symbol locations on front panel).
Figure 3. Front panel buttons and indicator LEDs Location

The above figure shows the Front panel buttons and indicator LEDs with corresponding symbols (see Figure 2).
To adjust digital potentiometers:
-
Push ‘SELECT’ once to choose the patient minimum POT (the ‘PATIENT MIN’ led should illuminate). Push ‘SELECT’ again to choose the console speaker POT (the 'OPERATOR MAX' led should illuminate). Push ‘SELECT’ again to choose the patient maximum POT (the ‘PATIENT MAX’ led should illuminate). Pushing ‘SELECT’ a fourth time will deselect all POTs and turn off all leds.
-
Push ‘TONE’ to generate a test tone through the selected POT channel.
-
Adjust the volume louder by pushing the ‘VOLUME UP’ button, and adjust the volume softer by pushing the ‘VOLUME DN’ button.
-
Push the ‘DEFAULT’ button to reset the POTs to their factory default setting.