- Topic ID: task_lm2_3ff_l3b
- Version: 5.0
- Date: Nov 8, 2021 5:11:35 AM
Z8G4 Host PC BIOS Setup and CMOS Battery Replacement
Prerequisites
Overview
This procedure contains the following subsections:
- HP Z8G4 BIOS Setup (F10) Utility
- HP Z8G4 BIOS Flashing and Recovery
- Saving and Restoring BIOS Settings as Default
- Z8G4 BIOS Settings Clear / Reset Procedure
- CMOS Battery Replacement
The BIOS of the computer is a collection of machine language programs stored as firmware in ROM. The BIOS ROM includes such functions as POST, PCI device initialization, Plug 'n Play support, power management activities, and the BIOS Setup (F10) Utility. The BIOS Setup (F10) Utility enables you to change factory default settings and set or change the system configuration based on the Host PC hardware or system functionality requirements.
1 HP Z8G4 BIOS Setup (F10) Utility
1.1 Z8G4 BIOS Setup (F10) Utility Functions
The BIOS Setup (F10) Utility enables you to do the following:
Procedure
- Change settings from the defaults or restore the settings to default values.
- View the system configuration, including settings for processor, graphics, memory, audio, storage, communications, and input devices.
- Modify the boot order of bootable devices such as hard drives, optical drives, or USB flash media devices.
- Establish an Ownership Tag, the text of which is displayed each time the system is turned on or restarted.
- Enter the Asset Tag or property identification number assigned by the company to this computer.
- Enable the power-on password prompt during system restarts (warm boots) as well as during power-on.
- Establish an administrator password that controls access to the Computer Setup (F10) Utility and the settings described in this section.
- Establish minimum requirements for valid passwords, including length and required types of characters.
- Secure integrated I/O functionality, including the serial, USB, or audio, or embedded NIC, so that they cannot be used until they are unsecured.
- Enable or disable different types of boot sources.
- Configure features such as Secure Boot, power management, virtualization support, and language and keyboard type used in Setup and POST.
- Replicate the system setup by saving system configuration information on a USB device and restoring it on one or more computers.
- Enable or disable DriveLock security or securely erase a hard drive (when supported by drive).
1.2 Accessing Z8G4 BIOS Setup (F10) Utility
You can only open the BIOS Setup (F10) Utility by powering on the Host PC or restarting the system. To access the BIOS Setup (F10) Utility menu, perform the following steps:
Procedure
- Turn on or restart the computer.
- Repeatedly press F10 when the monitor light comes on to access the utility.
You can also press Esc to a menu that allows you to access different options available at startup, including the Computer Setup utility.
note: If you do not press F10 at the appropriate time, you must restart the computer and again repeatedly press F10 when the monitor light comes on to access the utility. - A choice of four headings appears in the Computer Setup Utilities menu: Main, Security, Advanced and UEFI Drivers.
- Use the arrow (left and right) keys to select the appropriate heading. Use the arrow (up and down) keys to select the option you want, then press Enter. To return to the Computer Setup Utilities menu, press Esc.
- To apply and save changes, select Main > Save Changes and Exit.
-
If you have made changes that you do not want applied, select Ignore Changes and Exit.
-
To restore settings from the Advanced and Main menus to original values, select Apply Factory Defaults and Exit.
-
To restore settings from the Advanced and Main menus to those previously saved by Save Custom Defaults, select Apply Custom Defaults and Exit. If no custom defaults have been saved, then factory defaults are used.
note: Settings in the Security menu are not modified by Apply Defaults. Those values are reset by Restore Security Settings to Default at the bottom of the Security menu.note: Not all settings shown in the following sections are available for all models.note: Do NOT turn the computer power OFF while the BIOS is saving the Computer Setup (F10) changes because the settings could become corrupted. It is safe to turn off the computer only after exiting the F10 Setup screen.
-
1.3 Computer Setup (F10) Utility Menu
Procedure
- The following table describes the functions available in the Computer Setup (F10) Utility menu.note: With new BIOS releases, the following content is subject to change, so the menu might be different than shown.
- Ensure the BIOS setting conform to above Table.
2 HP Z8G4 BIOS Flashing and Recovery
The following information covers the necessary procedures for flashing and recovering from corrupted or incomplete flashing of the Host PC’s BIOS ROM. This is not to be confused with the BIOS Settings discussed later. The BIOS firmware code flashed to the BIOS ROM is the executable portion of the BIOS ROM code, which includes a default set of configuration settings. Later, customize these settings for the Host PC’s specific configuration details. You can save and restore these customized settings on CD for quick restoration in the event of BIOS ROM corruption or BIOS updating.
2.1 Z8G4 BIOS ROM Flash Update Procedure
Procedure
- Power down the Host PC.
- Insert the USB device to the host computer.
- Power on the Host PC.
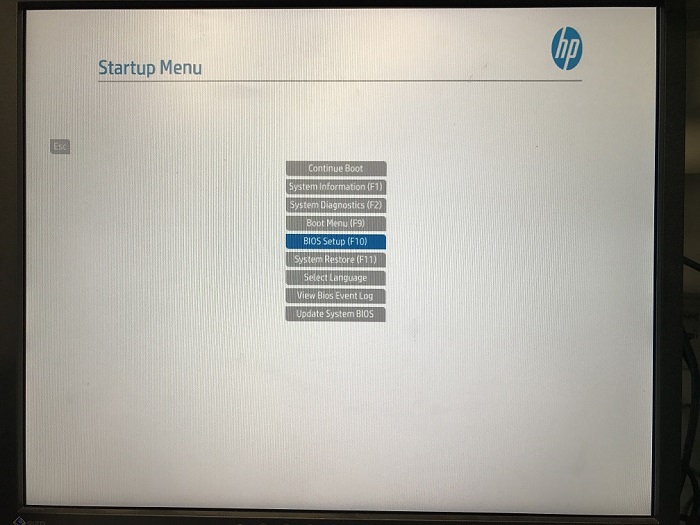
- When the display is active and Press the Esc Key for Startup Menu appears at the bottom of the screen, press F10 or Esc.
- The Startup Menu appears, use the up and down arrow keys to select BIOS Setup.
Figure 1. Startup Menu
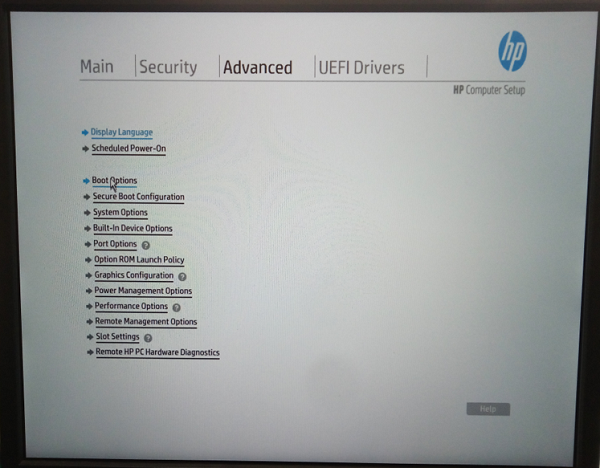
- In the Computer Setup (F10) Utility menu, the following headings are displayed: Main, Security, Advanced and UEFI Drivers.
- Select Advanced > Boot Option, and then press Enter.
Figure 2. Boot Option
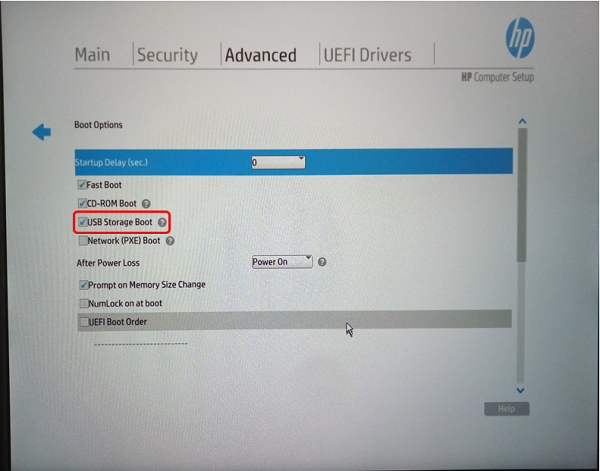
- Select USB Storage Boot.
Figure 3. USB Storage Boot
- Press ESC and save change BIOS setting
- Host PC will reboot, then repeat step 4 and 5 enter the BIOS main screen.
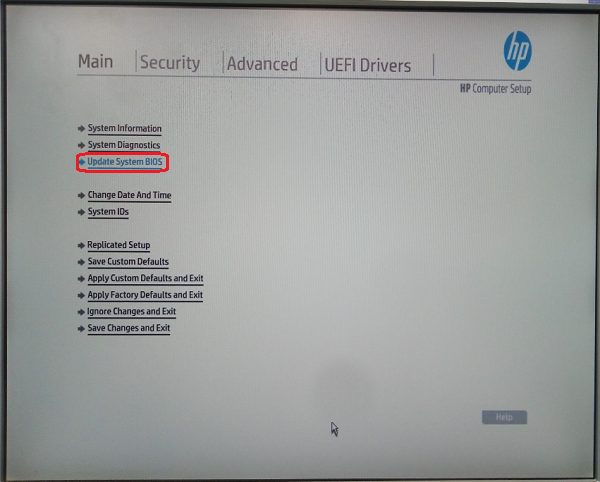
- Use the left and right arrow keys to select Main, use the up and down arrow keys to select Update System BIOS, and then press Enter.
Figure 4. update system BIOS
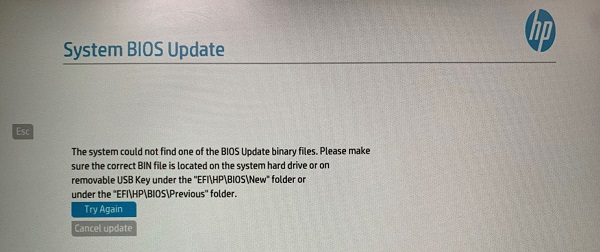
- If no BIOS USB media is found, you are prompted to insert one and restart the computer.
Figure 5. no BIOS USB Media
If a BIOS USB media is found, the following screen appears.
Figure 6. System BIOS Available (Example)
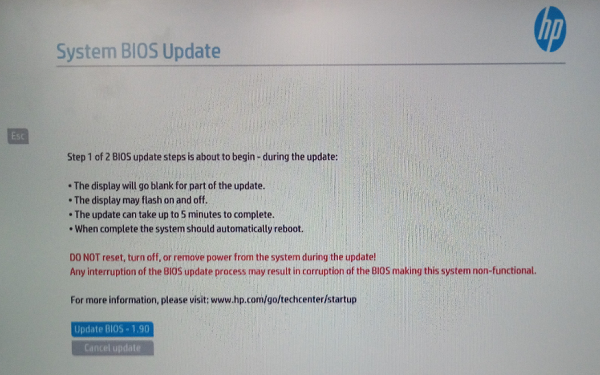
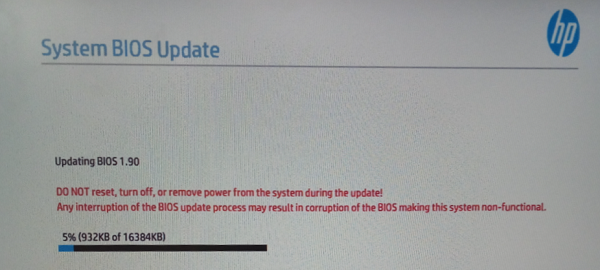
- Select the Update Bios – x.xx, the update procedure is going.
Figure 7. Updating BIOS (Example)
- When the System BIOS update is completed, the “Upon restarting, the screen may be blank for a few minutes and various LED lights may flash. Please do not attempt to interrupt or power during this time.” appears. Click Reboot to restart the Host PC.
- Re-enter the BIOS setting by pressing F10 or Esc when Host reboots and Press the Esc Key for Startup Menu appears at the bottom of the screen.
- Set and confirm the correct BIOS selections according to related Z8G4 BIOS Settings Table listed above.
- Press ESC and save change BIOS setting.
- The Host PC reboots.
2.2 FailSafe Boot Block
The FailSafe Boot Block enables BIOS recovery in the unlikely event of a ROM flash failure. For example, if a power failure occurs during a ROM upgrade, Boot Block uses a flash-protected section of the ROM to verify a valid system ROM flash when power is restored to the computer.
-
If the system ROM is valid, the computer starts normally. If the system ROM fails the validation check, FailSafe Boot Block provides enough support to start the computer from a BIOS image CD that has been created from a SoftPaq. The BIOS image CD programs the system ROM with a valid image.
-
If the system ROM is invalid, the computer power LED blinks red eight times and the computer beeps eight times; then the computer pauses for two seconds. On some models, a Boot Block recovery mode message appears.
-
In preparation for system recovery, use the BIOS CD media file in the SoftPaq to create a BIOS image CD or USB flash drive.
Recovering the Computer from Boot Block Recovery Mode
Procedure
- Remove any media such as USB flash drives or discs in the optical drives.
- Insert the USB device to the host computer.
- Turn the computer off, and then turn it on.
If no BIOS image CD or USB media is found, you are prompted to insert one and restart the computer. (See Figure 5)
If a setup password has been established, the Caps Lock light turns on and you are prompted for the password.
- Enter the setup password.
If the computer starts from the boot media and successfully reprograms the ROM, three keyboard lights turn on and a rising-tone series of beeps signals successful recover.
- Remove the boot media and turn off the computer.
- Restart the computer.
3 Saving and Restoring BIOS Settings as Default
This section describes the steps necessary to save and restore Z8G4 BIOS Settings.
3.1 Saving Host PC BIOS Settings as Default
Perform the following steps to save the Host PC BIOS Settings as default settings (settings currently configured and stored in ROM):
Procedure
- Turn on or restart the workstation.
- When the display is active and Press the Esc Key for Startup Menu appears at the bottom of the screen, press F10 or Esc.note: If you do not press F10 or Esc at the appropriate time, try again. Turn the workstation off, then on, and press F10 again to access the utility. You can also press Ctrl+Alt+Delete keys before starting if you do not press F10 before the message disappears.
- In the Computer Setup (F10) Utility menu, the following headings are displayed: Main, Security, Advanced and UEFI Drivers.
- Use the left and right arrow keys to select the appropriate heading, use the up and down arrow keys to select an option, and then press Enter.
- Select Advanced > Boot Option, and then press Enter.(See Figure 2)
- Select USB Storage Boot.
Figure 8. USB Storage Boot
- Press ESC and save change BIOS setting
- Host PC will reboot, then repeat step 2 and 3 enter the BIOS main screen.
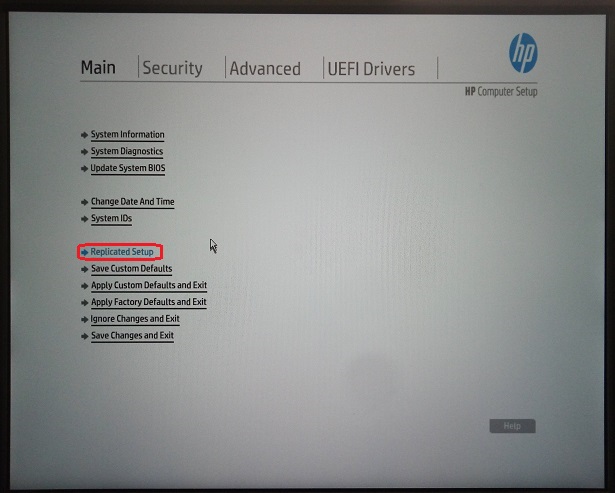
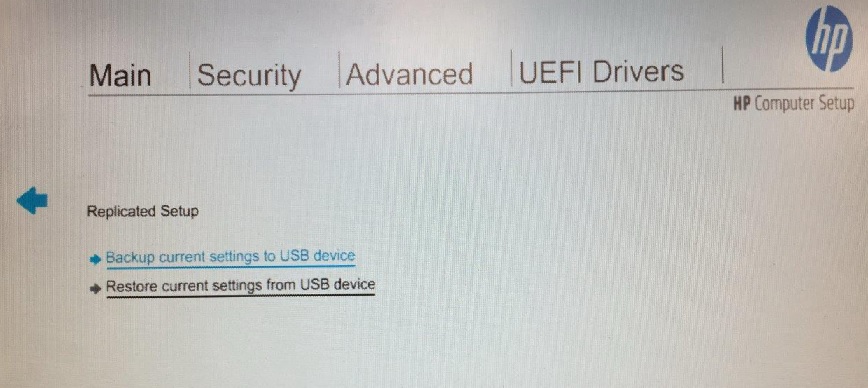
- Select Main > Replicated Setup, and then press Enter.
Figure 9. Replicated Setup
- Select Backup current settings to USB device. The HpSetup.txt file will be created in USB device and “Settings successfully saved to USB storage device (HpSetup.txt).” appears, and then click on OK.
Figure 10. Replicated Setup
- The Host PC reboots.
3.2 Restoring Host PC BIOS Settings from Default
Perform the following steps to restore the Host PC BIOS settings from default settings (BIOS Settings currently saved in Defaults Settings of ROM):
Procedure
- Reboot the Host PC, when the display is active and Press the Esc Key for Startup Menu appears at the bottom of the screen, press F10 or Esc.note: If you do not press F10 or Esc at the appropriate time, try again. Turn the workstation off, then on, and press F10 again to access the utility. You can also press Ctrl+Alt+Delete keys before starting if you do not press F10 before the message disappears.
- Select Main > Replicated Setup, and then press Enter. The Replicated Setup screen appears. (Figure 10)
- Select Restore current settings from USB device. The “Settings successfully restored from USB storage device.” appears, and then click on OK.
- Select Main > Change Date And Time, and then press Enter
- Select Advanced > Boot Option, and then press Enter
- Clear USB Storage Boot selection
- The Host PC reboots.
4 Z8G4 BIOS Settings Clear / Reset Procedure
4.1 Using the CMOS Button to Reset CMOS
Procedure
 warning
- caution
- Back up your computer CMOS settings run Computer Setup (F10) Utility, and select Main > Replicated Setup > Back up current settings to USB device.
- caution
- Shut down the operating system, power off the computer and external devices, and disconnect peripheral devices (tower, GSCB, keyboard, mouse...).
- Remove all the devices on the PCI slots (include NIC card, graphic card, GPU card, DIP card).
- Disconnect the AC power cord from the power outlet.note: The CMOS button does not clear CMOS if the power cord is connected.
- Open the workstation.
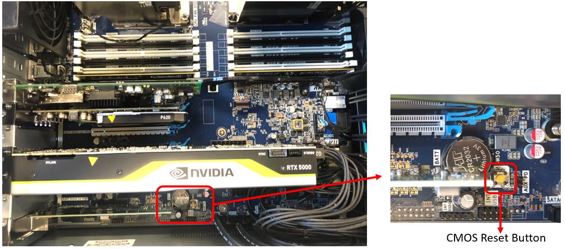
- Locate, press, and hold the CMOS button for 15 seconds.
For assistance locating the CMOS button and other system board components, see the below figure.
Figure 11. BIOS Setting (CMOS) Reset Button
- Close the workstation, reconnect external devices, connect the power cord and power on the workstation.
- The system boots up to a screen with message that the date/time has changed and that system options have changed.
- Press Enter. The system shuts down for three seconds and then powers on again. The second time will display another message, you can ignore it. The system will reboot automatically.
- With the third boot up, use the F10 (Setup) utility to reset the date and time and all the BIOS setting with #task_lwl_sff_l3b/table_swm_cpf_l3b.
 |
|
|
4.2 Using Computer Setup (F10) Utility to Reset CMOS
Procedure
- Access Computer Setup (F10) Utility menu.
- When Computer Setup message appears in the lower-right corner of the screen, press F10, and then press Enter to bypass the title screen, if necessary.
If you do not press F10 while the message is displayed, the computer must be rebooted to access this utility.
- From Computer Setup (F10) Utility menu, select Main > Replicated Setup > Back up current settings to USB device.
This restores the setting that include boot sequence order and other factory settings. However, it does not force hardware rediscovery.
- Choose Restore Factory Settings as Default, and the press F10 to accept.
- Select Main > Apply Defaults and Exit, and then press F10 to accept.
- Reset the computer passwords and configuration information, such as the system date and time.note: This step does not clear the passwords.
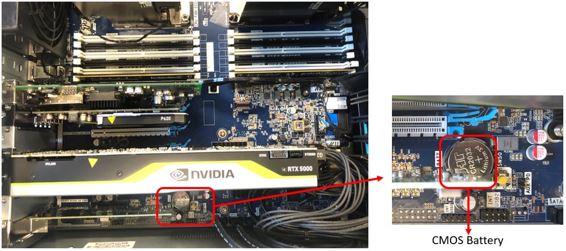
5 CMOS Battery Replacement
Figure 12. CMOS Battery (3.0V, Lithium Disk Cell – CR2032)

Procedure
- Locate CMOS Battery FRU by referencing the Illustrations below.
Figure 13. CMOS Battery on Motherboard
5.1 CMOS Battery Replacement
Procedure
- Remove / disengage any security devices that prohibit opening the computer
- Remove all removable media, such as compact discs or USB flash drives from the computer
- Turn off the computer properly through the operating system, then turn off any external devices.
- Disconnect the power cord from the power outlet and disconnect ay external devices.note: Regardless of the power-on state, voltage is always present on the system board as long as the system is plugged into an active AC outlet. You must disconnect the power cord to avoid damage to the internal components of the computer.
- Remove the access panel.
- Remove the GPU and DIP card to gain access to the CMOS battery
- Remove original CMOS Battery from Z8G4 Motherboard and dispose of properly.
- Lift the battery out of its holder.
Figure 14. Battery Removal
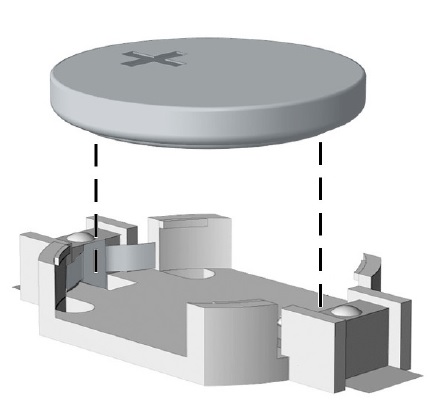
- Slide the replacement battery into position, positive side up. The battery holder automatically secures the battery in the proper position.
- Lift the battery out of its holder.
- Reinstall the GPU and DIP card removed earlier.
- Reinstall the access panel.
- Plug in the computer and turn on power to the computer
- Reset the date and time, your passwords, and any special system setups using computer setup
- Lock any security devices that were disengaged when the access panel was removed.
5.2 (Z8G4) BIOS Setting Procedure
Procedure
- Power ON Operator Console and press F10 on keyboard when the HP Boot Screen appears.
- Enter Computer Setup again, press F10 on keyboard when the HP Boot Screen appears.
This time change the individual settings listed that are different from the Default settings. refer to
6 Finalization
After running any of the procedures in this document, ensure that BIOS settings conform to those in .