- Topic ID: id_16158121
- Version: 2.0
- Date: Jun 10, 2020 2:45:52 AM
TGPU Power Supply Replacement - for small room
Prerequisites
Overview
Procedure
 caution
- Remove gantry covers as required Side and top covers will need to be removed.
- Turn OFF all 3 switches (Axial Drive, HVDC, 120VAC) on the service control panel.
- notice
- Power down the console and Lockout/Tagout.
- Remove the gantry front cover and rear cover.
- Remove the 4 screws that mount the TGPU Power Supply to the mounting pan.
- Disconnect the cables that connect to the power supply.
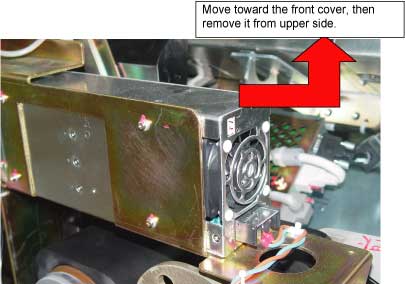
- Remove the TGPU Power Supply. See Figure 1
Figure 1. Remove TGPU Power Supply
- Install the new Power Supply in the reverse order. Connect cables by
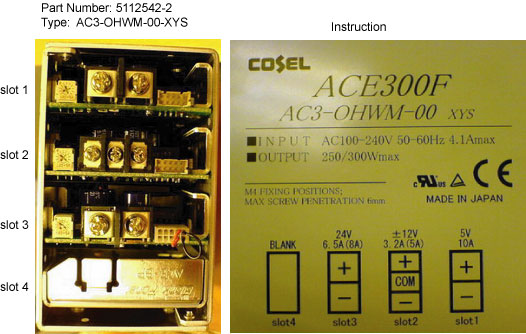
referring to the instruction pasted on the side of the Power Supply. note: There are two types of TGPU Power Supply with different cable connection (Slot 1 and Slot 2 exchanged). Make sure cables are correctly connected according to the instruction pasted on the side of the Power Supply.
Figure 2. Old-type TGPU Power Supply
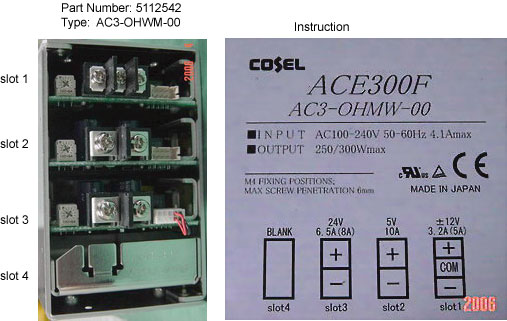
Figure 3. New-type TGPU Power Supply
 |
Finalization
- Remove the A1 LOTO.
- Turn ON the gantry service switches and power up the console.
- With a DVM, check the voltage on the supply.
- Install all removed gantry covers. note: Reconnect all top cover fan connections. Ensure that no cables are left in the rotating path. Return dollies to storage areas.
- Retest the system.