- Topic ID: id_16157710
- Version: 3.0
- Date: Apr 9, 2020 8:42:04 PM
MDAS/GDAS 16 Converter Card De-Ionizing
Prerequisites
Overview
The following procedure should be followed when DAS Converter boards and/or chassis need cleaning, or Converter boards are replaced for microphonics or noise resulting in image artifacts (rings, bands, streaks and smudges).
|

|
 |
|
note: Take DC Noise and DC Offsets baseline scan using DASTOOLS Manual test (use default settings) to establish the current noise characteristics of DAS. Do not troubleshoot any noise failures until after the cleaning.
Procedure
- Use the DASTools Viewlog to view the results of the baseline noise test to see the channels that violate the noise specification. The specifications are shown next to the actual data for the failed channels and shows the converter card number.
- Position the table to its lowest position. You will be sitting on the edge of the cradle to work on the DAS.
- Remove gantry right side cover, and turn OFF all three (3) service switches on the STC backplane.
- Continue to open the gantry by removing the following:
-
Mylar scan window.
-
Left side cover.
-
Top covers.
-
Front cover.
-
- Lock the gantry in position, using the rotational lock.
Refer to “Rotational Locking Pin,” in Equipment Service - Gantry (located in the Safety tab of this publication).
- All protective ESD materials should be in place (i.e. wrist straps and grounded mats for laying out converter cards; ionizing fan set up at far end of the patient table).
- Rotate and lock the gantry so that the DAS chassis you are working with is at 6 O’clock position, so that run off from the spray cleaner does not get onto the detector.
- Use the #6 screwdriver to remove the cover of the DAS chassis that has the suspected bad card(s).
- Remove the suspected noisy converter card(s) and place it (them) in static free bags. Also remove the neighboring cards to the “bad” card and place them in static free bags. Mark down the slot positions of all removed cards so they can be put back in the same slots after cleaning.
- At this point, examine the DAS for dust. If there is dust in the DAS, perform the inspection and cleaning procedure as prescribed in the MDAS 16 General Cleaning. If there are still noisy channels after completing the DAS cleaning procedure, repeat this cleaning procedure starting from step 1. If there was not any dust inside the DAS, continue with this procedure.
- Install the Aero Duster Spray System nozzle on the Aero Duster can and spray off the backplane connector from which the cards were removed. Hold the can upright to prevent liquid discharge.
- Use the Amax Contact Cleaner spray with the plastic tube to focus the spray to clean the backplane connectors of the suspected “bad” card location. Apply only enough to wet the entire backplane connector(s). Amax Contact Cleaner dries extremely fast. Do not spray directly on the detector.
- Let the backplane dry for two minutes. Do not spray air in the chassis to dry the cleaner.
- Remove the converter cards (see Figure 1) one at a time from their static bags and spray the components
and connector (see Figure 2)
with it facing down. Spray the outside of the connector shroud on all sides
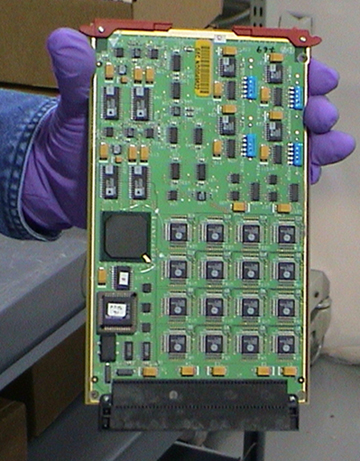
and also spray inside the pin housing. (Give it a good soaking). Allow the
card to air dry. Do not use the Aero Duster to dry it.
Figure 1. Proper method for handling converter cards
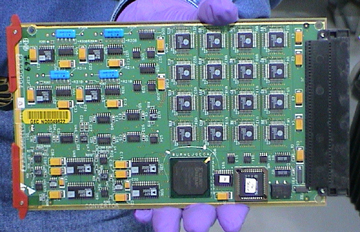
Figure 2. Cleaning with Amax, connector facing down
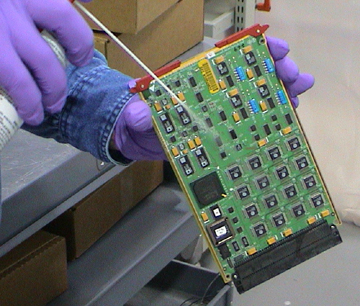
Figure 3. Correct Board position for Amax to dry
- Use the ionizing fan on the empty chassis and on clean converter cards before re-insertion into the chassis.
- Reinstall cards in the same slots from which they were taken.
Finalization
- Turn the DAS ON and let it warm up. It takes two (2) minutes of warm-up time for every minute the DAS was turned OFF, up to one (1) hour.
- Verify all covers are installed, turn on DAS power and complete the
following tests within DASTOOLS.
1 iteration of DC Noise and DC Offsets.
1 iteration of Pop Noise and Microphonics.
All tests must pass. If not, troubleshoot and correct the failures.