- Topic ID: id_15460842
- Version: 3.0
- Date: Apr 9, 2020 8:48:30 PM
HP Host Computer Hard Drive Exchange
Prerequisites
Overview
This optional procedure is used when retaining the original hard drives in a failed HP Host Computer (xw8400/xw8600). ALL drives must be swapped at once.
1 Remove the Side Cover
(For GOC Console: All cables removed from the Computer) (For TIO/NIO Console: Not need to remove all cables from the Computer) perform the following steps:
Procedure
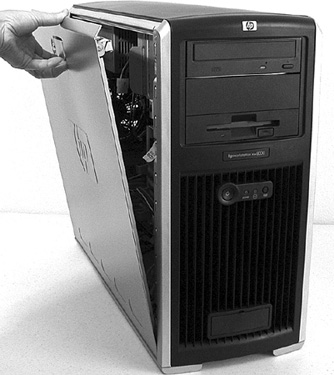
- Unlock the cover on the side of the old Host Computer.
The cover keys are attached to the back panel of the system.
- Pull out on the side cover latch to release the side cover.
- Tilt the cover open, then lift it off. Refer to Figure 1.
Figure 1. Opening the Side Cover
- Repeat the above procedure, to open the new Host Computer.
2 Remove the Hard Drives
Procedure
- Place the Host Computer on its side with the system board facing up.
- Label each SCSI connection as follows:
-
OS drive resides in slot 1 (bottom) -- label SAS Connecter as SAS0
-
Image disk resides in slot 2 -- label SAS Connecter as SAS1
-
Scan data disk 1 resides in slot 3 -- label SAS Connecter as SAS2
-
Scan data disk 2 resides in slot 4 -- label SAS Connecter SAS3
-
- Remove the power and SAS data cables from each drive.
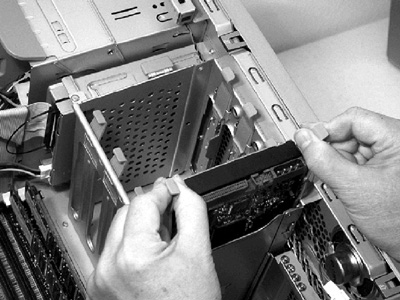
- Place your fingers on the colored release clips on the sides
of the drive, and squeeze inward. Pull gently just enough to release
the drive rail latches. Refer to Figure 2.
Figure 2. Hard Drive Rails
- notice
- Grasp the hard drive with your hand and pull out.
- Place the hard drive (with rails attached) on a static mat.
- notice
- Repeat the above procedures to extract all hard drives from the old (failed) Host Computer.
- Repeat the above procedures on the new Host Computer to extract all hard drives.
 |
|
3 Install the Hard Drives
Procedure
- notice
- Insert the site's original drives into the exact same slots
of the new Host Computer.
Drive 1 (OS) should be installed first, then Drive 2, Drive 3 and Drive 4. Press down gently until each drive snaps into place.
-
OS drive resides in slot 1 (bottom)
-
Image disk resides in slot 2
-
Scan data disk 1 resides in slot 3
-
Scan data disk 2 resides in slot 4
-
- Connect the drive cables:
- Connect the proper power cable to each hard drive.
- Connect the proper SAS Data cable to all hard disk drives. Refer
to below description of SAS cables:
-
OS drive resides in slot 1 (bottom) – Connected to SAS0 on mother board
-
Image disk resides in slot 2 -- Connected to SAS1 on mother board
-
Scan data disk 1 resides in slot 3 -- Connected to SAS2 on mother board
-
Scan data disk 2 resides in slot 4 -- Connected to SAS3 on mother board
-
- Repeat the above procedures on the old (failed) Host Computer
to install all hard drives removed from the new Host Computer. note:
The old (failed) Host Computer must have the new drives installed, when it is returned.
|
4 Replace the Side Cover
Procedure
- Ensure that all internal cables are properly connected and safely routed in the new Host Computer.
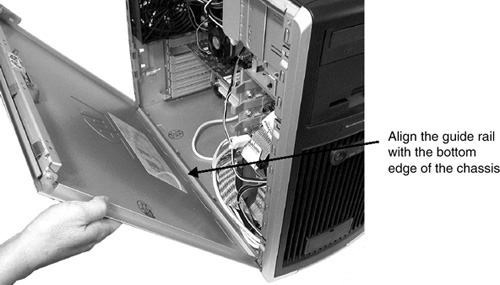
- Place the side cover onto the Host Computer chassis (aligning
the guide rail on the bottom inside edge of the cover with the bottom
edge of the Host Computer chassis). Refer to Figure 3.
Figure 3. Aligning and Closing the Cover
- Verify no cables are pinched, and gently close the cover.
- Lock the cover using the key provided.
- Repeat the above procedure, to close and lock the original Host Computer, with the new drives installed.
5 Finalization
Procedure
- Continue with HP Host Computer Replacement (if applicable).